Rocky River Trout Unlimited

  • Rocky River TU
    • RRTU Events >
      • Monthly Meetings
      • Streamside Day Trips
      • Alarka Trips
      • Fly Tying Classes >
        • Instructional Tyers
    • Davidson River HEP
    • Conservation >
      • Conservation Partners >
        • NC Camo Coalition
    • Diversity >
      • WOMEN ON THE FLY
      • BSA Merit Badge
    • We welcome your feedback!
    • Become a TU Member
    • Mission and Brief History
  • FORR
  • Programs
    • Trout In The Classroom
    • RiverCourse Fly Fishing Youth Camp
    • Casting Carolinas
    • Wilson Creek Adopt-A-Stream and Stream Watch
    • South Mountain Adopt-A-Park
    • Stone Mountain State Park
  • Resources
    • Fly of the Month Patterns >
      • DRY FLY PATTERNS >
        • Adams Variant
        • Asher
        • Atherton No 5
        • Baigent's Variant
        • Blue Quill
        • BWO
        • BWO Catskill
        • BWO CDC Emerger
        • BWO Sparkle Dun
        • BWO Spinner
        • Carolina Wulff
        • CDC Biot Comparadun
        • CDL Comparadun
        • Coachman Variant
        • Conner's October Caddis
        • Crackleback
        • Dragonfly Dry
        • Dry Pheasant Tail Variant
        • Dun Fly, August Fly,Wasp Fly
        • Early Nelson
        • Egg Laying Caddis
        • Troth Elk Hair Caddis FFI
        • Elk Hair Caddis
        • EZ Caddis
        • Female Adams
        • Fluttering Caddis
        • Ginger Quill
        • Gray Fox Variant
        • Grey Hackle Yellow Dry
        • Griffith's Gnat
        • Hazel Creek
        • Hendrickson
        • H & L Variant
        • Hopper Juan
        • Infallible
        • Japanese Beetle
        • Jassid
        • Jim Charley
        • Klinkhamer
        • Lacewing
        • Light Cahill Catskill
        • Little Green and Little Yellow Stonefly
        • Mr. Rapidan
        • North Carolina Yellow Sally
        • FFI Parachute Adams
        • Parachute Adams
        • Pheasant Tail Dry Fly.Skues
        • Puff Diddy
        • October Caddis
        • Orange Forked Tail
        • Rattler
        • Red Headed Caddis
        • Smoky Mountian Candy
        • Sunkist
        • Trude
        • Rusty Spinner
        • Sulphurs Part 1
        • Sulphur Part 2
        • Yellow Palmer
      • Dry Attractor
      • Midges >
        • Grey Goose Midge Emerger
        • Morgan's Midge
      • Nymphs >
        • Brassie
        • Chironimid
        • Copper John
        • Crossover Nymph
        • Crow Fly
        • Damsel Fly Nymph
        • Deep Sparkle Caddis Pupa
        • Devil's Doorstop
        • Girdle Bug
        • Gold Ribbed Hare's Ear
        • Guinea
        • Hare's Ear Nymph FFI
        • Hot Creek Special
        • Mr. Rapidan
        • Peridgon Nymph
        • BH Prince Nymph FFI
        • BH Prince Nymph
        • Realistic Stonefly
        • Royal Prince
        • Secret Weapon
        • Scud
        • Egan's Tasmanian Devil
        • Tups Indespensible
      • Pupae/Larva
      • Scud >
        • UV Scud
      • Soft Hackles >
        • Center Bead Soft Hackle
        • Grey Hackle Soft hackle
        • Orange Partridge Soft Hackle
      • Terrestrials >
        • Amy's Ant
        • Alen's Cow Killer
        • Cricket
        • Inchworm
        • Jack Cabe Hopper
        • Little River Ant
        • Moth
        • Murray's Flying Beetle
        • Parachute Ant
        • Texas Piss Ant
      • Wet Fly Patterns >
        • Black Gnat
        • Blue Charm FFI
        • Breadcrust
        • Coachman
        • Cock-y-Bundhu
        • Cooper Bug
        • Grizzly King
        • Ibis
        • Parmacheene Belle
        • Orange and Partridge Soft Hackle FFIFFI
        • Red Ass Soft Hackle
        • Tups Indespensible
    • Fly Patterns
    • RRTU Class Recipes
    • NC General Hatch Charts
    • Fly Shops, Outfitters and Guides
    • Fly Fishing >
      • RRTU Reference Fly Tying >
        • Entomology Basics
        • More Entomology Basics
      • More Fly Fishing Basics
      • Fly Fishing Tips
      • Trout Fishing & Trout Fishing Stories
    • Fly Casting
    • History, Reading, References >
      • S. Appalachian & Smoky Mtn History >
        • Archive History >
          • Archive History
          • FORR Campaign >
            • FORR 2020
    • Calendar Copy
  • RRTU Store
  • Tips - Tying

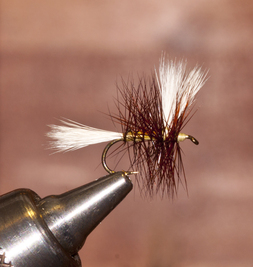
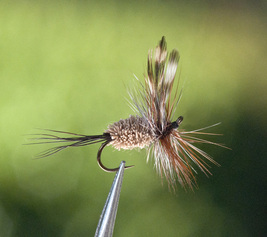
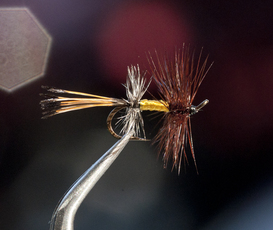
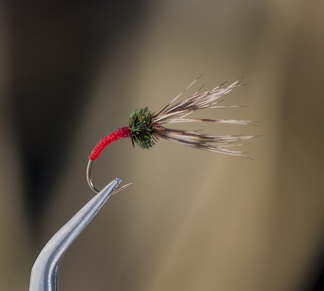
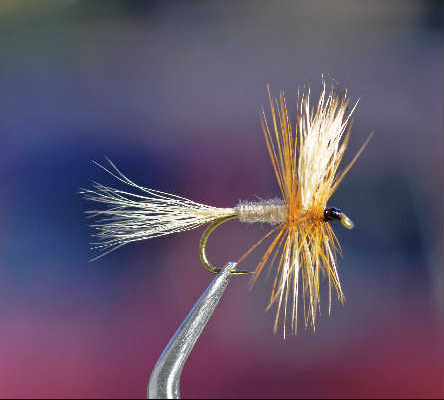
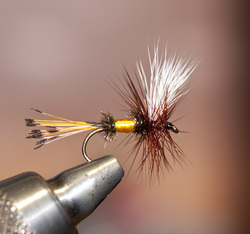
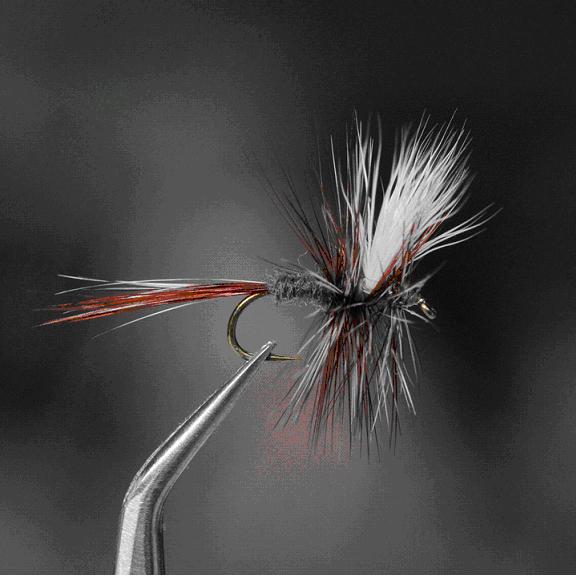
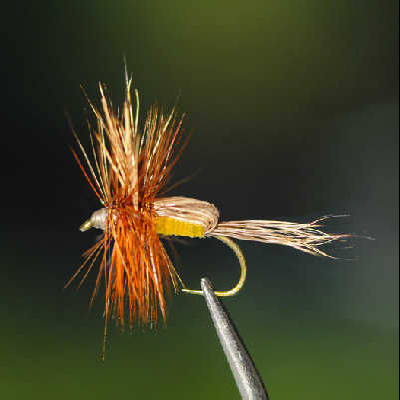
Attractor Fly Patterns

To improve floating or sinking characteristics of a fly pattern, extra or bulkier materials may be used that distorts the silhouette such that no specific insect or non-insect food source is imitated, yet the fly pattern still attracts fish. Thus, attractor fly patterns may vaguely suggest a type of insect or other food source by silhouette but very often has unnatural coloring that simply gains attention.


Picture
Fly of the Month : August 2017

Stimulator


​When you need a high floating, sink-resistant searching or attractor dry fly pattern on almost any freestone stream, several come to mind depending on what aquatic insect you may want to imitate as well. If you lean toward a mayfly dun, then a Wulff fly pattern comes to mind. If you lean toward a caddisfly, then an Elk Hair Caddis is a good attractor version of an adult caddis. If you lean toward a stonefly, then a Stimulator is considered by many anglers as a good attractor version of an adult stonefly. For a midge, the Griffith Gnat comes to mind. We could list a good number more example matches.
 How often do we encounter an adult stonefly hatch or even see adult stoneflies on eastern waters? Well, except for early season tiny winter black stoneflies, early season small brown stoneflies and the small summer yellow and olive sallies, we do not. BUT – the trout do!
 Stimulator
 Many of our larger, eastern stonefly hatches are nocturnal, occurring at dusk and even later into the night. For example, eastern golden stoneflies typically hatch around midnight as do eastern salmon flies. The larger eastern, black and brown stonefly species also hatch just after dusk in the summer months. Night fishing is not allowed on any North Carolina streams except the lower Nantahala River (a special exception in the regulations to allow anglers time on the whitewater section without rafters). Night fishing in the summer places a lot of undue pressure on trout that are actively pursuing nighttime stonefly hatches, thus, the no night fishing regulation is a sound management practice for our precious mountain trout waters. Also, brown trout forage mostly at night and are most vulnerable to night fishing.
An adult stonefly imitation as a searching fly pattern or attractor is believed to trigger a response from trout imprinted by our eastern night time stonefly hatches. Thus, the larger stimulator fly patterns work “magically” as an attractor rather than a “hatch match” on many Southern Appalachian trout streams.
Anglers and tyers wrongly credit Randal Kaufmann for the Stimulator. He did not originate the Stimulator but did popularize it in the early-1980s. Jim Slattery created his Fluttering Stonefly that he later renamed the Stimulator. Many fly tyers argue that the Orange Stimulator is a variation of the Improved Sofa Pillow fly pattern that was created by Pat Barnes in the 1940s. Some fly tyers argue that the Stimulator was derived from the Yellow-Bellied Mattress Thrasher which has rubber legs and was created by Steve Williams in the 1970s for use on the Au Sable in Michigan. Some even argue that the Stimulator was derived from the original Trude created by Carter Harrison in 1903. However, Jim Slattery clearly blogs on the internet that the influence for his creation of the Stimulator was derived from a live eastern stonefly hatch (which was stonefly mating and egg laying activity) on the Musconetcong River in New Jersey on two straight late-evenings.
A Stimulator tied with a salmon-orange body in sizes 8 to 12 is used to imitate the giant stonefly. A stimulator tied with a yellow or green body in sizes 14 or 16 is used to imitate the small summertime yellow or olive sallies which do hatch during the day. The Stimulator tied in size 14 or 16 with a tan, black or olive body may be used to imitate a caddisfly. Add rubber legs and the Stimulator may be used to imitate a hopper, cicada or a beetle.
In his book, Essential Trout Flies, Dave Hughes states “As a searching dressing, it is hard to beat the Yellow Stimulator…tie and carry it in sizes 8 through 12, and give it a prominent place in your dry-fly box…”
The outstanding qualities of this dry fly are: 1) rides high, 2) easy to see, 3) built-in floatation, and 4) a great indicator fly for a dropper. The only down side is the time required and number of steps to tie this dry fly pattern. Regardless, this dry fly pattern is “king” of the indicator flies. Use the Stimulator as your indicator in a nymph dropper rig for roughwater nymphing.
A final tip – bend the hook slightly downward mid-shank or use a curved hook to create the “egg-laying” humped effect we observe in stoneflies as they lay their eggs over the water.
Stimulator Attractor
 
HOOK :  Tiemco 1270 Stonefly in size : 10,12,14,16,18
Thread : Uni 8/0 Orange
Tail : Deer Hair Natural Belly
Body : Yellow Dub with copper wire wrap
Thorax: Orange dubbing
Wings : Elk Hair Natural
Hackle: Brown, and Grizzly dry fly rooster
 
There are many ties for this fly and this is mine that has worked for many years, feel free to try others and especially other colors.  Olive, orange, and brown are all used with good results.
 
  1. Debarb and mount the hook.  Attach thread at the one third mark back from the hook eye. Trim thread waste.  Make wraps in tight touching turns to the hook bend above the hook barb. Let the bobbin hang.
  2. Select a small clump of deer hair and trim from the hide.  Clean the guard hair from the bunch by pinching with your thumb and index finger and plucking with your other thumb and index.  Use your thumb to “press” out flat on your index finger which will enable you to clear more of the underfur.
  3. Place the hair in a stacker and gently tap on a hard surface to even the tips. Lift the stacker tube slightly for the last two or three raps by about an eighth of an inch.  This will leave the stacked tips slightly past the end of the tube making it easier to pull out without changing alignment. Place the hair on top of the hook shank and measure a short tail past the hook bend. Tie in with two loose wraps to hold the deer hair on top of the hook shank.  Check the length (Stimulators have relatively short tails) and when it is acceptable continue the wraps to the halfway point of the hook shank.  This should be moderately hard pressure.  Deer can flair and make a mess if you tighten with too much pressure.  Trim away any waste and let the bobbin hang.
  4. Select a three or four inch piece of copper wire and tie in on the side of the hook shank at the halfway mark.  Wrap in touching turns to the tail tie in.  This will bind the wire and the deer hair as well. Once you reach the tail let the bobbin hang.
  5. Dub about two inches of the thread in tight twists and begin wrapping in tight touching turns.  Repeat dubbing as necessary to make the two thirds mark on the hook shank.  Let the bobbin hang.
  6. Select a brown dry hackle with after measuring the length of the barbs to not exceed the hook gape.  This is slightly shorter than a “normal” dry fly.  Strip an eighth of an inch or so of barbs from the hackle to expose a tie section of stem.  Tie in the stem with the curved side of the hackle facing toward the hook bend.  Once secure, trim any extra hackle stem and let the bobbin hang.
  7. Wrap the hackle in open turns to the hook bend. Use the copper wire to bind in the hackle.  Continue wrapping the copper wire through the hackle using a wiggle to avoid pinching hackle barbs.  Once the wire has advanced through the body and up to the thorax bind in with the thread and “airplane” off the excess wire.  Finish the tie in with several wraps of thread.  Trim any access hackle stem from the hackle and let the bobbin hang.
  8. Select a section of elk hair from the hide and after trimming take out the underfur like you did with the deer hair.  Stack in hair stacker like above and tie with with two or three soft wraps on top of the hook shank.  The length should be about half way through the tail.  Trim the length as needed, cutting on a taper away from the hook eye. Once the length is good, begin tying in with slightly firm wraps that increase in pressure as you work toward the hook eye.  It will also help if as you advance the thread you work one or two wraps through the elk.  This will help maintain the position on top of the hook shank and form a better taper toward the eye. Once the hair is secure, advance the thread to the first wrap at the base of the wing and let the bobbin hang.
  9. Select a grizzly hackle feather and strip as before.  Tie in at the base of the wing and let the bobbin hang.
  10. Dub the thread with orange or whatever alternate color chosen and dub the head to within one or two eyelengths back.  Let the bobbin hang.
  11. Wrap the hackle in a spiral, slightly open to the end of the dubbing.  Tie off with thread.  Trim waste and form a secure head with several whip finishes.


Fly of the Month - April 2017

Renegade

Want a dry fly that really attracts fish, is quick and very easy to tie, floats well and is also easy to see on the water under almost any conditions. Sounds like a radical fly pattern design - yet the perfect fly. So, this fly is an attractor fly, which means it does not imitate anything. Although it is suggestive of any bug-like critter that may be floating down the stream. It is easy to tie as it does not have wings, just a body and hackle. It floats well because it is a fore-and-aft fly pattern design, with a front and a back hackle. It is easy to see as the front hackle is white.  Maybe not a radical fly pattern design, but a renegade fly pattern design!
 
Renegade                
 
The Renegade is an excellent choice for both rivers and lakes in larger sizes 8 to 12, is highly effective on our wild headwater streams in sizes 14 to 18, and is very productive as a midge cluster in the smaller sizes 20 to 24.
This fore-and-aft fly pattern was first tied and used by Taylor “Beartracks” Williams, a guide on the Malad River, Idaho, who created his simple, masterpiece fly in 1928. It was very effective fly pattern for cutthroat trout for Taylor. The Renegade is now one of the most popular fore-and-aft fly patterns developed in modern times. Fly patterns based on the fore-and-aft design have been popular in Europe for centuries.
Taylor was the first guide at the Sun Valley Lodge in 1937 where he became a friend to Ernest Hemingway. Hemingway utilized the Renegade on wary rainbows on Silver Creek in 1940, making the fly pattern famous and well known at that time. Ernest Hemingway and Taylor Williams remained close friends until Taylor’s death in 1952.
The Renegade is highly visible due to the white, oversized front hackle. The rear brown hackle provides stability and additional floatation. The peacock herl is a natural, universal material which is used in many other fly pattern designs. The tag give the fly pattern a touch of flash, giving a fish a glimmer that cannot be resisted.
The Renegade may be fished as a dry fly or a wet fly. As a dry fly, fish the renegade upstream to feeding trout using a dead drift or if needed with a slight twitch. Once the fly passes below you on the down drift, tail the fly out and retrieve as a wet fly.
Variations of the Renegade include: the Reversed Renegade, Double Renegade, Royal Renegade, Soft Hackle Renegade and the Renegade Nymph, originated by Terry Hellekson in 1974.
The Soft Hackle Renegade is an excellent trailer fly behind a streamer. Tied in sizes 16 or 18 with both front and rear hackles tied collar style with hen’s hackle, the fly appears much like a rising caddis pupa. The origin of the Soft Hackle Renegade is yours truly, Alen Baker and Tom Adams.
Hook : Tiemco 5212 or equivalent size : 12,14,16,18
​Thread : Uni 8/0 black
Tag: Gold mylar
Abdomen : Peacock herl with Brown rooster hackle
Thorax hackle : Cream rooster
             
Directions :

  1. Debarb the hook and mount in the vise. Begin the thread two eyelengths from the eye and wrap to the hook bend in tight, touching turns.  Let the bobbin hang.
  2. Select small piece of gold mylar and tie in at the halfway point on the hook shank.  Tie in on the side of the hook, facing you and make thread wraps to trap the mylar to the start of the hook bend.  Advance the mylar several turns down the hook bend and continue to wrap back up to the thread.  Wrap with slightly overlapping turns, making it as smooth as possible.  Tie off with several more thread wraps, going back to the bend.  Trim the waste mylar and let the bobbin hang.
  3. Select a brown rooster hackle with barbs one and one half the size of the hook gape.  Remove the barbs from the stem exposing about 1/8 inch.  Tie in the hackle with the “shiny” side toward the eye. Wrap the hackle forward in tight, touching turns, making three to five wraps.  Secure with thread and trim the waste. Let the bobbin hang.
  4. Select two or three peacock herls and tie in immediately in front of the brown hackle.  Wrap the herl forward to the two thirds mark in tight, touching turns and tie off.  Trim the waste and let the bobbin hang.
  5. Select a cream rooster hackle the same size as the brown hackle, strip in the same manner and tie in the same way.  Wrap the hackle in tight, touching turns to within two eyelengths of the eye.  Secure with several wraps and trim the waste. 
  6. Complete by forming a small thread head and whip finish.
Fly of the Month : January 2017

Mop Fly, Squirmy Wormy, Y2K
Fly of Fly of the Month
 
Among all the flies that are available in a fly shop to help you catch trout, there are three, new modern wet flies available that everyone talks about but at the same time will not explain anything about them unless you are sworn to secrecy. So, this article is a “flies of the month.” This trio of fly patterns are not pretty to look at, not complicated to tie, but for strange reason tend to catch lots of trout on our Delayed-Harvest trout streams in North Carolina. My guess -  these fly patterns will successfully catch stocked trout anywhere and in some cases, be effective for catching wild trout.


Picture

Fly of the Month 02.2014 
Corey's Calf Tail


Some Southern Appalachian fly patterns are modified versions of fly patterns that were found to be successful in other parts of the country and sometimes other parts of the world. We present a fly pattern that originated as a fly pattern designed for night fly fishing in Michigan. As with other fly patterns from the northeast and mid-west, Corey’s Calf Tail was systematically modified for use in the rougher waters of Southern Appalachians streams soon after its original creation and use.


Corey’s Calf Tail

Corey’s Calf Tail was created around the mid-1940’s by the late Ralph Corey of Big Rapids, Michigan. The fly pattern became well known in western Michigan over the next 30 years. L.L. Robey of Newaygo Michigan tied and marketed the fly pattern commercially beginning in the 1970’s. The original Corey’s Calf Tail is still considered an important attractor fly pattern on the Au Sauble, Pere Marquette and Manistee Rivers. From the late-1940’s, the fly pattern was adopted and modified by Southern Appalachian anglers soon after its creation to become a highly visible, high-floating attractor fly.
The original night fly pattern version was tied with a white calf tail, a single white calf tail topper wing (single bunch of hair angled forward over the eye of the hook, yellow floss or dubbed body with gold wire ribbing and brown hackle. Today, this original version can be purchased or custom ordered with a black, green, red, yellow or other color body from www.myflies.com tied by Aaron Marzec.
As the fly pattern already sounds like a recipe for success, the Southern Appalachian version has several key modifications that improve on the original. The white calf tail wing is tied upright and divided to be able to see the fly better as well as making the fly float better. A brown (and for some versions a grizzly) hackle is palmered through the entire body to make the fly float better as well. Calf body hair rather than calf tail is used on some versions giving the fly pattern a much straighter looking tail. This modification over 50 years ago simply required less calf tail material for each fly, a precious and more expensive material compared to calf body hair.
Needless to say, these modifications created a very different Corey’s Calf Tail for local use. Our Southern Appalachian version of Corey’s Calf Tail may be ordered as a custom tie from “TIE ONE ON”, Flies by Susan Cox, 199 Tamassee Knob Road, Tamassee, SC 29686 – Phone (864) 944-0852.
Roger Lowe’s Fly Pattern Guide to the Great Smoky Mountains includes Corey’s Calf Tail fly pattern recipe as well. You can also find Corey’s Calf Tail in various mountain stores where local mountain fly tyer are earning some extra money by tying and selling their flies. I have purchased a few in the past at the Citico service station on US 19E in Almond, NC.
Fly Fishing with Corey’s Calf Tail 
If you encounter high, dingy water, rough water or even water with glaring reflections and dark zones that make it very challenging to see a fly, Corey’s Calf Tail is an excellent fly to turn to for proven results. Whether a trout strikes it or not, there is no doubt that the fly will be highly visible and easy to follow on the drift.
The dense, white divided-wings and white tail provide a highly visible fly as well as a high floating fly. The palmered, hair-wing fly pattern is virtually unsinkable even in fishable rapids and cascades. If you have experienced the use of a Royal Wulff with the highly visible white calf tail divided wings, then imagine a fly with the same or better visibility with an added dense, white tail that floats higher due to the palmered hackle body.
Fish Corey’s Calf Tail in the same manner as a Wulff, Irresistible or any high floating attractor. Trout strike this fly through fast currents very aggressively with no turning back.
Corey’s Calf Tail is an excellent fly pattern for dusk, dawn and dark overcast conditions when visibility on the stream is minimal. Night fly fishing in North Carolina is only allowed on the lower Nantahala River (a regulation exception since rafters overwhelm these waters during the day) and Corey’s Calf Tail is a top of the list choice for such unique night fly fishing.

Corey’s Calf Tail  

Hook :  Dry Fly 1x, 1 L, TDE,  Tiemco 100 or equivalent, 10,12,14,16,18
Thread : Uni 8/0 Light Cahill or equivalent
Tail :  White Kip or Calf Tail
Abdomen :  Lt Cahill thread
Thorax : Lt Cahill thread
Hackle : Brown Rooster, dry

  Directions :
  1. Wrap thread one third back from eye, starting one to two eye lengths from eye, let bobbin hang
  2. Select calf tail hair and cut.  Clean underfur thoroughly and stack in hair stacker.  Tap several times and remove with right hand, pinching the tips between the index finger and thumb, maintain alignment.  Place calf tail on top of the hook, with the length to be tied in, about the same length as the hook shank.  Wrap softly at the one third back mark and release the grip with the right hand.  The wraps should be very close together working toward the hook bend.  This is only to position and judge the height of the wings.  Once you are happy with the wings, tie in firmly and trim the hair making a diagonal cut.  Now the calf tail can be secured by binding the diagonal with firm wraps.  Advance the thread immediately forward of the hair and lifting the bundle of hair on the top of the shank with your left hand, pull the thread against the base of the tie in, on top of the shank and pull the thread away and toward the hook bend.  When you pull the thread in a straight and parallel (to the hook shank) fashion the hair will stand straight up.  Make several turns immediately in front of the hair.  Take the thread and divide the upright hair clump into two fairly even sections.  Use a figure eight wrap to divide and shape the wings.  Once secure take the thread to behind the diagonal cut of the hair (the hair on top of the hook should be pretty well covered by thread now) and let the bobbin hang
  3. Repeat the selection of calf tail, choosing a smaller portion of hair to make the tail.  Tie in on top of the hook shank with the length being about the same as the hook shank.  By butting the tail up to the trimmed wing material, you will form a more even body.  Once the tail is secure let the bobbin hang above the hook barb.
  4. Select a Brown Rooster feather with barbs about one and one half the hook gape and pull away about a quarter inch of barbs.  Tie in, shiny side to the front.  The idea is to be able to make one full wrap (with no barbs), after tying in, so that the barbs do not bind up on themselves at the beginning of the wraps.  As you advance the crossover and bunching are okay, but this technique avoids barbs not being neat at the back of the hackle making for a neater profile.  Secure the hackle with thread at the tail and advance the thread in even and touching wraps to form a thread body.  Advance the thread to the head in front of the wings and let the bobbin hang.
  5. Wrap the hackle forward in open wraps with some space between each turn until reaching the wings.  The thorax should be denser with hackle, so begin touching turns of hackle for the thorax.  This is the “usual” wrap of hackle on a dry.  Continue to in front of the wing, trap and tie off, trimming any excess.
  6. Form a thread head, whip finish and add head cement if desired.

Picture


Fly of the Month  6.14    
Deer Hair


The Deer Hair dry fly is a roughwater fly featured in Roger Lowe’s Fly Pattern Guide to the Great Smoky Mountains. Roger’s caption “Sometimes known as an Irresistible; also nicknamed “The Speck”.
This is a fly with a number of variations which are all based on a spun deer hair body – almost!
Possibly the most original fly pattern and variation of the Deer Hair dates back to the Cherokee Indian that made a more durable, efficient “bait” on a bone hook. Imagine running out of bait while foraging native brook trout for the family. By taking a narrow strip of deer skin with the hair intact and wrapping and securing it on a bone hook, a reusable “bait” was invented. Leaving the hair “as is” would create a “woolly bugger” like “bait” and clipping the hair would create a highly floatable worm-like “bait”. Either way, the “bait” would prove so effective that the method of tying the strip of deer skin with the hair intact would be passed down for many generations and possibly be adapted to the wire hook later when the Spanish explorers came through the area in the early 1500’s and traded hooks for gold or food.
The original Deer Hair may well have been the first fly tied and used in North America and by Native Americans.

Deer Hair
“The Speck” or Deer Hair is a very close variation of the Adams Irresistible. The primary difference is the Moose hair tail which gives the fly more float past the bend in the hook.
The Irresistible is a true Southern Appalachian dry fly originated by Joe Messinger of Morgantown, West Virginia. Did Joe simply improve on the original Deer Hair fly pattern used by the Cherokee Indians for hundreds, possibly several thousands of years? The improvement is believed to be the spun deer hair which is secured to the hook in a superior manner. Spun deer hair is an advanced tying technique to master. It requires a strong, flexible thread, a little faith in getting the deer hair tied down uniformly 360 degrees around the hook shank and a packing and clipping technique to make the resulting blob of hair a dense, high floating body.
The first fly pattern created by Joe Messinger was called the Deer Hair Drake (note the name Deer Hair) and was renamed in the 1930’s to Irresistible. Ken Lockwood, an outdoor writer, was sent one of Joe’s flies. Ken remarked, “I haven’t used this one but is sure looks irresistible.” Over the years, the name stuck and the fly pattern has spawned various color variations including: Adams Irresistible, Black Irresistible, Brown Irresistible, White Irresistible and Yellow Irresistible with the Adams becoming the most popular. According to Dr. John Benbow, the Yellow Irresistible is the most irresistible (a definite Southern bias for yellow of course). Joe Messinger’s original Irresistible recipe calls for a natural deer hair top and a dyed-white deer hair bottom. A very advanced deer hair spinning technique is required to accomplish this subtle difference.
There is some dispute as to the origin of the Adams Irresistible itself. Harry and Elsie Darbee of (Roscoe) Livingston Manor, New York originated a similar pattern in 1939 called the Beaverhead Bastard which was generally tied on larger hooks for Salmon and Steelhead. His friend, Percy Jennings, at Harry’s suggestion tied the pattern onto smaller hooks. Percy’s daughter came up with the name “Rat Faced McDougal” to replace the “Bastard” name which she felt was not a fitting name for a fly pattern. The Beaverhead Bastard was tied with grizzly hackle tip wings (thus the dispute) and the Rat Faced McDougal was an improvement tied with calf hair as Harry wrote in his book Catskill Flytier that white calf-wings were “more visible, just as effective.”
The Deer Hair or Irresistible works very well on our rougher, fast flowing waters in the Southern Appalachian Mountains. The spun deer hair body provides excellent floatability. A number of variations have originated for western waters including: Irresistible Wulff, Irresistible October Caddis, Irresistible Yellow Stimulator for Yellow Sally hatches and the Irresistible Orange Stimulator which is a good choice for golden stone and Salmonfly hatches. Another variation based on a spun deer hair body is the Goddard Caddis.

Deer Hair or “The Speck” - moose tail, mixed brown & grizzly hackle, grizzly hackle tip wings

Irresistible - brown bucktail tail and wings, medium or dark dun hackle

Adams Irresistible - black, grizzly or Coq de Leon hackle, grizzly and brown or Cree hackle, grizzly hackle tip wings


Deerhair – Roger Lowe                                                                               

Directions :

HOOK :   Tiemco 100 or equivalent in size 18,16,14, 12
THREAD :  Uni8/0 or equivalent  Black
TAIL : Moose hair
ABDOMEN: Deer Body Hair, natural
WING :  Grizzly Rooster Hackle tips
HACKLE : Brown and Grizzly Rooster hackle

1.     Begin thread wraps two eye lengths from hook eye and make touching wraps to the hook bend. Let the bobbin hang.

2.     Select six or eight fine moose hairs and clean away any body fuzz.  Use hair stacker and align the tips.  The length should be slightly less than the hook shank.  Place the moose hair on top of the hook shank and using a soft wrap, bind them in place.  If everything looks good, continue with firmer wraps to tie in the tail.  Do not tighten so quickly that you make the moose hair flair.  Once secure, trim the excess and bring the wraps back to the hook bend and let the bobbin hang.

3.     Choose a small bundle of deer hair on the hide.  Something smaller than a pencil.  Trim from the hide and clean the underfur as completely as possible.  The better it is clean, the better it will spin.  It is not necessary to stack the hair.  Place the hair on top of the hook shank, at the hook bend and hold at a slight angle.  Using the bobbin make two soft wraps over the center of the deer hair.  Holding the hair in place with your left hand, take the bobbin and pull straight up to tighten the soft wraps.  When you begin to apply this pressure the hair will spin around the hook shank and begin to flair explosively.  That is good. Advance the thread to immediately in front of the deer hair and push the hair into itself, using a thumbnail.  Bind in with tight wraps immediately in front of the hair.  Repeat the process, three or four more times, advancing the hair to the thorax. Tie off thread with hitch knots and cut away temporarily.

4.     Using scissors, begin trimming the abundant hair fibers to the appropriate abdomen profile being careful not to cut the tail. Once you have a reasonable shape and size add the thread back in front of the deer hair.  You can return for final shape and size after finishing the thorax and head.  Being the creative barber is the best part anyway.

5.     Select two matching grizzly feathers and cut the tip section away from each.  The length will be the height of the wing plus a short length of stripped stem to tie in with.  With the concave part of the tips out and the tips aligned, tie in at about half the distance left from the eye to the abdomen.  Tie in by binding the bare stem on top of the hook shank and wrapping thread in front of the wings.  Pulling back the thread on top of the hook shank in a horizontal manner will cause the wings to stand upright.  Divide the wings with a couple of x turns and let the bobbin hang in front of the wings.

6.     Select a grizzly and a brown rooster hackle with barbs to suit the hook size chosen.  They should be about one and one half the hook gape.  Also make sure the two hackle feathers have similar stem thickness.  Strip both with sufficient bare stem to make one and one half wraps before the barbs.  Tie both in together with the shiny side up and the bottom aligned.  The tie in point is just behind the wings.  Begin wrapping one hackle at a time and make the first wraps open to allow the second hackle space.  Three or so behind the wings and two or three in front.  After binding in the hackles, trim the waste and whip finish the head. 


- Tom Adams, Alen Baker

Picture
Fly of the Month 10.13 
​ Fore and After


Fore and After is an original Southern Appalachian Pattern (SAP) or old timey pattern. However, the fly pattern is definitely a variation of the much older European fore-and-aft fly patterns. We present the pattern using the original Southern Appalachian recipe only.

Fore and After

Fore and After is one of the older Southern Appalachian fly patterns that feature a hackle at the rear and front of the fly. The fore and aft style dry fly patterns date back to the early 1900's with origins that have been disputed between the French and the English. In the book, French Fishing Flies written by Jean-Paul Puguegnot, credit is given to Doctor Juge for creating fore and aft fly patterns in 1918. His Taquine fly pattern consists of a red thread body with grey hackles on the rear and front. Horace Brown of England is also credited for designing fore and aft flies in the 1930's. Either way, the fly pattern was eventually modified by someone in the southern Appalachians using the Golden pheasant tippet tail which is literally a trademark for a number of Southern Appalachian Patterns. Another distinction is the shorter rear hackle rather than both of equal size.

Fore and Aft

The fore and aft style dry fly pattern is a fly with two sections of hackle, one at the shoulder and one at the tip of the body. The design yields a high floater, high riding fly with a tendency to roll around on the surface, placing the hook in various positions. This is a spectacularly useful fishing fly which imitates nothing in particular. Fore and aft flies just do not look all that fishy and no aquatic insects have been found with hackle-like appendages on both ends of their bodies except for a semi-bald caterpillar. My research indicates the original fore and aft fly patterns have hundreds of variations:

Buzz Hackle has a red hackle fibers tail, a grizzly over silver tinsel rear hackle, a peacock herl body and a brown front hackle.

Deren's Stone Fore and Aft has a ginger hackle fiber tail, a gold tinsel ribbing on a yellow body and ginger hackle both rear and front.

Double Badger has no tail, a peacock herl body and badger hackle both rear and front. It is used mainly on rivers but has its uses on still waters also. It is particularly good where there are hatches of Chironimid.

Gray Ugly has a grizzly tail, a peacock herl body and grizzly hackle both rear and front.

Sierra Bright Dot has a Golden pheasant tippet, fluorescent orange floss body and grizzly hackle both rear and front. The pattern has been used primarily on the eastside of the Southern Sierra for many years going back to the 1950's.

Renegade has no tail but rather a gold tinsel tag, a brown rear hackle, a peacock herl body and a white front hackle. The white or light front hackle provides a bivisible effect. As Edward Hewitt would say, "I can see it and the trout can see it."  The Red-Butted Double Renegade is a funky variation of the original Renegade. This fly pattern is tied in a fore and aft style with red thread wrapped half way down the bend of the hook (which likely triggers more frequent and aggressive strikes), brown hackle wound near the end of the shank of the hook, peacock herl body, white hackle wrapped in the middle of the shank of the hook, and brown hackle at the eye of the hook.

“The Double Renegade represents nothing specific in nature, but could be suggestive of many things. I have often hypothesized that the fish are taking it for a big ant pattern, but admittedly, I am not sure. I typically fish this fly on small freestone and meadow streams. Brookies, rainbows, and cutthroats go nuts for it, especially when you fish it downstream and then skate the fly back upstream in short jerks. For whatever reason, fish leap up out of the water to hammer it.”-  Jim LaFevers

Winnie’s Fore and Aft is a signature invention of Art Winnie in the early 1940’s. This fore-and-aft fly pattern has the addition of upright and divided duck feather wings.

Alen Baker

Fore and Aft


Hook : Tiemco 100 or equivalent, size 12, 14,16,18,20
Thread : Uni 8/0 black or equivalent
Tail : Golden Pheasant Crest fibers
Hackle-abdomen : Grizzly Rooster
Abdomen : Floss, or Dubbing – yellow is standard
Hackle- thorax :  Brown Rooster


Directions :

1.     Wrap thread starting two eye lengths back from eye in tight, smooth, touching turns to above the hook barb.  Let the bobbin hang.

2.     Select six or eight Golden Pheasant crest fibers for tail.  Make sure before cutting or pulling the fibers that the tips are aligned.  Measure the length before tying in by holding the fibers above the hook shank and allow about one and one half the overall length of the shank.  Tie in with soft wraps, making sure the fibers stay on top of the hook.  When tying in, begin at the hook gap and wrap forward to slightly past the half waypoint. Wrap firmly to the tie in and let the bobbin hang.  Trim the excess length of fibers.

3.     Select a grizzly rooster feather with barbs shorter than the hook gape.  Pull off sufficient fibers to allow for one full wrap before barbs.  Tie in at the tie in point of the tail feathers and advance the thread to the half waypoint.  Let the bobbin hang.  Wrap the grizzly in tight touching turns to about one third the length of the shank.  Bring the thread back to the grizzly, tie and trim excess hackle.  Let the bobbin hang.

4.     The abdomen can be floss or dubbing.  We will use floss.  Tie in the floss with the black thread, beginning at the grizzly and keeping the floss on top, wrap with black thread to slightly past half way. Let the bobbin hang.

5.     Wrap the floss forward using tight and slightly overlapped turns.  Spin the floss counter clockwise as you advance to keep the floss flat and not a tight bundle.  Tie the floss down with the black thread slightly ahead halfway.  Trim excess floss.  Let the bobbin hang.

6.     Select a brown rooster hackle that is about one and one half the size of the hook gape, prepare as above and tie in where the floss stops.  Advance the thread to the hook eye and let the bobbin hang.  Wrap the brown rooster as above, stopping two eye lengths back from the eye.  Tie in, cut excess and whip finish.


Picture
Fly of the Month 12.13
​ Sakasa Kebari


Tenkara fly fishing was presented to the Chapter in October by Appalachian Anglers Tenkara Guide Lance Milks. With simply a rod, a line and a fly the Japanese have fished for trout commercially and now recreationally for well over 200 years. No reel, no backing, no leader? Correct! They do use a 5X, 6X or 7X tippet to prevent rod breakage and assure an invisible line presentation. However, what is really amazing and simple is the extreme “one fly philosophy”. Each Tenkara fly fisher in Japan tends to develop his or her own special kebari which means “fly”. Rather than match the hatch, the fly is either dappled as a goju kebari which means “dry fly” on the surface to appear tenkara which means “from Heaven” or “from the sky” or is sunk and manipulated to attract trout. Here we present the most unique of the Japanese fly designs, the sakasa which means “reversed hackle”. This is a simple, very easy fly pattern to tie.

Sakasa Kebari

There is a variety of kebari, with each fly having different qualities. The obvious differences are shape, size and color, but there are different flies influenced in their history and development by the geographical region in Japan, from which they originated.

Mr. Yoshikazu Fujioka has done extensive research into tenkara flies and has shared his knowledge with his website “My Best Mountain Streams” www.hi-ho.ne.jp which is online in both English and Japanese.

Mr. Fujioka does not group the tenkara fly patterns into dry, wet, nymph, streamer and so on as we do in the western world. Rather he groups by styles and patterns used by tenkara practitioners. A general guideline for styles is based on whether a tenkara fly has an almost thick body or a slender body; uses a long hackle or short hackle, a soft hackle or a stiff hackle; and, whether the hackle is tied traditionally or reversed.

The three (3) styles of Sakasa Kebari are the long soft hackle kebari which presents a high degree of motion when manipulated underwater; the short soft hackle kebari which is most effective when presented in a natural drift beginning on the surface and allowed to gradually sink, literally both a dry and a wet fly pattern by western labels; and, the short stiff hackle kaberi which is essentially a dry fly.

Typical soft hackle materials for tying sakasa kebari includes but is not limited to partridge, pheasant, guinea, grouse and hen feathers. Oversized feathers are used for long soft hackle and undersized feathers are used for short soft hackle. Typical stiff hackle materials for tying sakasa kebari are high grade rooster feathers. Grizzly, dyed-Grizzly and Badger hackle are used in many Sakasa Kebari patterns. Black, brown, gray, cream, red, white, olive and yellow thread bodies in order of frequency of occurrence are used for slender body Sakasa Kebari patterns. Various dubbing colors and ribbing are used for almost thick body Sakasa Kebari patterns. Peacock herl from peacock sword eye feathers are highly used for the thorax, yet due to our western influence various dubbings, ice dubbing, chenille, tinsel, flash materials and even glass beads are used for some Sakasa Kebari patterns. Fine wire is used as underbodies, weighting and ribbing on Sakasa Kebari patterns as well.

For example, the Tenkara Red fly sold by Big Y Company is tied with a red thread body; a peacock herl thorax and a reversed partridge hackle on size 10, 12 and 14 hooks.

Tenkara USA sells four (4) Tenkara fly patterns. Their Takayama Sakasa Kebari, named after the Takayama village, is tied with a black thread body; a peacock herl thorax and a reversed grizzly hen hackle on size 16 and 18 hooks. Their Ishigaki Sakasa Kebari, named after the tenkara master Mr. Ishigaki, is tied with a thread body and a reversed partridge hackle on a size 12 hook. Their Amano Sakasa Kebari and Oki Sakasa Kebari flies are named after other Japanese villages.

I searched the internet using “tenkara flies” and found a good number of websites to research. Overall, I found roughly fifty recipes for kebari patterns using size 8 to 18 hooks with a majority of the recipes calling for size 12 hooks. There is actually a YouTube video where a tyer actually ties a size 8 Sakasa Kebari without a tying vise.

Fly Fishing with a Sakasa Kebari

The Sakasa Kebari is highly, highly effective. Charlie Campbell tied a few Sakasa Kebari for the two of us to try when we fished the delayed harvest waters of the East Prong Roaring River in Stone Mountain State Park. We fished a pool where other anglers had thrashed the water heavily that morning. Let’s just say there were very few fish in the pool that did not get excited as most of the trout would strike the Sakasa Kebari while briefly floating and then again when manipulated and sinking. The Sakasa Kebari fishes well as a single fly and fishes even better as a dropper using our traditional, non-tenkara methods of fly fishing. The reversed soft hackle yields even greater motion than a traditional soft hackle fly which is well known as very effective due to the motions of the soft hackle.

Fly of the Month 12.13 Sakasa Kaberi

……recipe and instructions…….

- Tom Adams, Alen Baker

Roughwater Flies

Picture
 Fly of the Month 03.11
​Blonde Wulff


This “fly of the month” represents the latest in the Tim Wilhelm/Tom Adams series. For those who
attended the RRTU February Anniversary (Birthday) Party, you may remember what Jim Dean said about this fly. I hate the word organic! I think it has been over used during the last decade. Everything has been organic this or organic that. I just hate hearing it used. So you can imagine how much it pains me to use it now.

When Tom and I first developed the idea to do a Fly of the Month our plan was to loosely mimic a fly tying manual developed by Greenville SC’s Mountain Bridge. Written I think in 1984, I was given a copy by a coworker shortly after it was published. The manual focuses on Southern Appalachian Flies and how to tie them and I had always wanted to do something similar as a fundraiser for Rocky River. So it was fairly easy for me to say yes to the Fly of the Month. Tom and I came up with a list of flies for our project (several lists really) and began. Several weeks after we started, the lists had been discarded and the project became (wait for it) an organic process as illustrated by this month’s fly.

Shortly after our 30 th anniversary I received the following in an email from Tom: “ Spoke with Jonathan yesterday and mentioned I was going to run this by you. Jim Dean must have mentioned a Blonde Wulff as many times as the word trout the other night. We have not tied a Wulff yet. What do you think? In times goneby I used a Wulff variation nearly every time I went out. Don't know why I stopped. Anyway let me know what your thoughts are. I could tie several of the variations also. ”

You know he’s right, at one time I wouldn’t go anywhere without a Wulff in the fly box and often I would fish that buoyant fly in tandem with a dropper. Not just Blonde Wulffs, but Ausable Wulffs and Royal Wulffs too. Man they were good flies, but somehow they just disappeared from my fly box. Why is that? Well maybe it’s because I’m trying too hard to “match the hatch” and now carry all sorts of little flies that represent emergers and midges and other flies. But wait, we don’t have hatches in NC. The trout we find in our streams are opportunistic feeders and what’s more opportunistic than a great big Blonde Wulff? Jim Dean handed out copies of the article he wrote for Outdoor Life in 1982. I’ve included one illustration from that article showing how a second fly can be fished from the Wulff.

 Fly of the Month 03.11 Blonde Wulff

Hook: Dry Fly, 1x long, Tiemco 100 or equivalent, Size: 10, 12, 14, 16
Thread: 8/0 Uni or equivalent in Black (plus Tanoption)
Tail: Tan Deer Tail
Body: Tan dry fly dubbing
Wing: Elk hair, fine
Hackle: Ginger Rooster
Note: Black thread is recommended, but I prefer to tie the materials in with tan and change to black for the head only. This is an added step (your choice).

Directions:

 1)    Wrap thread one third back from eye, starting one to two eye lengths from eye, let bobbin hang.

 2)    Select elk hair and cut. Clean underfur thoroughly and stack in hair stacker. Tap several times and remove with right hand, pinching the tips 
between the index finger and thumb, maintain alignment. Place elk hair on top of the hook allowing the length to be tied in at about the same 
length as the hook shank. Wrap softly at the one third back mark and release the grip with the right hand. The wraps should be very close 
together working toward the hook bend. This is only to position and judge the height of the wings. Once you are happy with the wings, tie in 
firmly and trim the hair making a diagonal cut. Now the elk can be secured by binding the diagonal with firm wraps. Advance the thread 
immediately forward of the hair and lifting the bundle of hair on the top of the shank with your left hand, pull the thread against the base of the 
tie in, on top of the shank and pull the thread away and toward the hook bend. When you pull the thread in a straight and parallel (to the hook 
shank) fashion the hair will stand straight up. Make several turns immediately in front of the hair. Take the thread and divide the upright hair 
clump into two fairly even sections. Use a figure eight wrap to divide and shape the wings. Once secure take the thread to behind the diagonal 
cut of the hair (the hair on top of the hook should be pretty well covered by thread now) and let the bobbin hang.

 3)     Select tan deer tail. Selecting from the base and not the tip of the tail will yield thicker hairs. Cut and clean the underfur. Place in stacker and 
even the tips. The hair will be very long at this point and can be cut to ease in placement. The tail should be about the same length as the hook 
shank. Tie in with soft wraps and trim the length so that the trimmed deer matches up to the diagonal of the elk hair. Once the length is okay, 
wrap the thread firmly with tight wraps to the hook bend above the hook barb. Let the bobbin hang.

 4)    Using tan dry fly dubbing, dub to from the tail to about two eye lengths behind the wings. Let the bobbin hang. The dub can cover and even 
out the difference between the deer and elk, though keep the dub tight and use as little as possible.

 5)    Select a medium ginger rooster hackle and strip about 1/8 th inch to tie in. Tie in with two wraps behind the wing and two wraps in front of 
the wings. This is where I change to black thread. Let the bobbin hang.

 6)    Wrap the hackle three to four wraps behind the wings and three to four in front. Tie off and whip finish the head. Apply head cement. Go catch
fish.

 - Tom Adams, Alen Baker

Picture
Fly of the Month 01.14  
Carolina Wulff

Much of our North Carolina trout waters may be labeled as roughwater. Sure, between riffles and runs there are typically the deeper, glassy surface pools. Yet even the pools have one or more heads where water flows into the pool as a rough whitewater run and one or more short drops at the tail that can readily sink a dry fly if not quickly retrieved at the last moment. We can always fish a wet fly or nymph in the roughwater but for most of the year we still prefer to fish a dry fly for the top action.
Many years ago, fly fisherman resolved this problem by utilizing hollow animal hair rather than feathers to build a more durable dry fly. The absolute most well-known roughwater dry flies are the fly patterns made famous by Lee Wulff. There is a whole series named after this world famous angling legend.

   We have all at some point tied on a Royal Wulff to seek top water action on one of our North Carolina trout streams. But what is the logic of design behind the unique red band between two collars of peacock herl. Let’s just leave it as a natural evolution emanating from another proven fly pattern, the Royal Coachman. The use of red to attract fish dates back to Roman times and a Muriel that depicts an angler fly fishing with a hook with red wool attached. Likewise, in the Southern Appalachians the use of yellow to attract fish dates back to the Cherokee Indians wrapping a Yellarhammer (feather of a flicker woodpecker) feather on a bone hook to attract fish.
  So at some point in time a local angler decided to make the Royal Wulff our own, thus the Carolina Wulff evolved locally as the roughwater fly to use in the mountain trout streams of North Carolina. One simple change to the fly pattern, use yellow floss rather than red floss.
  You will not find the Carolina Wulff in fly shops as it is not as well-known as the Royal Wulff, but none the less, it is highly effective as a go-to roughwater fly pattern. You may well find the fly available and sold locally in tackle shops, service stations and general stores throughout the North Carolina mountains where a local tier is making part of his living tying and selling his flies. For example, the Citco along NC 19 in-route to the Nantahala River has a display of locally tied flies that includes (before the sell out each month) the Royal Wulff as well as the Carolina Wulff and Tennessee Wulff (lime green floss band). All three of these roughwater fly patterns are effective locally. The logic behind the lime green is yet another story – katydid, green drake, etc.
  A size 12 and size 14 Carolina Wulff is all you will encounter in local stores. If you use a size 16 Royal Wulff on your favorite wild stream which allows hooking the smaller Brookies, then you will either need to tie your own size 16 Carolina Wulff or take your purchased size 16 Royal Wulff, put them in the fly vise and add a thin layer of yellow floss on top on the red band already there. Not ideal, but it works in a rush. The Carolina Wulff is especially effective on the Nantahala River and most wild streams in North Carolina.
  Over many generations of fly tiers and anglers, the use of hair-wing flies has blossomed. Some fly patterns are creative modifications of the Wulff series. Other hair-wing fly patterns have their own unique origin of how the fly pattern evolved to become a fly pattern that has survived and is used today.
  In addition to the Wulff series, the Humpy series, Goofus Bug series and Irresistible series come to mind as the family of roughwater flies (some listed are not hair-wing but rather hair-bodied) that may be a go-to part of an anglers fly box. Here is a very comprehensive (yet incomplete) list of the hair-wing, roughwater family of fly patterns related to the Wulff series (some have been featured in past fly of the month articles; others will be covered in the future):

Wulff series:  Royal Wulff, Royal Wulff Waterwisp (reversed, upside-down version), Adams Wulff, Black Wulff, Brown Wulff, Brown Wulff Waterwisp, Gray Wulff, Grizzly Wulff, Grizzly Wulff Waterwisp, Irresistible Wulff, Ginger Wulff, Blonde Wulff, White Wulff (most of the Wulff series body styles fly have been tied parachute style but not listed here since they are not considered roughwater fly patterns)

Eastern patterns:  Carolina (Yellow) Wulff, Tennessee (Lime) Wulff, Lime Wulff, Murray's™ Mr. Rapidan
Chocolate Thunderhead, Gray Thunderhead, Olive Thunderhead, Corey's Calf Tail, Rattler
Catskill Wulff, Minonipi Wulff, Ausable Wulff, Ausable Wulff Waterwisp, Water Walker (unique parachute style)

Western patterns:  Montana Wulff, Bumble Wulff (Western), H & L Variant (President Ike’s go-to fly), Reverend Lang, Colorado Captain, Flourescent Red Kolzer, Orange Kolzer, Yellow Kolzer

Specific suggestive patterns:  Green Drake Wulff, Brown Drake Wulff, Baetis Wulff

Humpy series:  Royal Humpy, Red Humpy, Adams Humpy, Olive Humpy, Green Humpy, Yellow Humpy, Black Humpy, Trude Humpy, (Natural) Humpy, Orange Double Humpy, Yellow Double Humpy

Goofus Bug series:  Royal Goofus Bug, Yellow Goofus Bug, Adams Goofus Bug, Light Elk (Special) Goofus Bug, White (Special) Goofus Bug, Blonde Goofus Bug

Irresistible series:  Adams Irresistible, Female Adams Irresistible, Black Irresistible, Blue Dun Irresistible, Brown Irresistible, Light Ginger Irresistible, Yellow Irresistible (Dr. John Benbow’s go-to fly), White Irresistible, Irresistible Waterwisp, Rat Face McDougal

Carolina (Yellow) Wulff

Hook : Dry Fly, 1x long, size  10, 12, 14, 16, Tiemco 100 or equivalent
Thread : 8/0 Uni or equivalent in Black  
Tail : Golden Pheasant Tippet
Body : Peacock Herl and Yellow floss
Wing : Calf Tail
Hackle : Coachman Brown rooster

Directions :

  1. Wrap thread one third back from eye, starting one to two eye lengths from eye, let bobbin hang
  2. Select calf tail hair and cut.  Clean underfur thoroughly and stack in hair stacker.  Tap several times and remove with right hand, pinching the tips between the index finger and thumb, maintain alignment.  Place calf tail on top of the hook, with the length to be tied in, about the same length as the hook shank.  Wrap softly at the one third back mark and release the grip with the right hand.  The wraps should be very close together working toward the hook bend.  This is only to position and judge the height of the wings.  Once you are happy with the wings, tie in firmly and trim the hair making a diagonal cut.  Now the calf tail can be secured by binding the diagonal with firm wraps.  Advance the thread immediately forward of the hair and lifting the bundle of hair on the top of the shank with your left hand, pull the thread against the base of the tie in, on top of the shank and pull the thread away and toward the hook bend.  When you pull the thread in a straight and parallel (to the hook shank) fashion the hair will stand straight up.  Make several turns immediately in front of the hair.  Take the thread and divide the upright hair clump into two fairly even sections.  Use a figure eight wrap to divide and shape the wings.  Once secure take the thread to behind the diagonal cut of the hair (the hair on top of the hook should be pretty well covered by thread now) and let the bobbin hang
  3. Select six or eight golden pheasant tippets for the tail and tie in on top of the hook shank.  Length should be about the same as the hook shank.
  4. Select a peacock herl and tie in by the tip at the bend of the hook.  Make several tight and touching wraps to make the rearmost band of herl.  Secure with a couple of thread wraps and in open turns advance the herl to the wings.  Secure with one thread wrap and take the thread back to the rear herl band.  Let the bobbin hang.  With the yellow floss on another bobbin, use the black thread to tie it in immediately in front of the rear herl and then advance the black thread to the where the forward wrap of herl will begin.  If you do not have another bobbin, cut a length of floss (six or eight inches) and tie it in the same way.   Once the floss is secure and the black thread out of the way, begin wrapping the floss in overlapping turns to the spot where the herl will be added.  Tie in with black thread, trim excess and advance the bobbin to behind the wing. 
  5. Wrap the second herl about three wraps, leaving enough room for the hackle and secure.  Trim any excess and let the bobbin hang.
  6. Choose a Coachman brown rooster hackle with barbs about one and one half the width of the hook gape.  Expose about a one quarter inch of stem and tie in behind the wing, trimming any excess.  The hackle “shiny “ side should be facing the eye. Advance the thread to in front of the wing and let the bobbin hang.  Begin wrapping the hackle in tight and touching turns.  About three wraps behind the wing and three wraps in front.  Leaving sufficient room for the head, tie in and trim excess.  Form a head, and apply head cement.

- Tom Adams, Alen Baker
     

Picture
Fly of the Month 3.14 Rattler
 

The Rattler dry fly is a roughwater fly featured in Roger Lowe’s Fly Pattern Guide to the Great Smoky Mountains. Roger’s caption “The fly is designed to bring trout up in fast water; is easily seen because of the calf hair wing.” This fly pattern has similar features to the Adams Variant we recently presented yet it has a unique and very different capability as both an attractor and as a high-floating, suggestive fly pattern.

This is not a fly that we have ever found in a fly shop or in catalogs at least in recent times.

Rattler

The tail is Golden Pheasant tippets rather than hackle fibers which is a pronounced Southern Appalachian characteristic. If you look at a good number of the other Southern Appalachian dry fly recipes you will find that constructing the tail from Golden Pheasant tippets is a very common characteristic.

Note that beyond the classic use of the Golden Pheasant tippet as for a tail on a good number of Southern Appalachian fly patterns, palmering hackle is also typically used to create a high floating body.

Much like the Adams Variant, the mix of brown and grizzly hackle is widely used for the mimic of the colors of many insects.

The origin of the Rattler has been lost in time. No one knows for sure of its originator or how the design came about. The understanding that many local guides and anglers have is that the Rattler was created based on a large floating fly used on the Ausable in Michigan to imitate the Hex spinner fall in the late evening. The design is not a spinner yet the fly pattern may be fished into the darkness of the late evening where legal to do to.


Another story about the name Rattler is that an angler using the Rattler must be cocked and ready to set the hook like a rattle snake or “rattler” ready to strike.

Fish the rattler in the roughest waters on the stream. It was intended and designed to survive the heaviest dunking possible. The white calf wings make the fly patter highly visible. Both the palmering and the hair-winged construction provide a great deal of buoyancy and yet a high quality of imitativeness of a pronounced aquatic insect struggle on the surface.

The Rattler is fished much like a Wulff pattern. The palmered grizzly hackle adds huge amounts of float capabilities that hold up well in roughwater. The Rattler is a “go to fly” on wild waters where the cascades and falls contain rising rainbow or brown trout.

Fly of the Month 4.14 Rattler


……recipe and instructions…….


- Tom Adams, Alen Baker


Picture
 Fly of the Month 10.12 Thunderhead

It looks like a Wulff pattern but it is an original Southern Appalachian fly pattern developed by Fred Hall who lived in Bryson City, North Carolina. Fred and Allene Hall tied flies as part of making a living and sold them locally to sporting goods stores in the area in the 1950s. 

Thunderhead

The Thunderhead was created as the ideal dry fly for our freestone, pocket water streams in and around the Smokies. This fly is a great floater pattern. The pattern is tied exactly like any Wulff pattern that utilizes calf hair for upright and divided wings. After researching this fly as much as possible, I was not able to confirm whether this fly pattern actually pre-dates the world renown Wulff series or not. It was certainly utilized in the Smokies as far back as the late-1940s by our well known Tarheel fly fishermen like Mark Cathy and Cap Wiese. Jim Casada said “I wouldn’t be at all surprised if the Thunderhead was in use before the Wulff patterns. Certainly mountain folks were using what they called a Hair-Wing Royal Coachman long before the name Royal Wulff came along.”
 
Jim Casada believes the name of this fly comes from the notion that the calf hair appears “to resemble a big cloud formation rolling up in an afternoon on a hot summer’s day.” However, I find it most interesting that there is a ThunderheadMountain on the Tennesseeside of the Smokies and I have often wondered if an ole local angler fished a stream coming off Thunderhead Mountainand named the fly for the mountain. Again, according to Jim Casada who knew Fred Hall fairly well says “Fred would probably not have gone that far afield geographically for a name.” Well, it’s just a thought.
 
Jim Casada includes this fly in his Smoky Mountain Fly Box as “a traditional mountain favorite.” The fly was included in a sold-out poster of Southern Appalachian Fly Patterns by Vic Venters published by the North Carolina Wildlife Resources Commission. Roger Lowe includes the fly in his Fly  Pattern Guide to the Smoky Mountains as two patterns, with a gray body and with a chocolate body. The chocolate body is a favorite on Tennesseestreams.
 
I find this pattern to be relatively easy to tie but it can be purchased in Size 12 or Size 14 at several places along the way to Appletree. I have actually purchased a dark olive body version as well. I have found no research on the dark olive version short of the fact that some of our “ole timers” still tie these flies in three different body colors today – gray, chocolate, black and dark olive! They are appropriately labeled as follows:

Thunderhead (original gray body version)
Chocolate Thunderhead
Black Thunderhead
Dark Olive Thunderhead
 
I fished the Thunderhead (the original gray body version) last spring at Appletree on a small wild stream in the area and caught and good number of wild rainbow trout including a very nice, hard fighting 14 inch rainbow. Now that is a trout worth bragging about in a wild stream. A Wulff pattern would probably have worked equally well, but the feeling of confidence with a proven local fly pattern is hard to beat.   felt the heritage of local fly fishing we should all be proud of as North Carolinians.
 
While preparing this article, I fished the Thunderhead on a wild stream in the Wilson Creek area in late-August – a time when water temperatures tend to put the trout down due to low oxygen levels. I had a great early morning trek up this wild stream catching and releasing a total of 29 rainbows, many of these bows were small. However I caught and released four that were 8 inches, three that were 10 inches and one that was 12 inches. That’s a fine 3-4 hours experience on a hot summer day.
 
A special thanks to Jim Casada, Jim Dean and Roger Lowe for sharing their knowledge about the Thunderhead fly pattern. Tom and I plan to research and share more local or traditional Southern Appalachian fly patterns in the future. If you know of a pattern, let us know about it.
 
 Fly of the Month 10.12 Thunderhead

Hook:  Dry Fly, Tiemco 100 or equivalent, Size: 10, 12, 14, 16, 18
Thread:  Black Uni 8/0 or equivalent
Tail:  Blend of brown and grizzly spade hackle
Wing:  White Calf tail
Abdomen:  Grey dubbing
Hackle:  Coachman Brown and Grizzly dry rooster hackle

Directions:
 
1)     Wrap thread starting two eye lengths from the eye to the hook bend above the hook point. Let the bobbin hang. Select a spade hackle ( this is the wide body feather, which on today’s capes is along the outside ) from a Coachman Brown and a Grizzly cape. Holding the tip in one hand, gently stroke back the barbs so they are at right angle to the stem. Use fingertips and select five or six barbs.  Hold by their tips and pull away from the stem. This will keep the tips even. Select the other color spade hackle (which is already prepped and at right angles) and overlay the first with tips matching and pull the five or six barbs from the second color.  Blend the two colors by rolling between your fingertips. Do your best to keep the tips aligned. Tie in the spade hackle at the hook bend with two or three light wraps and check the length. The tail should be one and one half the length of the shaft. Once you are happy with the length make one or two wraps to secure, trim the curled ends from the stem and wrap with tight, touching wraps forward to about the two thirds mark of the hook shaft.  Let the bobbin hang.
 
2)     Select calf tail fibers, trim from the tail and align with a stacker. Tie these in where the bobbin is hanging allowing for the height to be about one and one half the size of the hook gap. When tying the calf in, make sure you keep the back section (the part behind what will be upright) pinched tight and on top of the hook shaft.  After three or four tight wraps for positioning, bring the thread forward of the tie in and under the calf.  By pulling parallel to the hook shaft and toward the hook bend the calf will stand straight up. Make three or four wraps directly in front of the calf to maintain the upright position. Use your thumbnail to push the calf against the tie in point and it will be easy to  divide into two even wings.  Hold the wing closest to you with one hand and take the thread over the middle dividing the wings further. The thread will be on the opposite side of the hook at this point. Bring the thread around the wing and back across the middle further defining the divide. Make an “x” for three or four wraps and take the thread in tight wraps back to the hook bend above the barb. Let the bobbin hang.
 
3)     Choose a medium grey dub. Muskrat or Adams in color. Add a small amount to waxed thread and spin on the thread very tightly. Make touching, slightly overlapping wraps forward to within one or two eye lengths of the wing. Most tiers will use too much dubbing. Think of it as doubling the thickness of the thread and you will not have too much.  Let the bobbin hang.
 
4)     Select one Brown rooster dry hackle and one Grizzly. They should be close to matching as possible. When selecting it will also help with the tie in if the stems are about the same thickness. They will tie in with the shiny side forward, toward the eye. Strip an eighth of an inch from each and tie in, one on top of the other so that the first wrap is behind the wing and in front of the dub. Advance the thread to the eye and let the bobbin hang.

5)     Wrap the hackles forward one at a time. Two or three wraps behind the eye and the same in front. When wrapping the first color leave a small space between wraps to allow for the second color.  Do not crowd the eye. Make a wrap close to the back of the wing on the first color and close to the front of the wing with the second color.  After the first is advanced toward the eye stop short about two eyelengths and bind in with the thread. Clip the excess hackle as close to the thread as possible.  Wrap the second color forward and wiggle it slightly as you wrap to squeeze it in between the first. Tie it off one turn in front of the first color and clip off the excess. Form a small thread head. Whip finish. Add cement.  Enjoy a Southern Classic Dry fly.

 Fly of the Month 10.12 Thunderhead - Tom Adams, Alen Baker

Picture
Fly of the Month 08.11 Yellow Humpy

This “fly of the month” represents the latest in the Tim Wilhelm/Tom Adams series. How would you like to carry in your fly box and fly that represents a caddis, green drake, stonefly, "hoppers," beetles, and, in small sizes, blue-winged olives or even midges? If you are carrying a Humpy you are and by varying the colors you have all sort of magic in your fly box although the most common color
is yellow. Besides representing several different insects it also goes by several names including Goofus Bug and Horner Deer Hair Fly.

In his article "Goofus Bug Evolution," for American Angler (Spring, 1990) Pat Barnes credits this pattern to Keith Kenyon. Kenyon, a Montana guide and tier, secretly created it in 1944 for the Firehole River, says Pat. The pattern's effectiveness leaked out and requests for that "goofy deer hair fly" bombarded Pat and Sig in their West Yellowstone shop after it opened in 1946.

Thus the name "Goofus Bug" was adopted and its popularity in Montana rocketed. When Dan Bailey began offering the Goofus Bug in the early 1950s it was labeled "The Poor Man's Wulff." Bailey gets credit for starting the Blond Goofus Bug, tied from white or bleached deer body hair. This also made its appearance in his mail order catalogue in the early 1950s. The name Humpy seems to originate in Wyoming where Jack Dennis, besides creating the Royal Humpy variation, began commercially tying the Humpy with Elk hair. Whatever your name of choice, it is a good producer, floats well and is well suited for using with a dropper.

Fly of the Month 08.11 Yellow Humpy

Hook: Dry Fly, standard length, Tiemco 100 or equivalent, Size: 10, 12, 14, 16
Thread: 8/0 Uni or equivalent
Abdomen: Floss, Stretch Floss, Thread, Dubbing- Yellow, Red, Green, Tan. Orange
Wingcase: Deer Body hair, Elk Body hair – natural or bleached
Wing: Elk body hair, natural , deer body hair, kip or calf tail
Tail: Moose body hair, deer hair, elk hair
Hackle: Rooster badger and brown
Note: There are as many variations on the tying details for the body and wings as any fly I know. This is one of the several methods of tying and is one of the easier methods. The photos illustrate some of the optional methods.

Directions :

1)    Wrap body with tight, touching wraps beginning about three eyelengths from the eye and stopping at the bend above the barb. Let the bobbin hang.

2)    Select several moose hair, clean and stack. You may want to trim some, just for handling purposes. Set aligned hair on top of the hook and gently secure with several light wraps and verify the length. Once satisfied with the length, which should be about the length of the hook shaft, tie down softly for the first several wraps from the back and increase pressure as you advance toward the eye. This will avoid the hair standing or splaying. Trim the excess and bring the bobbin back to the bend. Let the bobbin hang.

3)    Select a medium size clump of deer/elk hair and clean the underfur thoroughly. Stack and remove with your left hand (for right handed tyers). The length should be about one and one half the length of the shaft. Tie in softly, keeping the hair pinched firmly with your left hand, with the tips facing away from the eye at the point directly above the hook barb. Make certain the hair stays on top of the shaft as you tie in by advancing forward, adding a little more pressure along the way. Stop about one third back from the eye. Do not crowd the eye, there is a lot more to go. Wrap the thread back to the tie in tight, touching wraps and let the bobbin hang.

4)    The underbody can be various materials. Floss, Stretch Floss, Tying thread, or even dubbing. Tie the floss in as far back as possible, trim the
 excess and advance the thread to about one third back of the eye. Wrap the floss forward to the thread and tie off. Let the bobbin hang.

5. Using your left hand, pinch the deer hair and pull over the hook shank and tie in where you left the bobbin. Make sure by pinching the deer hair stays on top and aligned as possible. Secure with thread wraps. Using thread, raise the deer hair to upright by advancing the thread to immediately in front and pulling the thread toward the hook bend.

6. Split the deer hair in to two wings with x-wraps.

7. Tie in rooster hackle and wrap three turns behind the wings and four in front and form a head. Whip finish and dress the head.

Other fly patterns in this series include: Black Humpy, Green Humpy, Orange Humpy and Red Humpy

 - Tom Adams, Tim Wilhelm


Proudly powered by Weebly