Fly of the Month 09.21 - CDC Biot Comparadun
We thought a little more realistic looking, highly productive fly pattern may be needed for the fall and winter hatches of Blue-Winged Olive or BWO and other may flies. Utilizing CDC feather fibers as well as turkey or goose biots may be viewed as more advanced, but with a little practice, these materials are actually as easy to tie with as deer body hair and dubbing.
CDC feathers and puffs have a “vein-like” structure and natural oils that provide buoyancy. The buoyancy is readily maintained by using a drying powder like Frog’s Fanny or Dry Magic to restore the material once soaked with fish slime. CDC can be highly visible on the water surface depending on the contrast between the CDC color, the lighting and the water conditions.
A dubbed body provides color and translucency. A dyed quill body provides durability, color and the appearance of ribbing. A dyed turkey or goose biot provides durability, color, the appearance of ribbing and a more realistic body contour. All three methods of tying a body to “match the hatch” are highly effective depending on the present selectivity of the trout.
The Comparadun style fly pattern has no hackle and depends on the buoyancy of the 180-degree arching or splayed wing to ride flush in the surface film, presenting a well-defined profile of both body and wing, exposing the entire body to the trout - an excellent flat-water pattern.
The Comparadun is comparable to a parachute style fly pattern but without the circle of hackle fibers that provide the buoyance which gives a “rough appearance” of legs. The Comparadun is so effective, one may conclude that imitating legs may be over-rated. Keep in mind that Comparadun and parachute fly patterns are not designed for “rough water” conditions. Yet the deer-hair wing or in this case the CDC wing gives this fly good buoyancy, and it can hold its own in choppy waters as well.
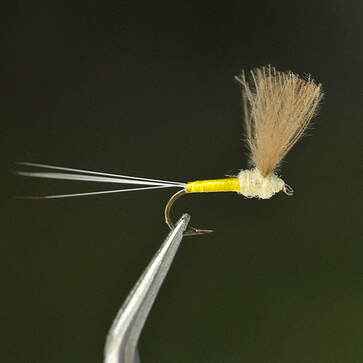
CDC Biot Comparadun
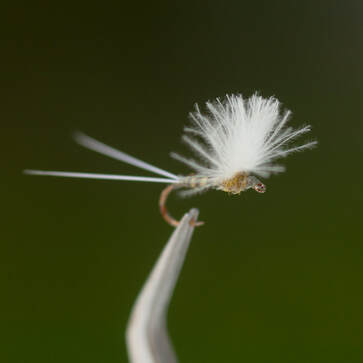
BWO CDC Biot Comparadun Sulphur
The two most useful mayfly fly patterns needed to “match the hatch” in our area are the Blue-Winged Olive and the Sulphur, especially for the Tennessee tailraces. Actually, BWOs appear on rainy or cloudy days for most of the year on many of our Delayed Harvest Streams. A close third would be the Green Drake for a short period on our larger waters such as the Davidson River.
Bob Nastasi one of the authors of Hatches and originators of the Comparadun created this fly pattern in the 1960s. The Comparadun pattern is really a variation of Fran Betters' Haystack fly pattern. Both patterns work equally as well. Tying the CDC wing on the Comparadun requires a technique that helps make the body more slender on smaller fly patterns and keeps the wing upright and slightly slanted back which is more like the natural mayfly duns.
CDC Biot Comparadun
BWO CDC Biot Comparadun Sulphur
Fly of the Month 09.21
Tom Adams and Alen Baker
Recipe:
CDC Biot Comparadun
Hook: Standard Dry, Size 12, 14, 16, 18, 20
Thread: Yellow 8/0 or equivalent to match pattern colors
Tail: Microfibetts Light Dun or equivalent to match pattern colors or CDL
Wing: CDC Light Brown or equivalent to match pattern colors Body: Turkey or Goose Biot
in Sulphur Yellow or equivalent to match pattern colors
NOTE: This pattern is adaptable to most dry fly imitations by changing some or all of
the material and thread colors
Directions :
1. Debarb and mount the hook in the vise and start the thread wraps at the
one half mark but when you are starting the thread pull an extra inch and
a half or so and bind on top of the hook shank with the trailing length
extending past the hook bend. This will be used later so do not trim the
waste end. Take the thread to the middle of the shank. Let the bobbin
hang.
2. Select four microfibbets and keep the tips aligned when removing them
from the bundle. Measure the length to about one and one half the length
of the shank. Tie in the fibetts on top of the hook shank and begin tying in
at the midpoint of the shank going toward the bend. Stop one or two turns
from the bend and take the thread under the microfibetts and back toward
the eye. Pulling up to lift the microfibetts up from the bend. Pull the loose
end of thread that you put in place at the beginning forward and through
the microfibetts splitting the four into two and two. Keeping mild pressure
on the divider thread make tight turns of the bobbin thread trapping the
loose thread on top of the hook shank as it splits the fibbets. Trim away
any waste thread and make tight turns to the bend. Let the bobbin hang.
3. Select a turkey biot and remove from the stem. Tie the tip of the biot with
the notch facing the bend. This will make for smooth wraps of biot. If you
want the ridges simply tie in the opposite way. Once the biot is secure,
advance the thread to one third back from the eye. Let the bobbin hang.
4. Using hackle pliers, begin tight and slightly overlapping turns of the biot to
the thread and secure with three turns of thread. Two behind and one in
front of the biot. Trim away the waste biot and make two or three more
turns to clean up and secure the biot. Let the bobbin hang.
5. Select a CDC feather looking for a nice and plentiful tip in particular.
Stroke away the fuzzy low feathers if needed. Stoke the remainder of the
feather forward to align the barbs gathering with a pinch. Use the pinched
barbs to measure the wing. A minimum of a shank length. This will trim
to exact later so long is better than short. Tie in the cdc with the pinch
method on top of the hook shank with three turns behind. Make two turns
in front while lifting the cdc to vertical. The cdc behind the lift should
remain on top of the hook shank as you trim away the waste. If needed,
spread the stubs of the trimmed cdc from left to right on top of the shank.
Do not allow them to spin over to the bottom. This will make fanning the
wing much easier and accurate. Let the bobbin hang.
6. Select a small amount of dubbing and form a very thin noodle and begin
the dub at the eye and then behind the wing ending at the eye.
7. Whip finish and trim the waste. Spread the wing into a 180 degree fan as
possible. Trim the wing to the appropriate height, about one and one half of
the hook gape.


