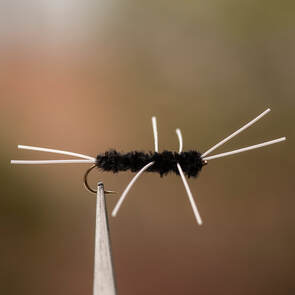
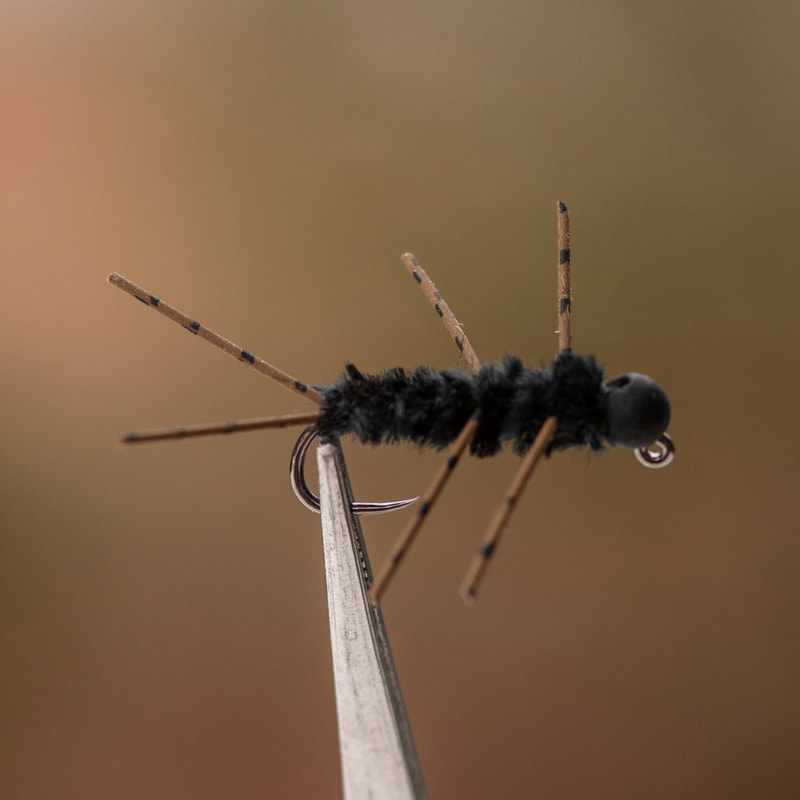
Girdle Bug
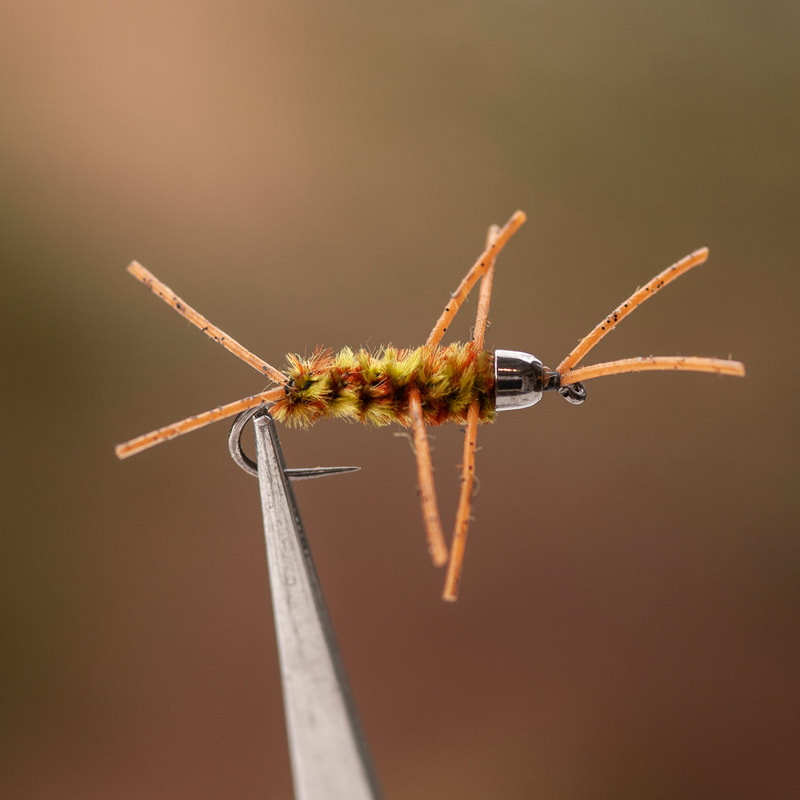
Olive Cone Head Rubberlegs
|
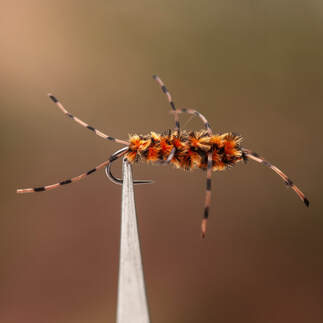
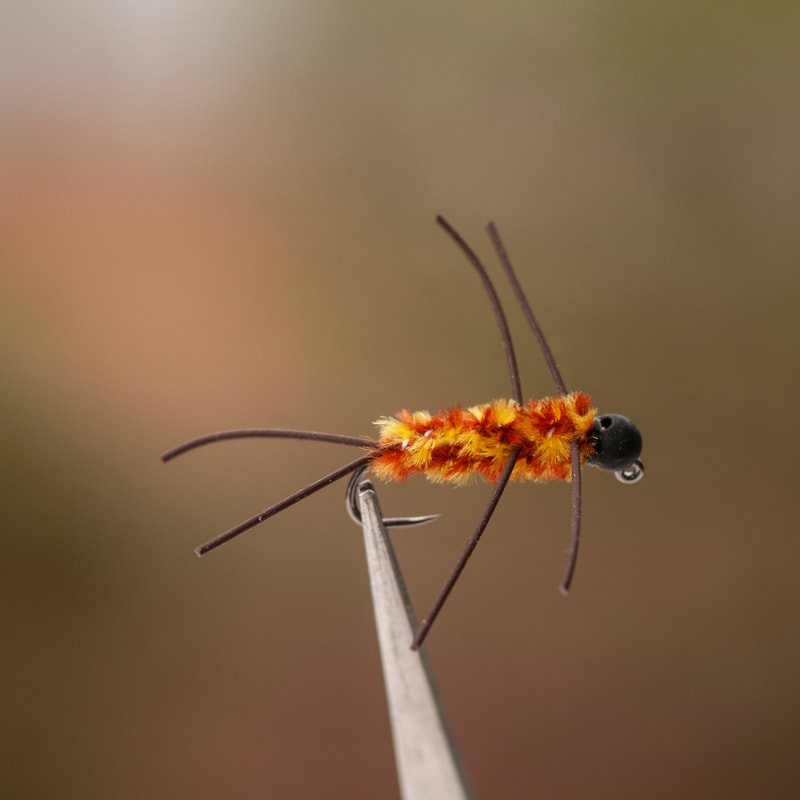
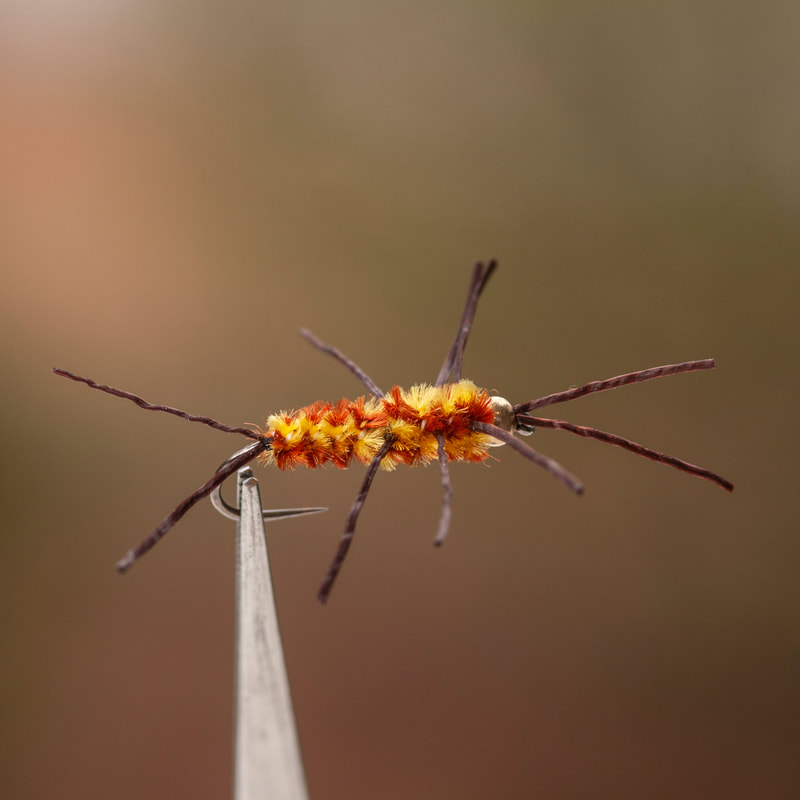
Sexy Stone
Jig Head Black Stone
|
Jig Head Golden Stone
Bead Head Golden Stone Flexi Legs
|
Fly of the Month 03.21 - Girdle Bug
A simple, highly productive fly is what every angler--fly tier has in mind when they sit down to tie a few fly patterns in a rush. By far, the Pheasant Tail Nymph fits this category, especially when it is tied using only one material (two when using peacock herl as the thorax), a hook, thread and pheasant tail barbs. There are a number of other simple fly patterns, but a simple, highly productive fly pattern that comes to mind next is the Girdle Bug.
Girdle Bug
Back in the 1930s, Frank McGinnis from Anaconda, Montana tied a big nymph or wet fly he thought would imitate a crane fly larva, a stonefly nymph or maybe a hellgrammite hoping to attract big trout hanging in the bottom of pools on the Big Hole River. He simply used black or coffee Chenille and the white elastic rubber from a women’s girdle to give the fly action and for a nice “springee forked tail, feelers and legs.” He named the fly the McGinnis Rubber Legs. But his angling friends called it the Girdle Bug. Of course, the Girdle Bug named stuck as the fly pattern became a very popular nymph or wet attractor, well known for big fish strikes, including trout, steelhead and bass.
Our own Steve Yates of Fayetteville, NC ties this original Girdle Bug with white rubber legs. However, the true Southern Appalachian version of the Girdle Bug was originated by Roger Lowe in the 1980s for use on the Tuckasegee River. Roger Lowe of Cashiers, NC ties his Girdle Bug with yellow legs, taking the advantage of the attractiveness of the color yellow, well known as a vital element of many Southern Appalachian fly patterns.
Of commercial origin, an all black version (black Chenille and black rubber legs) is named the Ugly Bug Nymph. Most likely there are other commercially named versions of the Girdle Bug as well.
As new synthetic materials became available, Pat Bennet of Island Park, Idaho in 1995 tied the Girdle Bug with True Olive Super Floss. It was marketed as Pat’s Rubber Legs or in general as a Rubber Legged Stone. Subsequently, with a few color changes and material changes the Girdle Bug has evolved. The Tungsten Girdle Bug Jig was developed for Fly Fishing Competitions as a Euro Nymph utilizing a jig hook for weight and hook-up positioning. Using MFC Sexy Legs material for the legs, the Rubber Legged Stone or Sexy Stone was developed for Fly Fishing Competitions as a Euro Nymph as well. And, the latest in Sexy Stone innovation is a pink Chenille body - and it is highly productive - explain this one!
Regardless, the Girdle Bug, Rubber Legs, Rubber Legged Stone, Sexy Stone or Ugly Bug Nymph is a simple, highly productive fly pattern that uses only two materials - Chenille and some form of “springee forked tail, feelers and legs.” The tyer may control the amount of weight applied by adding no weight, wrapping non-toxic lead substitute wire as an underbody, using a bead head, tungsten bead head or even a heavy cone head. The amount of weight determines how the fly pattern is fished - from a shallow stream drift, to faster free moving drifts in rapids, to a deep bottom sink. The tyer may control positioning using a jig hook for a hook-up position. And of course, the tyer may control the color via material selection - the color combinations are endless and yes, includes pink.
Girdle Bug
Rubber Legs
Rubber Legged Stone
Sexy Stone
Ugly Bug Nymph
Fly of the Month 03.21
Tom Adams and Alen Baker
Girdle Bug
Hook : Streamer TMC 300 or equivalent, size 12,10,8,6,4
Thread : Black Uni 6/0
Tail: Round White Rubber legs, variants use Silicone legs, Flexi Floss legs, Sexy legs
Abdomen : Black Chenille variants use variegated chenille in olive, tabacco/black,coffee/black,yellow/brown
Legs and Antennae : White Round Rubber legs, variants use color of choice
Weight : Non lead wraps, cone head or bead head
NOTE: There are multiple methods of attaching the legs to the hook and use the one you are most happy with. The easiest method I know is not illustrated online that I am aware of. What I do is put the antenna on first. Slide the bead out of the way and have the thread at two or three eyelengths from the eye. Do not overwrap as it will impeded the bead/cone from moving back into place. Choose a leg that is about the shank length and holding the leg in your left hand, bring it up and under the hook shank where you have placed the thread and the bobbin is hanging. Lifting the leg up and on top of the hook shank will trap it (slightly) with pressure from the thread and bobbin. Immediately make a cross up and over the top of the hook and leg while holding the leg in place with your left hand. Make two x wraps to secure the leg on top of the hook shank. Whip finish and cut the thread. The bead/cone will push the antenna forward as you move it to the eye. The tailing is the same, but instead of the bead/cone making the final position of the tail you will need to pull the tail away from the eye ( after securing) and binding each side of the tail to each side of the hook shank using thread wraps. The other sets of legs will tie in the same without the need for special finishing on their direction. A few practice times and this is easy and non intimidating.
Directions :
- Debarb and mount the hook in the vise, attach the thread and advance to three or four turns from the eye let the bobbin hang.
- Using an appropriate size non lead wrap make about fifteen turns before cutting away the waste. Position the non lead about three eye lengths from the eye. Use several wraps of thread to form a small thread dam at the front and back of the non lead wraps in order to secure it in place. Advance the thread to about three eye lengths from the bend and let the bobbin hang. If you are using cone or bead heads, place the head on first before mounting and add the non lead wraps, sliding up to or into head.
- Select a white rubber leg that has been trimmed to about two inches and tie in on the straight part of the shank immediately ahead of the bend. Use an “x” wrap to secure the legs on top of the shank. Wrap the two legs from the tie in toward the bend in tight and touching turns making sure the binding is trapping them on either side of the hook shank. Once firmly secured let the bobbin hang.
- Select a three inch piece of chenille and using your thumbnail and pinching the end of the chenille, strip about one quarter inch of the chenille to expose the cotton center. Tie in by this cotton string center and move the chenille out of the way momentarily.
- Advance the thread to about the halfway mark and let the bobbin hang. Secure another rubber leg and tie in at this point. Advance the thread to halfway to the eye and tie in another rubber leg. Advance the thread and tie in the antennae rubber leg just as you did the tails. Let the bobbin hang. The legs should all be a right angle to the hook shank and can be adjusted after everything else is completed.
- Begin wrapping the chenille forward in tight and touching turns minding to not trap any legs. Stop at the hook eye and tie in securely. Make a several turn whip finish and trim away the waste chenille and thread.
- Trim the tail, antennae and legs to the length desired and even up the length of all.