Fly of the Month 06.21 - Little River Ant
Bo Cash insists that the ant is the best all-round terrestrial to imitate on the trout stream. Although most terrestrials are dormant during the cold winter months, Ants emerge in early-spring and continue to be active until late-fall. Ants are literally available as a food source for trout longer than other terrestrials. Ants are found all over trees and brushes. Thus, ants are readily blown into the trout stream. Ants are an easy insect to imitate. Ants have a distinct, wasp-like silhouette of a larger, longer gasper or abdomen and a smaller, shorter thorax/head separated by a very thin body connection.
There are hundreds of Ant fly patterns. Ants are typically imitated as a (wingless) ant or a (winged) flying ant in the colors of black or red or two-tone. The red colored ants may be amber, brown, cinnamon or a burnt red. Regardless of color, the silhouette appears to be more important to the trout. Ant fly patterns may be tied as large as size 8 and as small as size 26, however, the more practical range is size 12 to size 20.
The one distinct species of large ants is the black carpenter ant which are typically a size 8 to size 12. There are a few rare species of ants that are cream, gray and even yellowish in color. Two other species of insects that have the ant-like silhouette are the termite with a much longer abdomen and the velvet ant which is actually a wingless wasp that is a very bright red, in which some have dark rings and all have a fuzziness to their bright red bodies. Thus, depending on color and size, an ant fly pattern may imitate a carpenter ant, fire ant, garden ant, mound ant, picnic ant, army ant, termite, velvet ant, etc.
One simple tying hint - tie all your ant patterns with wings, then if you do not want wings at streamside, just “nip” them off - thus the flying ant fly pattern is a great conversion ant fly pattern.
Little River Ant
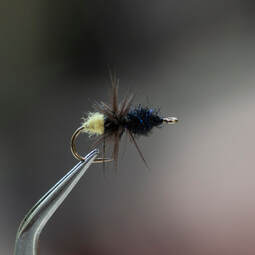
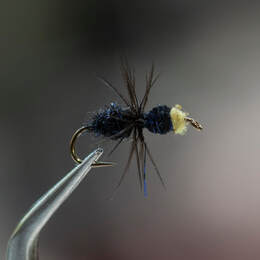
Our local streams with overhanging banks and overhanging vegetation are the best candidates for using an ant fly pattern. The Little River Ant is a Southern Appalachians fly pattern that is believed to have been originated in Tennessee by Kirk Jenkins or possibly by Jack Shuttle and first used on the Little River within and around the Great Smoky Mountains National Park. This unusual, unique and otherwise dark ant fly pattern is tied with a bright yellow tag, which according to Walter Babb, is believed to be a piece of food being carried by the ant rather than an egg sac - only the queen ant carries an egg sac. We are uncertain if the designers intent was to imitate a piece of food or simply put a hi-vis tag in place. The yellow spot (which is either tied with bright foam or yellow dubbing or yellow floss) is certainly an attractor for trout. The tag certainly helps make this fly pattern much easier to see when floatant is applied for a surface fly.
Since the Little River Ant is a wet, soft hackle fly pattern, it is highly effective as a “go to” dropper fly. However, with floatant liberally applied, this ant pattern can also be twitched on the surface as a struggling ant, easily seen by the angler. Note that with the tag being a piece of food, the fly pattern is tied in reverse with the abdomen or larger body part at the hook eye and the thorax/head or smaller body part at the bend of the hook.
Note: There are 4 orientations of tying a fly pattern on a hook - (1) standard - tail at the bend and the hook down, (2) reverse - head at the bend and the hook down, (3) silhouette or hook-up - tail at the bend and the hook up (example, used for a crayfish fly pattern), and (4) waterwisp - tail at the eye and the hook up.
Little River Ant
Fly of the Month 06.21
Tom Adams and Alen Baker
Little River Ant Tying Instructions
Hook: Standard Dry, Size 12, 14, 16,18
Thread: Black 8/0 or equivalent
Wing: Cut wing white saddle feather
or white hackle tips, upright, divided
Body: Black wool dubbing with yellow dubbing
Hackle: Black Hen Hackle
Directions :
- Debarb and mount the hook in the vise and start the thread wraps at the eye. Make several wraps toward the bend to about the one half mark. Let the bobbin hang.
- Dub the thread with an ample amount of black dubbing and begin making wrpa in tight touching and overlapping turns. This will be the abdomen on the normal aspect tie. Form an egg shape to resemble the natural. Add dubbing as needed and I would not try having all the needed dubbing at the beginning of dub wraps. It will be larger than the thorax. Once you are happy with the shape let the bobbin hang immediately in front of the thorax.
- Select a black hen hackle and strip away the fuzzy barbs from the base area. Stroke back the remaining barbs while keeping a small amount at the tip of the feather. Trim the short barbs leaving a small triangle to tie in with. Secure the triangle with one or two thread wraps immediately in front of the abdomen. Wrap the hen hackle at right angles to the hook shank while stroke the barbs gently to separate them and avoid unnecessary tangles. Once you have made one and one half to two turns, secure the hackle with three wraps of thread. Trim the waste feather and stem. Let the bobbin hang immediately in front of the hackle.
- Dub the thread and form the thorax with black dub like the abdomen only smaller. Leave sufficient space for the yellow dub.
- Dub the egg or food particle using yellow or cream dub and form a small oval shape in front of the thorax.
- Whip finish to complete.


