Fly of the Month 08.19
Modern fly pattern design for a beetle is often based on utilizing some type of foam material. However, there was a time when there were no foam materials available (foam was not even invented yet) and fly tyers imitated beetles with a bulky dark body of wool yarn, peacock herl, dyed black ostrich herl, or black Chenille and primarily with cock-y-bondhu feathers, then later with simply brown or black hen feathers as a hackle.
The Red Tag fly pattern is a classic example of a beetle imitation for trout and grayling from the north country of England. The Red Tag is still in use today in Australia and Tasmania as a beetle imitation. But this article is about the beetle imitation that once used the cock-y-bondhu feather in the past. Subtle colorations of chicken feathers made all the difference to our ancestral fly-fishers who believed that natures colors meant the difference in fly pattern performance. For the most part, dying chicken feathers was a practice adopted more so in the late-1800s, prior to that, natural was the in thing.
Note: The cock-y-bondhu may be found spelled many ways. We have used the spelling which appears to be the one most commonly used today.
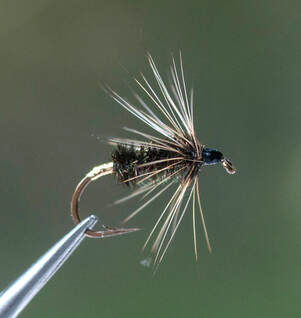
Cock-Y-Bondhu Fly
This fly was tied originally to represent a small red and black beetle found in Wales and Scotland. While the actual beetle is limited to this area, the fly has gained a wide popularity and it is tied as follows: tail, none; body, green peacock herl twisted on a scarlet silk thread together with black ostrich herl and wound round the shank of the hook; hackle, cock-y-bondhu, or furnace, and if either of these is not available, use two hackles, a red and a black; wing, none.
A cock-y-bondhu hackle has a black center or list with red, reddish-brown or brown outer fibers and tipped with black. The furnace is essentially the same hackle except for the black outer edge. Essentially, this fly pattern is considered a floating fly as opposed to a dry fly. A floating fly is a wet fly pattern that is greased sufficiently to float for a while before eventually sinking. The cock-y-bondhu is not only a wet fly but is considered a soft hackle fly which provides far more motion when drifted and tugged along in the current and in the water column.
To fish the cock-y-bondhu, apply a generous amount of floatant and allow the fly to dry, then fly cast up and across the current and allow the fly to drift naturally downstream in the current, mending as necessary. At the point of the tail-out, allow the fly to sink and retrieve with a repeating tug and slack motion, each ever closer until the fly is fully retrieved and ready for another presentation cycle with a change of the drift lane.
Cock-Y-Bondhu
Fly of the Month 08.19
Tom Adams and Alen Baker
References:
Smedley, Harold Hinsdill. Fly Patterns and Their Origins, 1944
Modern fly pattern design for a beetle is often based on utilizing some type of foam material. However, there was a time when there were no foam materials available (foam was not even invented yet) and fly tyers imitated beetles with a bulky dark body of wool yarn, peacock herl, dyed black ostrich herl, or black Chenille and primarily with cock-y-bondhu feathers, then later with simply brown or black hen feathers as a hackle.
The Red Tag fly pattern is a classic example of a beetle imitation for trout and grayling from the north country of England. The Red Tag is still in use today in Australia and Tasmania as a beetle imitation. But this article is about the beetle imitation that once used the cock-y-bondhu feather in the past. Subtle colorations of chicken feathers made all the difference to our ancestral fly-fishers who believed that natures colors meant the difference in fly pattern performance. For the most part, dying chicken feathers was a practice adopted more so in the late-1800s, prior to that, natural was the in thing.
Note: The cock-y-bondhu may be found spelled many ways. We have used the spelling which appears to be the one most commonly used today.
Cock-Y-Bondhu Fly
This fly was tied originally to represent a small red and black beetle found in Wales and Scotland. While the actual beetle is limited to this area, the fly has gained a wide popularity and it is tied as follows: tail, none; body, green peacock herl twisted on a scarlet silk thread together with black ostrich herl and wound round the shank of the hook; hackle, cock-y-bondhu, or furnace, and if either of these is not available, use two hackles, a red and a black; wing, none.
A cock-y-bondhu hackle has a black center or list with red, reddish-brown or brown outer fibers and tipped with black. The furnace is essentially the same hackle except for the black outer edge. Essentially, this fly pattern is considered a floating fly as opposed to a dry fly. A floating fly is a wet fly pattern that is greased sufficiently to float for a while before eventually sinking. The cock-y-bondhu is not only a wet fly but is considered a soft hackle fly which provides far more motion when drifted and tugged along in the current and in the water column.
To fish the cock-y-bondhu, apply a generous amount of floatant and allow the fly to dry, then fly cast up and across the current and allow the fly to drift naturally downstream in the current, mending as necessary. At the point of the tail-out, allow the fly to sink and retrieve with a repeating tug and slack motion, each ever closer until the fly is fully retrieved and ready for another presentation cycle with a change of the drift lane.
Cock-Y-Bondhu
Fly of the Month 08.19
Tom Adams and Alen Baker
References:
Smedley, Harold Hinsdill. Fly Patterns and Their Origins, 1944
Cock-Y-Bondhu
Hook Tiemco 3769 or equivalent, size 10, 12,14
Thread Black Veevus 14/0
Tail Gold Mylar
Abdomen Peacock Herl
Thorax Peacock Herl
Hackle Cream Badger Rooster Hackle
1 Debarb and mount hook in vise. Start thread at the one third mark back from the eye. Let the bobbin hang.
2 Select two or three inches of mylar and cut the tie in end at a forty five degree angle. Tie in by this angled tip with the gold showing. Advance the thread to the hook bend while binding in the mylar. Return the thread in touching turns to the front one third mark and let the bobbin hang.
3Begin wrapping the mylar to several turns onto the hook bend and then return wrapping back over itself and advance to the the thread. Secure with the thread and cut mylar waste. Advance the thread to before the hook bend and let the bobbin hang.
4Select two or three peacock herl strands and trim away the tips. Tie in by the tips and advance the thread to three eyelengths back from the eye and let the bobbing hang.
5Begin wrapping the herl toward the eye in tight touching turns and continue to the thread. Leave room for the hackle wrap. Tie in and trim waste. Let the bobbin hang.
6Select a sized hackle, remove from the skin and remove about a quarter inch of barbs. This is after trimming the stem to even sized hackle barbs. Tie in by the tip immediately in front of the herl. Let the bobbin hang.
7Make one and one half wraps of hackle, stroking back the fibers as you wind and trap the stem against the hook shank with thread. Make two or three wraps of thread and cut away the waste hackle.
8Make several wraps of thread to form a head, whip finish and cut thread.