
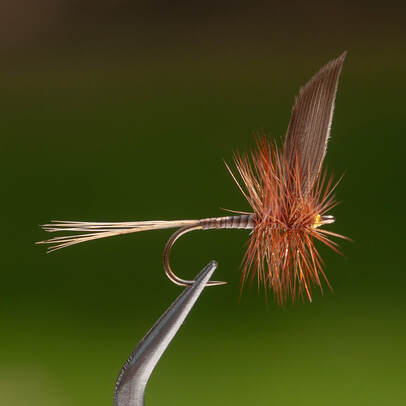
Ginger Quill dark FFI
|
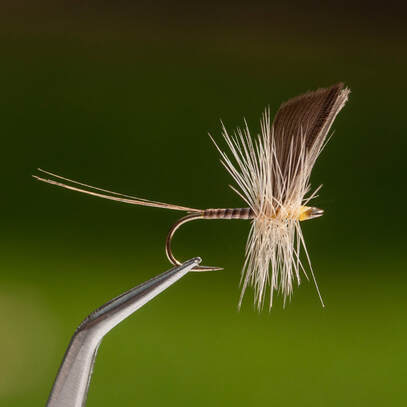
Ginger Quill light FFI
|
Fly of the Month 07.23 Ginger Quill
The “fly of the month” series for 2023 will celebrate the Fly Fishers International Fly Tying Group Fly Tying Skills Awards Program. Each month Tom and I will present one of the fly patterns used to evaluate a fly tyer’s skills toward a Bronze Level in the first six months, then one of the fly pattern used to evaluate a fly tyer’s skills toward a Silver Level in the later part of the year. The first fly pattern in the Silver Level series is a standard Catkill style dry fly. The Catskill style defines the standardized proportions used for dry, wet, nymph and stream fly patterns.
[Catskill] Ginger Quill
This fly pattern primarily imitates Mayflies Stenacron interpuctatum. Ginger quill also can be applied as a common name for the Light Cahill which belongs to the same genus Stenacron an that contains 21 different individual species. This is a major genus in the East and Midwest that produces hatches from mid-May until mid-June with stragglers present until mid-July.
The Ginger Quill belongs to a set of dry fly patterns incorporating feather quill material for the body construction. Over time, many variations have been popularized resulting in several slightly different material listings and proportion guidelines. Wings have been constructed from starling or mallard duck wing quills. Body quills have been used from stripped ginger hackle quills or stripped peacock eye herls. Different interpretations of the color ginger results in many variations based on local mayfly insect hues.
Tying the fly pattern for the Silver Level Submission
Visit the FFI website and navigate to the Fly Tying Group, then to the Silver Award Handbook pages. The website has excellent instructions as to how to tie and submit the required group of fly patterns to an FFI Silver Award Evaluator. The website includes a video presenting each step to tie the Ginger Quill. The handbook is easy to understand and follow. Tie three flies with consistency for the Silver Awards submission, then tie more for the fly box.
Fly of the Month 07.23
[Catskill] Ginger Quill
Hook: Mustad 94840 or TMC 100
Size: 12 or 14
Thread: Yellow 8/0 UNI-Thread or UTC 70 Denier
Wing: Natural Grey Mallard Wing Quills
(matched quill sections from the Mallard duck wing should be equal in width to the
gap of the hook. Wing length should be equal to the length of the hook shank)
Tail: Ginger hackle fibers (equal in length to the hook shank)
Body: Peacock herl stem, stripped
(formed from wraps of a stripped peacock herl stem. Underbody should not be visible
and not be tapered. Minimizing body taper may be difficult based on the herl stem
used to make the wraps. There should be no visible lump at the wing tie-in position)
Hackle: Ginger neck hackle
(1.5x times hook gap, short of the wing tips visible above the hackle, with 8-10 turns
of hackle distributed evenly behind and in front of and not crossing the wings)
Directions:
1a) Mount the hook in the vise jaws, attach thread in front of the ¼ shank position and wrap back towards the bend about 5 or 6 turns using flat turns.
1b) Twist the bobbin clockwise to make it into a rounded thread and wrap back to the wing tie-in position at the ¼ shank position. This provides a firmer foundation for the wing tie-down zone. Flatten the thread by spinning the bobbin counterclockwise.
2a) Cut a slip from the middle of each feather. Place the slips together. Prepare the wing slips by placing them back-to-back and even up the tips. Measure the width of the slips against the hook gap. Remove any fibers until the wings are equal to about three-fourths the width of the gap.
2b) Determine the tie-in position on the wings by using the hook shank as the measure for the wing height. Place the wings over the hook shank with tips forward and butts to the rear. Using a soft loop, mount the wings at the ¼ shank position. Pull upwards to begin the collapsing of the wing fibers. Make another loop and tighten again. Make a few more wraps to secure the wing butts and move thread to in front of the wings as you lift the wings upright. While still holding the wings upright, make several wraps in front to stand the wings up vertical. Trim the wing butt waste as close as possible to the tie-in position and wrap thread to the rear tail tie-in position using flat wraps.
3a) Prepare the ginger hackle fibers for the tail by stroking the hackle fibers out perpendicular to the hackle stem and strip of the fibers. The number of tail fibers will be proportionate to the size of the fly and the length of the tail should be the length of the hook shank. Tie in the tail at the rearmost position of the straight section of the hook shank - usually above the point of the barb. The tail waste should be bound along the top of the hook shank up to the wing butts. You are using these waste hackle fibers to form a flat section to minimize or eliminate a body taper. Trim tail waste so the hackle stubs butt up against the wing butts.
3b) Select a stripped peacock herl for the body. These stems will be tapered. The stripped herl will give the body a segmented look. You want the segments to appear wide enough after wrapping the body so you need to decide where on the peacock herl you will get a section that is wide enough but not tapering too much in thickness. Laying the peacock stem on a hard surface and running the back side of your scissors down the stem may flatten the stem and remove most of the thickness taper.
3c) Attach the peacock herl stem at the tail tie-down position and bind the stem waste down along the top of the shank like you did with the tail waste. Tie off the stem either where it abuts the wing butts or closer to the wing tie-in if underbody wraps are already level. Stripped peacock herl stems may be a little fragile or split if they are dry. You may want to moisten them prior to tying them in.
4) Trim the waste stripped herl stem. Carefully wrap the peacock stem forward using edge-to-edge turns. The underbody should not be visible when body is completed. The body should not be tapered nor should there be a visible lump or bump at the wing tie-in position. Head cement may be used sparingly to reinforce the body segments. Be sure to let it completely dry prior to tying in and wrapping the hackle. If too narrow a stem is used, you will lose the segmented look.
5a) Prepare the ginger hackle stem by stripping off the fuzz from the lower part of the stem. Tie in the hackle by the butt behind the wing with the concave side forward. Leave space behind the wing to make several wraps of the hackle. Bind the stem down along the bottom side of the shank and bring the thread in front of the wing tie-in position and continue binding the stem down.
5b) The hackle fibers should be 1½ times the gap in length. Trim the hackle butt waste. Wrap the hackle by making four to five turns behind the wing, crossing under to the front and making four to five wraps. The goal is to distribute the hackle evenly behind and in front of the wings. Wing tips should be visible above the hackle.
6) Form the head of the fly, whip finish, trim the waste thread, and apply head cement. Check to
make sure the wings are centered on top of the shank. Check to be sure the fly sits with the 3 point stance with tail tip, bottom of hook, and hackle tips supporting the fly.
- Tom Adams, Alen Baker