
Catskill Light Cahill
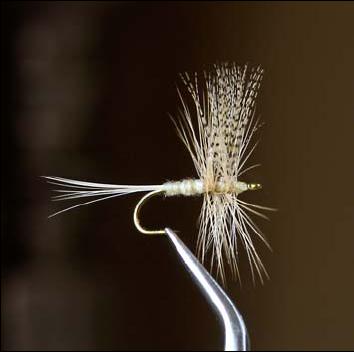
Fly of the Month 08.10 Light Cahill Dry (Catskill style)
“The Catskill style of dry fly captures the mayfly silhouette. It perches on it hackle points and tail fibers, giving the proper light impression on the water of a mayfly dun drifting on the surface waiting for its wings to dry. In brisk water, this light impression is the key that triggers trout to move upward to take the fly. That is one reason why the traditional hackled dry is often more effective than a more imitative dressing, tied without hackle… Another reason is that the imitative dressing is difficult to keep afloat and hard to see when it does remain on the surface.”
(Dave Hughes, Trout Flies the Tier’s Reference.)
I suppose the Light Cahill was my first fly of choice simply for those very reasons that Mr. Hughes states. The fly floats well and is easy to see. As my skills and abilities improved, that “go to” fly became an Elk Hair Caddis and then a Parachute Adams, both progressively darker and lower in the water. Yet there is nothing that compares to a Catskill pattern and once the tie is mastered, simple adjustments in color and size can leave your fly box well supplied for any hatch and many streams.
Ernest Schwiebert tells us in his two volume to me TROUT that the pattern was developed by Daniel Cahill who “was a simple man who fished and
worked as a brakeman on the Erie and Lackawanna…”
Although his text does not give a date, taken in context with the story Schwiebert is telling, the pattern appears to have been developed in the 1880’s. The Light Cahill is identified by W. Patrick McCafferty in his aquatic entomology book as being a flat headed mayfly (Family Heptageniidae), called such because of its appearance while in its nymph form. Certainly we have all picked up stones in the stream and found these critters scurrying about on the underside.
McCafferty goes on to say: “ In eastern and central regions, species of the genera Stenonema and Stenacron can be very important: these genera occur both in trout waters and in warmer waters that do not support trout. The familiar name Light Cahill applies primarily to Stenacron interpunctatum.”
The Light Cahill hatch can be quite sparse, but it can be important because there is so little competition on the water on late-season evenings. The best hatching in the East is in late June an early July.
Fly of the Month 08.10 Light Cahill Dry (Catskill style)
Hook: Dry, 1X Fine, Round Bend, Tiemco 100 or equivalent, Size: 12,14,16,18,20
Thread: Uni 8/0 Light Cahill
Tail: Cream Rooster Spade hackle
Body: Light Cahill dry fly dub
Wings: Lemon Wood duck flank
Legs: Cream Rooster hackle
Note to Readers: This seems complicated and there is a lot of description, but do not let that hinder you from trying. After the first attempt, reread the directions and I hope they become clearer.
Directions:
1) Wrap tight from the eye, starting two or three eye lengths back from eye, to approx. one third (1/3) the distance to the hook bend. Let bobbin hang.
2) Select Lemon Wood Duck flank feathers. Choose a feather by observing the total width of the center and straightest, i.e. pull back those which do not line up evenly at the end of the feather. Do not pluck the unneeded ones and save them for later use on other flies. Pinching the center ones and stroke forward you can observe if they appear too few or too many for the size fly being tied. Practice will help in this selection. You may also pre-size and separate feathers once purchased and store as preselected avoiding some anxiety.
3) Tie in the whole feather, with several firm wraps, at the rearmost point of the thread wrap leaving the length of the wings approx. one and one half (1 ½) the size of the hook gape. With the wings somewhat secure, bring the thread forward of the tie in point (approx. six turns) and bring it under the wings and over the top of the hook shank. Take the thread firmly back toward the hook bend and over the shank pulling against the wings and they will rise up to the correct position. It may take several wraps to firmly position the wings, but do not build up the thread to hold them in place. The tension of the angle by the thread from pulling back against them should do the trick.
4) Cut the excess feather as close to the upright as the tie in allows, using a straight, vertical cut with your scissors.
5) With the thread forward of the wings, select and divide the upright wing into approx. halves. Grasp the one-half, divided feathers away from the tier with your left hand, bring the thread through the middle gap (toward the hook bend)
over the top of the shank and pull down firmly immediately past and down of the upright feathers, bringing the thread around the base of the feathers and over the hook shank, going first to the eye and then to the bend. That will leave the thread such that the same action on the feathers closest to the tier may be wrapped in the same fashion. This will create an “x” pattern around the base of the upright feathers on top of the hook shank. Do this several turns and finish with two turns over and under the shank in an “x” . Take the thread to the hook bend in tight wraps and bring wraps back to the stub of the wings (where they are tied on top of the hook shank) and let the bobbin hang.
6) Select eight or ten cream spade hackle barbs choosing web free, stiff ones from a feather. Holding by the tips will even them and pull away as one from the quill. This should leave a curly section at the base of the barbs which you can trim with scissors making the end nice and even. Place the barbs on top of the hook and butt them against the end of the wings. Keeping the tail on top of the shank, wrap the thread softly over about half of the tail and let the bobbin hang while you examine the length of the tail. Trim and repeat as often as necessary to make the length, past the bend, about same length as the shank. When satisfied with the length, wrap the thread softly from the hook bend (directly above the barb of the hook) toward the eye and increase pressure as you approach the wings rearmost tie in point. Return the thread to the point above the hook barb and let the bobbin hang.
7) Begin dubbing by waxing about two inches of thread, pull a tiny amount of dub from the package and spin the dubbing on with your fingers. Always rotate in the same direction. Make the dub very, very small and tight. It will often take several applications of dub to finish almost any size hook. Begin wrapping the dubbed thread forward in tight loops and add dub as necessary advancing to two eye widths back from the wings. Let bobbin hang.
8) Select cream rooster hackle sized for the hook, this should be slightly larger than the hook gape (about one and one half (1 ½). Strip a quarter inch to expose the quill and tie in, with the shiny side facing the tier, at a 45 degree angle. The first two wraps of thread will bind the quill behind the wing and there should be enough quills to wrap several turns in front of the wing. Do not overwrap thread at this point and make sure to leave two eye lengths bare of thread. Let the bobbin hang.
9) Grasping the hackle by the tip (you can use hackle pliers, though I usually do not for the first several wraps on size 16 and larger hooks) advance the hackle by wrapping for three or four turns behind the wings and the same in front of the wings. Make sure as you wrap the hackle does not rotate or spin on itself. Always keep the shiny side toward the eye. Stop two eye lengths back from the eye and pick up the bobbin allowing the thread to bind the hackle stem against the hook. By wiggling the thread back and forth slightly as the thread is wrapped it will work its way between the barbs avoiding an unsightly gather of barbs. Three or four tight wraps to secure.
10) Form head with several wraps and apply cement.
- Tom Adams, Tim Wilhelm