
BH Prince Nymph FFI
Fly of the Month 11.23 BH Prince Nymph
The “fly of the month” series for 2023 will celebrate the Fly Fishers International Fly Tying Group Fly Tying Skills Awards Program. Each month Tom and I will present one of the fly patterns used to evaluate a fly tyer’s skills toward a Bronze Level in the first six months, then one of the fly pattern used to evaluate a fly tyer’s skills toward a Silver Level in the later part of the year. The fifth fly pattern in the Silver Level series is a beadhead nymph.
The "bead head" has become one of the most effective wet fly or nymph. The weight of a brass or tungsten bead keeps the fly very close to the bottom where trout see and capture their food. The flash of a bead has proven to be attractive to sport fish including trout, bass and panfish. Beadhead fly patterns are also used in still water.
Beadhead style flies that are popular in America and Europe actually originated in the central part of Europe more than 100 years ago. The roots of the beadhead fly lies in Northern Italy. By 1900, fishermen of Piedmont, Bergamo, Brescia and Friuli fished in their alpine rivers with this type of nymph.
Beadhead Prince Nymph
The Prince Nymph originated in the 1930's by Minnesota brothers Don and Dick Olson, and were popularized shortly thereafter Doug Prince, a western angler for whom it was subsequently named. The Prince Nymph (a.k.a. the Forked Tail Nymph) has long proven to be one of trout angling's most widely and easily recognized fly patterns - a classic trout fly pattern.
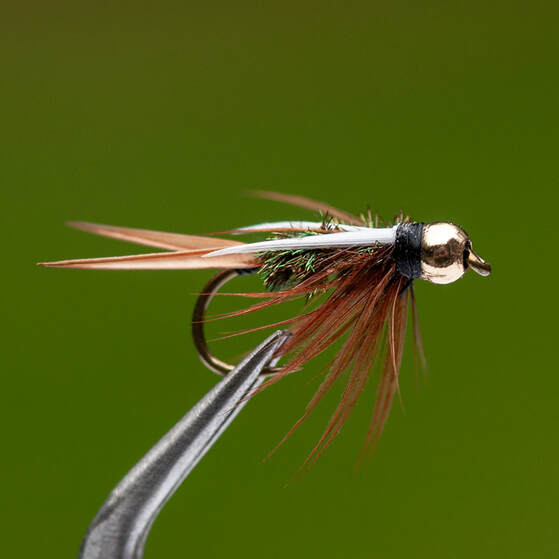
The Beadhead Prince Nymph is a general purpose nymph that uses goose biots for the tail and wing, and peacock herl for the body. Gold ribbing helps to simulate a segmented body while adding flash. A hen hackle collar with the fibers stroked towards the bottom of the fly complete the pattern. A modern addition, the beadhead adds weight and flash. It is most commonly used as a stonefly nymph, but this fly pattern is really more of an attractor nymph as it is simply "buggy."
The Beadhead Prince Nymph is a searching nymph pattern making use of peacock herl which is iridescent and reflects points of light. Adding a beadhead helps to get the fly down to where the fish are located. The gold ribbing and bead reflect light mimicking air bubbles forming inside the shuck of emerging nymphs or the air bubble carried below the surface by some beetles. Proper bead selection, bead attachment, biot mounting, and peacock herl wrapping are some of the techniques required in tying this pattern.
Several of these techniques have different procedures to arrive at the same result. Some tiers will mount the biots one at a time while other tiers will mount them both simultaneously. Multiple Peacock herls may be reinforced for strength by wrapping them around the tying thread, or, as done here, by spinning the herls in a dubbing loop to form a peacock chenille.
Tying the fly pattern for the Silver Level Submission
Visit the FFI website and navigate to the Fly Tying Group, then to the Silver Award Handbook pages. The website has excellent instructions as to how to tie and submit the required group of fly patterns to an FFI Silver Award Evaluator. The website includes a video presenting each step to tie the BH Prince Nymph. The handbook is easy to understand and follow. Tie three flies with consistency for the Silver Awards submission, then tie more for the fly box.
Fly of the Month 11.23
Fly Name: Beadhead Prince Nymph
Hook: Nymph Hook, Dai-Riki 060
(use a 1X long shank hook to accommodate the bead without closing down the hook gap)
Size: 12
Thread: Black 6/0 or 8/0
Bead: Gold bead sized for hook (for size 12, 2.8 to 3 mm)
(match to the hook size. When placed up against the hook eye, it should not
overhang the hook eye, nor should it wobble excessively at the head)
Tail: Brown biots
(biots should form a "V" on top of the rear of the fly and should be
approximately hook shank in length)
Rib: Fine gold oval or small gold flat tinsel (make 4 or 5 turns)
Body: Peacock herl
Hackle: Fairly rigid brown hen or softer rooster hackle
(use fairly rigid hen hackle or softer rooster hackles. Make no more than 2 wraps
of hackle. For this pattern, tie in the hackle before the wings. Tie hackle on wet
style with fibers pointing towards the rear of the fly)
Wing: White biots
(biots should form a "V" over the back of the fly and should reach the tail tie in
position. The wing biots should form an angle close to 30° and hug the body)
Directions:
1) Bend the barb of the hook down, slide a bead onto the hook shank, and mount the hook in the vise. Check to be sure the bead does not overhang the hook eye. Slide the bead toward the bend of the hook. Attach the tying thread behind the hook eye and wrap a thread base over the front of the shank where the bead will be located. Wrap several layers so the bead will not wobble excessively when it is brought up against the eye of the hook. Half hitch the thread, cut the thread, add a coat of head cement to the wraps, and slide the bead forward.
2) Re-attach the tying thread to the left of the bead and wrap a thread base with side-by-side wraps of tying thread to a position over the barb.
3a) Form a small thread bump at the position on the shank over the hook barb. This is the tie in position for the biot tails. The thread bump will help splay the tail biots when you tie them onto the top of the shank at the tail tie-in position. Select the brown biots and hold them with their convex sides against each other and tips even. This should make the biots splay away from each other in a "V" shape. The tail should be ½ a shank in length. Position the biots so they are resting on the shank with the tie-in spot over the barb. Switch hands so the thumb and a finger from the left hand are holding the biot pair in position.
3b) Make a soft wrap over the biot fibers directly behind the bump on the shank. Make several tighter wraps and check to be sure the fibers form a "V" shape on top of the rear of the fly. You can carefully figure 8 wrap to establish the splay of the fibers. Wrap the thread forward, binding down the biot stems. Trim the wastes when you get to the rear of the bead. Wrap the tying thread a few wraps back down the shank and let the thread hang. Attach the flat tinsel to the side of the shank away from you and bind it down along the far side of the shank to the tail tie-in position.
4) Attach 3 or 4 peacock herls by their tips at the tail tie-in position. Form a loop to be used to form a spun herl rope from the peacock fibers. Take the thread up the shank to behind the bead. Attach the herls to the loop and spin the loop to form a peacock herl chenille rope. Wrap the herl rope up the shank using touching turns. Tie off the herl rope behind the beadhead. Make a few more wraps of tying thread or secure assembly with a half hitch. Trim peacock herl waste.
5. Wrap the flat tinsel forward making 4 to 5 evenly spaced turns for size 10 - 14 flies. Tie off the rib behind the bead and trim the waste.
6) Select and prepare the hackle by stripping off the fluff from the butt end. Use a fairly rigid hen hackle or a softer rooster hackle. Attach the hackle by the butt behind the bead. The dull side should be down (against the shank) with shiny side up. Make 1 or 2 turns of hackle, tie off, and trim waste. Hackles may be at least 1½ gap in length. These fibers should move similar to those in a soft hackle tie. Stroke the hackle fibers back and down. While holding the fibers against the body, make several wraps of thread to secure the fibers in the rearward sweep.
7) Select the white biots for the wings. These should form a "V" over the back and the tips should reach to the end of the body. The white biots should form an angle close to 30°. Attach one of the biots at the proper angle with one or two thread wraps. Attach the second biot in a similar way to form the 30° angle. Carefully fold the biot waste up and back to the rear and tie off tight against the bead. Similarly tie off the other biot. Trim the white biot waste and make several wraps to bind down the biot ends. Whip finish and add head cement to the wraps to finish the tie.
- Tom Adams, Alen Baker
The “fly of the month” series for 2023 will celebrate the Fly Fishers International Fly Tying Group Fly Tying Skills Awards Program. Each month Tom and I will present one of the fly patterns used to evaluate a fly tyer’s skills toward a Bronze Level in the first six months, then one of the fly pattern used to evaluate a fly tyer’s skills toward a Silver Level in the later part of the year. The fifth fly pattern in the Silver Level series is a beadhead nymph.
The "bead head" has become one of the most effective wet fly or nymph. The weight of a brass or tungsten bead keeps the fly very close to the bottom where trout see and capture their food. The flash of a bead has proven to be attractive to sport fish including trout, bass and panfish. Beadhead fly patterns are also used in still water.
Beadhead style flies that are popular in America and Europe actually originated in the central part of Europe more than 100 years ago. The roots of the beadhead fly lies in Northern Italy. By 1900, fishermen of Piedmont, Bergamo, Brescia and Friuli fished in their alpine rivers with this type of nymph.
Beadhead Prince Nymph
The Prince Nymph originated in the 1930's by Minnesota brothers Don and Dick Olson, and were popularized shortly thereafter Doug Prince, a western angler for whom it was subsequently named. The Prince Nymph (a.k.a. the Forked Tail Nymph) has long proven to be one of trout angling's most widely and easily recognized fly patterns - a classic trout fly pattern.
The Beadhead Prince Nymph is a general purpose nymph that uses goose biots for the tail and wing, and peacock herl for the body. Gold ribbing helps to simulate a segmented body while adding flash. A hen hackle collar with the fibers stroked towards the bottom of the fly complete the pattern. A modern addition, the beadhead adds weight and flash. It is most commonly used as a stonefly nymph, but this fly pattern is really more of an attractor nymph as it is simply "buggy."
The Beadhead Prince Nymph is a searching nymph pattern making use of peacock herl which is iridescent and reflects points of light. Adding a beadhead helps to get the fly down to where the fish are located. The gold ribbing and bead reflect light mimicking air bubbles forming inside the shuck of emerging nymphs or the air bubble carried below the surface by some beetles. Proper bead selection, bead attachment, biot mounting, and peacock herl wrapping are some of the techniques required in tying this pattern.
Several of these techniques have different procedures to arrive at the same result. Some tiers will mount the biots one at a time while other tiers will mount them both simultaneously. Multiple Peacock herls may be reinforced for strength by wrapping them around the tying thread, or, as done here, by spinning the herls in a dubbing loop to form a peacock chenille.
Tying the fly pattern for the Silver Level Submission
Visit the FFI website and navigate to the Fly Tying Group, then to the Silver Award Handbook pages. The website has excellent instructions as to how to tie and submit the required group of fly patterns to an FFI Silver Award Evaluator. The website includes a video presenting each step to tie the BH Prince Nymph. The handbook is easy to understand and follow. Tie three flies with consistency for the Silver Awards submission, then tie more for the fly box.
Fly of the Month 11.23
Fly Name: Beadhead Prince Nymph
Hook: Nymph Hook, Dai-Riki 060
(use a 1X long shank hook to accommodate the bead without closing down the hook gap)
Size: 12
Thread: Black 6/0 or 8/0
Bead: Gold bead sized for hook (for size 12, 2.8 to 3 mm)
(match to the hook size. When placed up against the hook eye, it should not
overhang the hook eye, nor should it wobble excessively at the head)
Tail: Brown biots
(biots should form a "V" on top of the rear of the fly and should be
approximately hook shank in length)
Rib: Fine gold oval or small gold flat tinsel (make 4 or 5 turns)
Body: Peacock herl
Hackle: Fairly rigid brown hen or softer rooster hackle
(use fairly rigid hen hackle or softer rooster hackles. Make no more than 2 wraps
of hackle. For this pattern, tie in the hackle before the wings. Tie hackle on wet
style with fibers pointing towards the rear of the fly)
Wing: White biots
(biots should form a "V" over the back of the fly and should reach the tail tie in
position. The wing biots should form an angle close to 30° and hug the body)
Directions:
1) Bend the barb of the hook down, slide a bead onto the hook shank, and mount the hook in the vise. Check to be sure the bead does not overhang the hook eye. Slide the bead toward the bend of the hook. Attach the tying thread behind the hook eye and wrap a thread base over the front of the shank where the bead will be located. Wrap several layers so the bead will not wobble excessively when it is brought up against the eye of the hook. Half hitch the thread, cut the thread, add a coat of head cement to the wraps, and slide the bead forward.
2) Re-attach the tying thread to the left of the bead and wrap a thread base with side-by-side wraps of tying thread to a position over the barb.
3a) Form a small thread bump at the position on the shank over the hook barb. This is the tie in position for the biot tails. The thread bump will help splay the tail biots when you tie them onto the top of the shank at the tail tie-in position. Select the brown biots and hold them with their convex sides against each other and tips even. This should make the biots splay away from each other in a "V" shape. The tail should be ½ a shank in length. Position the biots so they are resting on the shank with the tie-in spot over the barb. Switch hands so the thumb and a finger from the left hand are holding the biot pair in position.
3b) Make a soft wrap over the biot fibers directly behind the bump on the shank. Make several tighter wraps and check to be sure the fibers form a "V" shape on top of the rear of the fly. You can carefully figure 8 wrap to establish the splay of the fibers. Wrap the thread forward, binding down the biot stems. Trim the wastes when you get to the rear of the bead. Wrap the tying thread a few wraps back down the shank and let the thread hang. Attach the flat tinsel to the side of the shank away from you and bind it down along the far side of the shank to the tail tie-in position.
4) Attach 3 or 4 peacock herls by their tips at the tail tie-in position. Form a loop to be used to form a spun herl rope from the peacock fibers. Take the thread up the shank to behind the bead. Attach the herls to the loop and spin the loop to form a peacock herl chenille rope. Wrap the herl rope up the shank using touching turns. Tie off the herl rope behind the beadhead. Make a few more wraps of tying thread or secure assembly with a half hitch. Trim peacock herl waste.
5. Wrap the flat tinsel forward making 4 to 5 evenly spaced turns for size 10 - 14 flies. Tie off the rib behind the bead and trim the waste.
6) Select and prepare the hackle by stripping off the fluff from the butt end. Use a fairly rigid hen hackle or a softer rooster hackle. Attach the hackle by the butt behind the bead. The dull side should be down (against the shank) with shiny side up. Make 1 or 2 turns of hackle, tie off, and trim waste. Hackles may be at least 1½ gap in length. These fibers should move similar to those in a soft hackle tie. Stroke the hackle fibers back and down. While holding the fibers against the body, make several wraps of thread to secure the fibers in the rearward sweep.
7) Select the white biots for the wings. These should form a "V" over the back and the tips should reach to the end of the body. The white biots should form an angle close to 30°. Attach one of the biots at the proper angle with one or two thread wraps. Attach the second biot in a similar way to form the 30° angle. Carefully fold the biot waste up and back to the rear and tie off tight against the bead. Similarly tie off the other biot. Trim the white biot waste and make several wraps to bind down the biot ends. Whip finish and add head cement to the wraps to finish the tie.
- Tom Adams, Alen Baker