
Troth Elk Hair Caddis FFI
Fly of the Month 12.23 Troth Elk Hair Caddis
The “fly of the month” series for 2023 will celebrate the Fly Fishers International Fly Tying Group Fly Tying Skills Awards Program. Each month Tom and I will present one of the fly patterns used to evaluate a fly tyer’s skills toward a Bronze Level in the first six months, then one of the fly pattern used to evaluate a fly tyer’s skills toward a Silver Level in the later part of the year. The six and final required fly pattern in the Silver Level series is a roughwater adult caddis.
Troth Elk Hair Caddis
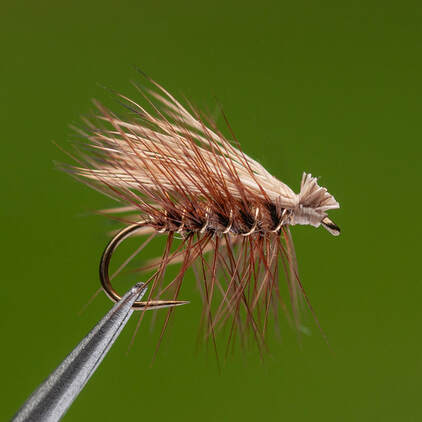
The Elk Hair Caddis, designed by Al Troth of Montana, is an imitative pattern as well as a standard caddis pattern for fishing riffles and runs of freestone streams. Fished to mimic a fluttering adult caddis the fly relies on the elk hair wing for keeping it afloat as well as providing the tent wing silhouette when viewed from below. When hoppers and stoneflies are present, the Elk Hair Caddis will be an effective searching pattern.
The Troth Elk Hair Caddis fly pattern was created in 1957 and it was fished for the first time in Pennsylvania waters. For decades, the standard by which all caddisfly patterns have been judged has been Al Troth’s Elk Hair Caddis, which first came to the fly-fishing public’s attention in a 1978 article in Fly Tyer. In the article, Troth claimed that he had set out to develop a wet fly for his Pennsylvania streams, but his design ended up floating so well that he stuck with it.
The pattern became so popular among fly fishermen because it floats like a cork. It can be fished dead-drifted, skittering on the surface, stripped in the surface film, or even as a diving caddis. In his book The Orvis Guide to Essential American Flies, Tom Rosenbauer devotes a chapter to the Elk Hair Caddis.
Al Troth (May 30, 1930 – August 3, 2012)
Al Troth is an American fisherman, considered a pioneer in the sport of fly fishing. Troth was born in Monessen, Pennsylvania to an Anna and Alfred Troth. He began fishing at age 12 in Pennsylvania, and continued to fish local rivers and streams in Pennsylvania as a hobby. He graduated in 1948 from Monessen High School. After graduating high school, he worked at Pittsburgh Steel Company until joining the Navy.
After 4 years of service he returned to Pittsburgh Steel Company as a metallurgist while attending college at California State Teachers College in California, Pennsylvania, where he met Martha Manandise, his future wife. Troth taught Industrial Arts at a local high school in the Williamsport area for 15 years in north-central Pennsylvania, where the Loyalsock was his home water.
Troth spent much of his spare time fishing, including many fishing trips to Montana. He developed his skill and expertise at fly tying. Troth invented a new type of fly, the Elk Hair Caddis fly. This fly, and variations of it, has been a fly fishing standard for over 50 years. It was tied using the hair of a female elk, bleached so as to be more visible. He designed other fly patterns, although none were as popular as the Elk Hair Caddis.
Troth fished summers in Montana becoming familiar with Big Hole, Beaverhead and other Montana streams and rivers. After a number summertime trips to Montana, he eventually moved the family to the small town of Dillon, Montana in 1973 with his wife and son, Eric. There he went into business as a professional fly tyer and guide, conducting and coordinating fishing trips for fly fisherman as well as fishing himself.
Troth retired from guiding in 1996 with the onset of Parkinson’s while his son, Eric, continued with the family business. On August 3, 2012, Al Troth passed away at the age of 82, after a log battle with Parkinson’s disease and dementia.
Al Troth was best known as the innovator of many popular trout fishing flies. Troth has been featured in numerous books and recognized on the cover of Fly Fisherman magazine 3 times for his fly tying skill. Known for the creativity and excellence of his work, he produced beautiful fly displays in the latter part of his career. He also attracted many loyal clients in his parallel profession as fly fishing outfitter on the rivers of southwestern Montana.
Troth will remembered for his devotion to durable, easy-to-tie, effective fly patterns, and we anglers owe him a debt of gratitude for landing many trout on an Elk Hair Caddis.
Tying the fly pattern for the Silver Level Submission
For the Silver Award required pattern, adhere to Troth's original pattern as nearly as possible. Troth liked to use hackle 1½ the gap in fiber length, and used light elk hair which he liked to splay out using pressure from his thumb nail after tying in the wing.
Visit the FFI website and navigate to the Fly Tying Group, then to the Silver Award Handbook pages. The website has excellent instructions as to how to tie and submit the required group of fly patterns to an FFI Silver Award Evaluator. The website includes a video presenting each step to tie the Troth Elk Hair Caddis. The handbook is easy to understand and follow. Tie three flies with consistency for the Silver Awards submission, then tie more for the fly box.
Fly of the Month 12.23
Fly Name: Troth Elk Hair Caddis
Hook: Tiemco 100, standard dry hook
Size: 12, 14 (size 12 used in step-by-step)
Thread: Tan - UNI 8/0 or 6/0, UTC 70
Rib: Fine gold wire
(2 turns of ribbing are used at the rear to trap the hackle stem. Ribbing should cross
over the stem as you spiral it forward over the body)
Body: Fly Rite Light Tan (No. 19), Tan fur or synthetic (tan Super Fine used in step-by-step)
Hackle: Brown neck hackle, palmered
(hackle should be 1½ hook gap in length as suggested by Troth)
Wing: Light elk body hair (extend to just behind the hook bend)
Wing Butts: Cut at an angle close to the line of the wing
(there should be a distinct segmentation between the head and wing,
≈½ eye width but not too wide)
Directions:
1) Bend the barb down on the hook and mount the hook in the vise. Attach thread with a jam knot about one eye length behind eye of hook. Wrap the thread 3 or 4 turns down the shank. Tie in the wire ribbing material on top of the shank. Using edge-to-edge wraps, bind the ribbing material down on top of the shank as you wrap the thread to the rear of the hook. Stop at the position on the shank above the ½ way distance between hook point and barb point.
2) Spin the dubbing onto the tying thread. You want to dub a body that mimics the caddis body which is larger at the rear and tapers slightly smaller as you wrap forward. Distribute your dubbing on the thread accordingly. Wrap the dubbing forward. The last two turns should have a reduced amount of dubbing. End the body two eye lengths behind the hook eye.
3a) Select and prepare the dry fly hackle by stripping off the fluff. Al Troth preferred the barb length to be 1½ the gap width. Attach the hackle by the butt just in front of the body with the shiny convex side upwards. Clip the excess stem waste. Wrap 2 turns close to the front of the body and then spiral wrap the hackle over the body in evenly spaced turns to the rear of the body. Do not twist the stem during this body wrap. Be sure you have some hackle fibers under the shank at the front.
3b) While holding the hackle tip in the off hand, catch the hackle tip under a couple turns of the ribbing wire. By wrapping the hackle to the back with turns going over the top away from you and under the shank towards you, the wire will counter-wrap the hackle stem as you forward wrap the ribbing material. As you forward wrap the wire rib, wiggle it so it will seat down on the stem without trapping hackle fibers (Fig. #6.) Tie off the ribbing at the front of the hackle. While holding onto your thread bobbin, bend the wire back and forth until it breaks, then trim the hackle tip waste close to the body.
4a) Select a bunch of light elk hair, remove the fuzzy under fur, and stack the fibers to align the tips. Measure the hair against the hook. The wing should be the length of the hook, including the bend. You want the wing to extend a little beyond the body. To help in getting the wing to set down onto the shank, use your bodkin to separate the hackle fibers along the top of the shank and stroke them down. Wrap your thread to a position about 2 wraps behind the eye of the hook.
4b) Hold the wing material between the thumb and a finger of your off hand, press it tightly over the top of the hook shank, make a soft wrap, tighten the wrap with an upwards pull, make 5 to 6 tight wraps edge-to-edge working back over the wing, and make 8 to 10 more wraps back and forth in this space. You want a distinct segmentation (a separation about a ½ eye width, not a highway) between the flared wing and the flared wing butts. Keep tension on the thread bobbin.
4c) Al Troth would spread the wing clump into a tent shape by using pressure from his thumb nail against the top of the wing just behind the rear thread wraps on the segmentation. This produces a caddis wing profile when viewed from under the fly and enhances the tent appearance of the wing when viewed from the top or side.
5a) Hold the wing butts back with thumb and fingers of the off hand and make several wraps under the wing butts behind the eye and tight against the butts. These wraps will prop up the butts to make a 45° angle to the shank.
5b) Whip-finish behind the eye, cut the thread waste, and cement the head and segmentation wraps. Hold the clump of butts with your off hand thumb and forefinger, pull them tight, and clip them straight across which should be nearly in line with the wing. This step must be done in one cut. Be sure your scissors are at the right angle and not favoring the off side or near side. Serrated scissors should be used. The result is a flared wedge shape for the head.
- Tom Adams, Alen Baker
The “fly of the month” series for 2023 will celebrate the Fly Fishers International Fly Tying Group Fly Tying Skills Awards Program. Each month Tom and I will present one of the fly patterns used to evaluate a fly tyer’s skills toward a Bronze Level in the first six months, then one of the fly pattern used to evaluate a fly tyer’s skills toward a Silver Level in the later part of the year. The six and final required fly pattern in the Silver Level series is a roughwater adult caddis.
Troth Elk Hair Caddis
The Elk Hair Caddis, designed by Al Troth of Montana, is an imitative pattern as well as a standard caddis pattern for fishing riffles and runs of freestone streams. Fished to mimic a fluttering adult caddis the fly relies on the elk hair wing for keeping it afloat as well as providing the tent wing silhouette when viewed from below. When hoppers and stoneflies are present, the Elk Hair Caddis will be an effective searching pattern.
The Troth Elk Hair Caddis fly pattern was created in 1957 and it was fished for the first time in Pennsylvania waters. For decades, the standard by which all caddisfly patterns have been judged has been Al Troth’s Elk Hair Caddis, which first came to the fly-fishing public’s attention in a 1978 article in Fly Tyer. In the article, Troth claimed that he had set out to develop a wet fly for his Pennsylvania streams, but his design ended up floating so well that he stuck with it.
The pattern became so popular among fly fishermen because it floats like a cork. It can be fished dead-drifted, skittering on the surface, stripped in the surface film, or even as a diving caddis. In his book The Orvis Guide to Essential American Flies, Tom Rosenbauer devotes a chapter to the Elk Hair Caddis.
Al Troth (May 30, 1930 – August 3, 2012)
Al Troth is an American fisherman, considered a pioneer in the sport of fly fishing. Troth was born in Monessen, Pennsylvania to an Anna and Alfred Troth. He began fishing at age 12 in Pennsylvania, and continued to fish local rivers and streams in Pennsylvania as a hobby. He graduated in 1948 from Monessen High School. After graduating high school, he worked at Pittsburgh Steel Company until joining the Navy.
After 4 years of service he returned to Pittsburgh Steel Company as a metallurgist while attending college at California State Teachers College in California, Pennsylvania, where he met Martha Manandise, his future wife. Troth taught Industrial Arts at a local high school in the Williamsport area for 15 years in north-central Pennsylvania, where the Loyalsock was his home water.
Troth spent much of his spare time fishing, including many fishing trips to Montana. He developed his skill and expertise at fly tying. Troth invented a new type of fly, the Elk Hair Caddis fly. This fly, and variations of it, has been a fly fishing standard for over 50 years. It was tied using the hair of a female elk, bleached so as to be more visible. He designed other fly patterns, although none were as popular as the Elk Hair Caddis.
Troth fished summers in Montana becoming familiar with Big Hole, Beaverhead and other Montana streams and rivers. After a number summertime trips to Montana, he eventually moved the family to the small town of Dillon, Montana in 1973 with his wife and son, Eric. There he went into business as a professional fly tyer and guide, conducting and coordinating fishing trips for fly fisherman as well as fishing himself.
Troth retired from guiding in 1996 with the onset of Parkinson’s while his son, Eric, continued with the family business. On August 3, 2012, Al Troth passed away at the age of 82, after a log battle with Parkinson’s disease and dementia.
Al Troth was best known as the innovator of many popular trout fishing flies. Troth has been featured in numerous books and recognized on the cover of Fly Fisherman magazine 3 times for his fly tying skill. Known for the creativity and excellence of his work, he produced beautiful fly displays in the latter part of his career. He also attracted many loyal clients in his parallel profession as fly fishing outfitter on the rivers of southwestern Montana.
Troth will remembered for his devotion to durable, easy-to-tie, effective fly patterns, and we anglers owe him a debt of gratitude for landing many trout on an Elk Hair Caddis.
Tying the fly pattern for the Silver Level Submission
For the Silver Award required pattern, adhere to Troth's original pattern as nearly as possible. Troth liked to use hackle 1½ the gap in fiber length, and used light elk hair which he liked to splay out using pressure from his thumb nail after tying in the wing.
Visit the FFI website and navigate to the Fly Tying Group, then to the Silver Award Handbook pages. The website has excellent instructions as to how to tie and submit the required group of fly patterns to an FFI Silver Award Evaluator. The website includes a video presenting each step to tie the Troth Elk Hair Caddis. The handbook is easy to understand and follow. Tie three flies with consistency for the Silver Awards submission, then tie more for the fly box.
Fly of the Month 12.23
Fly Name: Troth Elk Hair Caddis
Hook: Tiemco 100, standard dry hook
Size: 12, 14 (size 12 used in step-by-step)
Thread: Tan - UNI 8/0 or 6/0, UTC 70
Rib: Fine gold wire
(2 turns of ribbing are used at the rear to trap the hackle stem. Ribbing should cross
over the stem as you spiral it forward over the body)
Body: Fly Rite Light Tan (No. 19), Tan fur or synthetic (tan Super Fine used in step-by-step)
Hackle: Brown neck hackle, palmered
(hackle should be 1½ hook gap in length as suggested by Troth)
Wing: Light elk body hair (extend to just behind the hook bend)
Wing Butts: Cut at an angle close to the line of the wing
(there should be a distinct segmentation between the head and wing,
≈½ eye width but not too wide)
Directions:
1) Bend the barb down on the hook and mount the hook in the vise. Attach thread with a jam knot about one eye length behind eye of hook. Wrap the thread 3 or 4 turns down the shank. Tie in the wire ribbing material on top of the shank. Using edge-to-edge wraps, bind the ribbing material down on top of the shank as you wrap the thread to the rear of the hook. Stop at the position on the shank above the ½ way distance between hook point and barb point.
2) Spin the dubbing onto the tying thread. You want to dub a body that mimics the caddis body which is larger at the rear and tapers slightly smaller as you wrap forward. Distribute your dubbing on the thread accordingly. Wrap the dubbing forward. The last two turns should have a reduced amount of dubbing. End the body two eye lengths behind the hook eye.
3a) Select and prepare the dry fly hackle by stripping off the fluff. Al Troth preferred the barb length to be 1½ the gap width. Attach the hackle by the butt just in front of the body with the shiny convex side upwards. Clip the excess stem waste. Wrap 2 turns close to the front of the body and then spiral wrap the hackle over the body in evenly spaced turns to the rear of the body. Do not twist the stem during this body wrap. Be sure you have some hackle fibers under the shank at the front.
3b) While holding the hackle tip in the off hand, catch the hackle tip under a couple turns of the ribbing wire. By wrapping the hackle to the back with turns going over the top away from you and under the shank towards you, the wire will counter-wrap the hackle stem as you forward wrap the ribbing material. As you forward wrap the wire rib, wiggle it so it will seat down on the stem without trapping hackle fibers (Fig. #6.) Tie off the ribbing at the front of the hackle. While holding onto your thread bobbin, bend the wire back and forth until it breaks, then trim the hackle tip waste close to the body.
4a) Select a bunch of light elk hair, remove the fuzzy under fur, and stack the fibers to align the tips. Measure the hair against the hook. The wing should be the length of the hook, including the bend. You want the wing to extend a little beyond the body. To help in getting the wing to set down onto the shank, use your bodkin to separate the hackle fibers along the top of the shank and stroke them down. Wrap your thread to a position about 2 wraps behind the eye of the hook.
4b) Hold the wing material between the thumb and a finger of your off hand, press it tightly over the top of the hook shank, make a soft wrap, tighten the wrap with an upwards pull, make 5 to 6 tight wraps edge-to-edge working back over the wing, and make 8 to 10 more wraps back and forth in this space. You want a distinct segmentation (a separation about a ½ eye width, not a highway) between the flared wing and the flared wing butts. Keep tension on the thread bobbin.
4c) Al Troth would spread the wing clump into a tent shape by using pressure from his thumb nail against the top of the wing just behind the rear thread wraps on the segmentation. This produces a caddis wing profile when viewed from under the fly and enhances the tent appearance of the wing when viewed from the top or side.
5a) Hold the wing butts back with thumb and fingers of the off hand and make several wraps under the wing butts behind the eye and tight against the butts. These wraps will prop up the butts to make a 45° angle to the shank.
5b) Whip-finish behind the eye, cut the thread waste, and cement the head and segmentation wraps. Hold the clump of butts with your off hand thumb and forefinger, pull them tight, and clip them straight across which should be nearly in line with the wing. This step must be done in one cut. Be sure your scissors are at the right angle and not favoring the off side or near side. Serrated scissors should be used. The result is a flared wedge shape for the head.
- Tom Adams, Alen Baker