Fly of the Month 11.20
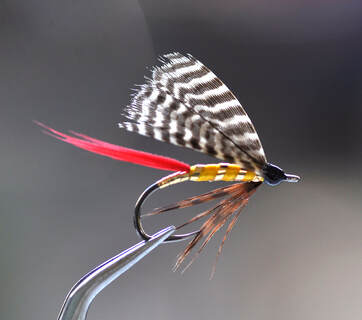
The Professor was created in Scotland in 1820 and named after Professor John Wilson who’s pen name was Christopher North. James and John Wilson were also known for the creation of the Queen of the Water fly pattern. The fly pattern has become more popular in the United States than in its country of origin. Originally tied as a wet fly and used to catch fish from the Lochs (Lakes), the Professor has evolved to be tied as a dry fly, a large lake fly, a hair-wing steelhead fly and a streamer. It has also been modified slightly here and there by color variations and material substitutions.
Professor Dry
Professor [Wet]
Blue Professor
Professor Gold
“When I first learned to tie flies and fly fish, the Professor Dry was one of the first flies I used to catch trout. I had heard that the “big secret” among local fly fishers was that trout could not resist the color of yellow. When I searched through my newly purchased Orvis Tying Recipes book, I found a bright yellow attractor fly pattern called the Professor. It was time to confirm if the “big secret” was true. Sure enough, I was soon catching trout on the dry fly I tied, and it was called the Professor Dry. Soon after, I purchased a reprinted book written by Ray Bergman which was Trout, 1932. The Professor [Wet] (yellow floss and gold tinsel rib) and Blue Professor (blue floss and gold tinsel rib) are presented in the color plates along with the fly pattern recipes.” - Alen
Bill Everhardt ties a Southern Appalachian version he calls the Professor Gold. The Professor is a fly pattern rich in the history and tradition of catching trout for two centuries.
We believe the red (crimson) quill section tail is doubly attractive along with the yellow body. Our logic or proof is the success of the Blue Professor which does not contain any yellow. We should invent the “purple professor” with a purple floss body and gold rib. Bet the red tail will work equally well for each of these fly patterns. Maybe the “big secret” is not yellow but rather a bit of red.
Fly of the Month 11.20
Tom Adams and Alen Baker
References:
Marbury, Mary Orvis. Favorite Flies and their Histories, 1892.
Professor
HOOK : Wet fly, Mustad 3906B, size 4,6,8,10,12
Thread : 70 d UTC white and Uni 8/0 black
Body : Yellow Floss with Silver Mylar ribbing ( flat or oval )
Tail : Red Goose Shoulder with Silver Mylar tag
Throat : Brown Hen hackle
Wing: Mallard flank
Note : the thread should be “unwound” in a counterclockwise fashion to make it as flat as possible and keep the thread wraps to the minimum necessary to hold the materials.
Directions :
- Begin with white thread five eyelengths from the eye and advance in tight touching turns to the halfway mark. Let the bobbin hang.
- Select a three inch piece of mylar and tie in on top of the hook shank with the gold side “out” and advance with tight touching turns of thread to the beginning of the hook bend. Bring the thread back several turns toward the head and begin making wraps of the mylar. Three or four turns on the bend are what will show. After those wraps continue wraps to the half way mark where the thread is waiting. . Make even turns of the thread to the hook bend trapping the mylar and then take the thread slightly forward of the halfway mark and let the bobbin hang.
- Select a narrow slip of the red goose from both sides of the feather. They will match up with the curve side facing each other. Measure the length to slightly longer than the hook shank and tie in on top of the hook shank with the tips pointing up. Keeping the goose on top, advance the thread to the hook bend. Bring the white thread back to the original tie in near the head and let the bobbin hang. Trim any waste goose.
- Add the leftover mylar to the top of the hook shank and take the thread back to the original tie in and trim the waste.
- Select a four inch length of yellow floss and tie in with the white thread, on top of the hook shank. Advance the thread to the hook bend while trapping the floss on top of the shank. Bring the white thread back to the original spot and let the bobbin hang.
- Tie in at the head the black thread and capture the white thread with several turns and trim the waste threads. Let the black thread bobbin hang.
- Select the yellow floss using hackle pliers and begin advancing in tight, slightly overlapping turns to the black thread. Secure the yellow floss with several turns of black thread and let the bobbin hang.
- Advance the mylar in open turns to rib the body. Secure with the black thread, trim the waste and let the bobbin hang.
- Select a brown hen hackle of appropriate size to allow the barbs to reach to or slightly past the hook point. Pull eight or ten barbs away from the stem and tie in where the thread is hanging, but, underneath with the tips almost touching the hook point. Secure with several wraps and if necessary adjust the placement of the barbs using a fingernail to rotate into position. Let the bobbin hang.
- Select two matching mallard flank feathers and strip the extra barbs from the stem after determining the length. The length should be halfway to the tip of the red goose. The mallard feathers tie in facing each other leaving space for a thread head. If there are stems, trim and form a nice shaped head. Whip finish and apply several coats of head cement.

