Fly of the Month 05.10
Sheep Fly
Last month, as an incentive, we promised those that took delivery of the newsletter by email that we would give you something extra. As it turns out, because April was sort of a big news month, we found ourselves this month with a blank page. I don’t know if it is fair, but the post office charges the same amount to print and mail a blank page as it does to print one with the Fly of the Month on it. Therefore, we’re going to give this month’s fly to everyone and hopefully we won’t find ourselves with blank space next month.
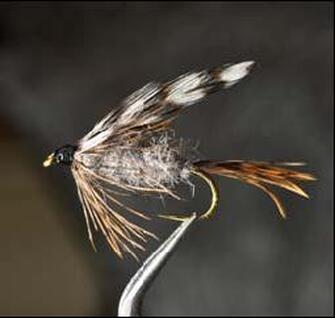
The Sheep Fly
The Sheep Fly is often attributed to Cap Wiese, headmaster of the Patterson School found just outside of Lenoir, NC. While Cap did develop some notable flies such as the Early Nelson, the Sheep Fly was actually developed by Newland Saunders of Lenoir. The confusion may be the result of it being one of Cap’s favorite flies. It was also a favorite of Don Howell and Kevin Howell writes on his website “If I had to choose one fly to fish for trout with for the rest of my life with this would be the fly. It was originally tied by Newland Saunders from Lenoir, NC to imitate a grey fly that is commonly found around sheep. Over the flies 60 year life span is has been modified a few times, after learning more etymology we have come to realize that the sheepfly imitates three different food groups, it looks like a Cranefly larvae, a stickbait, and a large emerging mayfly. My favorite sizes are an 8 and 10 but I fish it from a (size) 4-16.”
Jim Casada writes in his latest book: “…that Cap Wiese, the headmaster of Patterson School, was catching big trout with his Sheep Fly along with taking pioneering steps to give a fledgling conservation organization, Trout Unlimited, a foothold in the state.“
Hook: Nymph or small streamer type, 2x long , 2x heavy, Tiemco 5261 or Mustad 3906b or equivalent, Size: 6, 8, 10, 12, 14
Thread: Uni 6/0 Black
Tail: Brown Hen hackle
Body: Muskrat or equivalent dubbing in Adams gray
Legs: Brown Hen hackle
Wings: Grizzly tips
Directions:
1) Overwrap (that term is for wrapping the majority of the length of the hook shaft) with lead or lead substitute using material approximately the same thickness as the hook diameter. Close wraps from five or six eye lengths back from the eye to five or six eye lengths before the bend.
2) Begin thread wrap at three or four eye lengths back from the eye and form a taper at the front and back of the lead wrap. It is not necessary to completely cover the lead with thread. Stop the thread behind the lead and before the bend and let the bobbin hang.
3) Using brown hen hackle, gather seven or eight fibers, keeping the tips even and tie in just before the hook bend making sure the feathers stay on top of the hook shaft. Secure with three or four firm wraps and let the bobbin rest forward of the tail tie in.
4) Begin dubbing by waxing the thread and adding a generous portion of dub. Tapering the dub on the thread will help tapering on the hook. Wrap forward, adding or subtracting dubbing to make a cigar shape, while covering the lead with dub. Stop at the forward taper point allowing five or six eye lengths for legs and wings. Using a bodkin or dubbing pick, loosen the dub fibers on the body to make a “buggy” look.
5) Select a hen hackle and tie in by the tip. To facilitate the tie in, hold the feather by the tip using tweezers and stroke back all but a few barbs very near the tip. This will get the barbs (to keep) out of the way and expose a tiny bit of stem, which makes the tie in easier and more secure. Trim the tip and soft wrap about two or three turns the prepared hackle feather. Stoke the barbs back as they are tied in. Use three or four wraps to secure and trim excess.
6) Use two grizzly tips, sized to the hook length. The tips can be tied in at the same time. Strip about a 1/8 inch of barbs and have the feathers face out. The shiny sides of both feathers are outward. Tie in firmly on top of the hook shaft immediately in front of the hackle. Allow room for the head.
7) Wrap head, whip finish, and coat with several coats of head cement.
Note: The original pattern also included a head tied with Peacock herl and fine copper wire wrapped on the body.
-Tim Welhelm, Tom Adams

