Sulphur Sparkle Dun
Fly of the Month 10.14
The quest for the perfect mayfly dun imitation fly pattern has been underway by anglers and tyers for centuries. Much work has been done to match a mayfly body in size, color and texture including extended bodies. Much work has also been done to imitate mayfly wings that both appear similar in size, color and silhouette as well as providing a floating capability. Mayfly fly patterns utilize a diversity of materials and have evolved tremendously in the last 100 years. In the last fifty years, anglers and tyers have paid more attention to the finer elements of the life cycle of the mayfly. They have made attempts to imitate every aspect of the mayfly while on or near the surface, basically in every occasion when a rise from a trout occurs.
Of the well-known heavy hatches in the southeast we should focus on Sulphur hatches or blue-winged olive (BWO) hatches. The Sulphur hatches are the most studied and likely are attributed to the most often used fly patterns, especially on tailrace rivers.
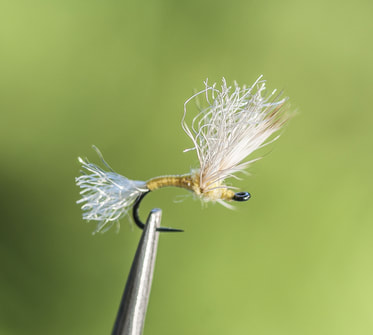
Sulphur Sparkle Dun
The Sparkle Dun is supposed to be an imitation of an emerging mayfly much like a comparadun is supposed to be an imitation of the dun after it sheds the shuck or just prior to taking off from the water surface. The tail of the Sparkle Dun fly pattern actually represents the shuck rather than the mayfly tail itself. One could argue that the Sparkle Dun is also an imitation of a crippled dun in that some duns struggle or even fail to remove the shuck, becoming crippled temporarily or permanently. Regardless, the trout must view the tail as a shuck and an indicator of a short-lived, easier protein to be acquired with less effort.
There is some controversy behind the comparadun. Swisher, on his web site has a "history of the no-hackle" fly, and shows a comparadun from either the late 60's or early 70's that he hints pre-dates the one made famous. The origin of the comparadun may well have been from the "Haystack" which has a deer hair tail, an Adirondack, New York fly pattern, possibly tied by Fran Betters? Regardless, a traditional comparadun is tied with a split tail made of spade hackle fibers or micro-fibbets, a dubbed body and deer hair wing in a 120-180 degree “fan” arc upright wings that are perpendicular to the hook shank as viewed from the front. The split tail mostly helps balance the fly while floating. The hollow deer hair helps the fly float well. Hollow deer hair was used by Bob Nastasi and Al Caucci originally and later Craig Matthews back in the late-1980’s and early-1990’s for his version of the comparadun, the Sparkle dun. Craig Matthews used sparkle yarn to differentiate between his fly pattern and the others.
Sparkle Duns are adaptations of the comparadun pattern created by Al Caucci and Bob Nastasi. It is a clever and deadly variation. It is essentially a comparadun with a Z-Lon tail that represents the shuck the dun has just emerged from. A trailing shuck usually of Z-Lon is tied in at the tail end of a comparadun fly to imitate a mayfly escaping from its exoskeleton (shuck) during emergence. Rene Harrop uses synthetic dubbing (longish fibers) for the trailing shuck.
The Sparkle Dun is one of our favorite small dry fly patterns to use on South Holston brown trout in the glassy, clear water. The Sparkle Dun is fished most effectively on the dead drift, and like most dry flies, try to get the fly to the fish before your line for the best results. It should sit low in the water like the naturals, yet is still quite visible. Use during a hatch when the duns are on the water and trout are feeding on them. The Sparkle Dun is fished as a dry fly; however it performs best when tied with a sparse wing allowing it to ride lower in the water affixed to the surface film. This better imitates the exact scenario that many mayflies find themselves in trying to dry their wings and escape their shuck. A dun that has just emerged from the shuck has to dry its wings before it can fly off; thus, it will be on the water for the maximum amount of time. If you were a trout, which mayfly dun would you prefer: one that might fly away before you sip it down, or one that is guaranteed to still be there after you spend the energy to reach it?
The Sparkle Dun is one of the most useful styles to learn to tie. It is not a difficult pattern to master, and it catches fish. When tying sparkle duns or comparaduns, the most critical step is picking out the right type of deer hair for the wing. The deer hair should be short with black tips and not hollow or only slightly hollow. Patches of this type of quality deer hair are hard to find so be prepared to spend some time looking for it.
Variations
The Sparkle Dun is a perfect dry fly pattern for trout to imitate many different natural mayflies, including Pale Morning Duns, Sulphur, and Baetis mayflies. The dry fly is sparse, yet gives a great drift. The deer hair lets you track the dry fly. Trout cannot resist a sparkle dun.
The following is a list of other Sparkle Dun fly patterns:
Adams Sparkle Dun
BWO (Baetis) Sparkle Dun
Callibaetis Sparkle Dun
Dark Olive Sparkle Dun
Gray Sparkle Dun
Green Drake Sparkle Dun
Light Olive Sparkle Dun
Mahogany Sparkle Dun
March Brown Sparkle Dun
Pale Evening Sparkle Dun
Pale Morning Sparkle Dun
Pale Yellow Sparkle Dun
Tan Sparkle Dun
Trico Sparkle Dun
Yellow-Olive Sparkle Dun
A useful variation is the CDC Sparkle Dun, which uses CDC fibers for the wing. This latter variation is sometimes tied with a mallard flank wing in front of the CDC. The trout care if the mallard flank is there or not. This dressing imitates a hatching pale morning dun. To imitate other mayfly duns, vary the size and color.
Improved Sulphur Sparkle Dun
Hook: Tiemco 206BL, size 14,16,18,20,22 or equivalent
Thread : Danville 70 yellow or equivalent
Abdomen : Tying thread
Thorax : Superfine Dubbing, sulphur yellow
Wing : Comparadun Deer hair, natural light tan
Tail/Shuck : Z-lon, olive brown
1. Mount hook and tie on thread two eyelengths back from the eye and advance to above the hook bend in tight, touching wraps. Trim waste and let the bobbin hang
2. The wing material is a very specific deer hair. Sold as comparadun hair it is essential to make a good selection in order to get a good wing. The hair must be hollow (deer hair) and the tips need to be fine. The hair must compress well and flair well also. Remember, you are only using the last half inch or so of hair. If it is not fine, it will make a severe bump when you trim away the waste after tying in. Select hair, roughly half the diameter of a pencil and trim away from the hide at the base of the hair. Cut as close to the skin as possible. Holding the hair by the tips in one hand use the other index finger and thumb to stroke out the short hairs and the underfur. The cleaner it is the tighter it will tie in. Once clean, put the hair in a stacker to even the tips. Remove from the stacker by the tips and measure the length of the wings to be about the same length as the hook shank. Continue holding the measured hair in your left hand and position over the hook shank. Use a soft wrap to finish the position and then pull a hard wrap. This will bind the hair and make it flair. Add two or three more tight wraps, progressing in touching turns, toward the hook bend. Lift the forward pointing hair, that will be the wing, and make several wraps immediately in front of the hair. This will bind it in while making it stand up. Let the bobbin hang.
3. Trim the deer hair fairly close to the upright wing. Do not trim so close that the wraps will have no purchase. Think of it as the thorax, stopping at the abdomen. Trimming at a slight angle will give a taper to the hair and will give a slope of hair to tie in with thread. Make several wraps to finish the wing tie in and take the bobbin to behind the wing and let the bobbin hang.
4. Select Z-lon bundle and trim to three inches. Separate the bundle into four equal sections. Take one of the bundles and after cutting one end square, hold against the upright wing and make the tips of the z-lon flush with the tips of the wing. Bind in with two thread wraps. Take tight and touching thread wraps to the hook bend while keeping the z-lon on top of the hook shank. Return the thread in tight and touching wraps to the back of the wing and advance the thread through the wing. That is, separate a third of the wing materials and advance the thread a turn, repeating with another third of the wing, finally binding the wing upright with several turns immediately in front of the wing. This is useful in many patterns to secure the hair and minimize slippage or rotation. Also, make an effort to keep the body thread wraps touching but avoiding overlapping. This will make a low profile, thin abdomen like the natural. Let the bobbin hang.
5. Dub a very thin noodle of dub onto the thread and form the thorax with two or three wraps behind the wing and the same in front. Dubbing should be very light and when tying in always begin at the front and make dubbed wraps to the rearmost point returning the dub wraps to the end point back at the front. Thin dubbing is essential in making this technique successful.
6. Whip finish and cut the thread.
7. The wing will be mostly upright at this point. Gently pull the hair to the left and right of the hook shank to make the hair wing form a 180 degree shape. Oftentimes, pushing the hair to vertical with a thumbnail is helpful. Note: Should the hair drift down over time while in the fly box, that indicates the binding wraps in step four were insufficient.
- Tom Adams, Alen Baker

