
Thunderhead
Fly of the Month 10.12
Thunderhead
It looks like a Wulff pattern but it is an original Southern Appalachian fly pattern developed by Fred Hall who lived in Bryson City, North Carolina. Fred and Allene Hall tied flies as part of making a living and sold them locally to sporting goods stores in the area in the 1950s.
The Thunderhead was created as the ideal dry fly for our freestone, pocket water streams in and around the Smokies. This fly is a great floater pattern. The pattern is tied exactly like any Wulff pattern that utilizes calf hair for upright and divided wings. After researching this fly as much as possible, I was not able to confirm whether this fly pattern actually pre-dates the world renown Wulff series or not. It was certainly utilized in the Smokies as far back as the late-1940s by our well known Tarheel fly fishermen like Mark Cathy and Cap Wiese. Jim Casada said “I wouldn’t be at all surprised if the Thunderhead was in use before the Wulff patterns. Certainly mountain folks were using what they called a Hair-Wing Royal Coachman long before the name Royal Wulff came along.”
Jim Casada believes the name of this fly comes from the notion that the calf hair appears “to resemble a big cloud formation rolling up in an afternoon on a hot summer’s day.” However, I find it most interesting that there is a ThunderheadMountain on the Tennesseeside of the Smokies and I have often wondered if an ole local angler fished a stream coming off Thunderhead Mountainand named the fly for the mountain. Again, according to Jim Casada who knew Fred Hall fairly well says “Fred would probably not have gone that far afield geographically for a name.” Well, it’s just a thought.
Jim Casada includes this fly in his Smoky Mountain Fly Box as “a traditional mountain favorite.” The fly was included in a sold-out poster of Southern Appalachian Fly Patterns by Vic Venters published by the North Carolina Wildlife Resources Commission. Roger Lowe includes the fly in his Fly Pattern Guide to the Smoky Mountains as two patterns, with a gray body and with a chocolate body. The chocolate body is a favorite on Tennesseestreams.
I find this pattern to be relatively easy to tie but it can be purchased in Size 12 or Size 14 at several places along the way to Appletree. I have actually purchased a dark olive body version as well. I have found no research on the dark olive version short of the fact that some of our “ole timers” still tie these flies in three different body colors today – gray, chocolate, black and dark olive! They are appropriately labeled as follows:
Thunderhead (original gray body version)
Chocolate Thunderhead
Black Thunderhead
Dark Olive Thunderhead
I fished the Thunderhead (the original gray body version) last spring at Appletree on a small wild stream in the area and caught and good number of wild rainbow trout including a very nice, hard fighting 14 inch rainbow. Now that is a trout worth bragging about in a wild stream. A Wulff pattern would probably have worked equally well, but the feeling of confidence with a proven local fly pattern is hard to beat. felt the heritage of local fly fishing we should all be proud of as North Carolinians.
While preparing this article, I fished the Thunderhead on a wild stream in the Wilson Creek area in late-August – a time when water temperatures tend to put the trout down due to low oxygen levels. I had a great early morning trek up this wild stream catching and releasing a total of 29 rainbows, many of these bows were small. However I caught and released four that were 8 inches, three that were 10 inches and one that was 12 inches. That’s a fine 3-4 hours experience on a hot summer day.
A special thanks to Jim Casada, Jim Dean and Roger Lowe for sharing their knowledge about the Thunderhead fly pattern. Tom and I plan to research and share more local or traditional Southern Appalachian fly patterns in the future. If you know of a pattern, let us know about it.
Fly of the Month 10.12 Thunderhead
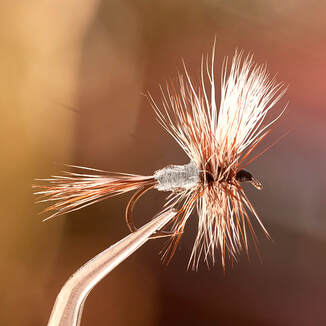
Hook: Dry Fly, Tiemco 100 or equivalent, Size: 10, 12, 14, 16, 18
Thread: Black Uni 8/0 or equivalent
Tail: Blend of brown and grizzly spade hackle
Wing: White Calf tail
Abdomen: Grey dubbing
Hackle: Coachman Brown and Grizzly dry rooster hackle
Directions:
1) Wrap thread starting two eye lengths from the eye to the hook bend above the hook point. Let the bobbin hang. Select a spade hackle ( this is the wide body feather, which on today’s capes is along the outside ) from a Coachman Brown and a Grizzly cape. Holding the tip in one hand, gently stroke back the barbs so they are at right angle to the stem. Use fingertips and select five or six barbs. Hold by their tips and pull away from the stem. This will keep the tips even. Select the other color spade hackle (which is already prepped and at right angles) and overlay the first with tips matching and pull the five or six barbs from the second color. Blend the two colors by rolling between your fingertips. Do your best to keep the tips aligned. Tie in the spade hackle at the hook bend with two or three light wraps and check the length. The tail should be one and one half the length of the shaft. Once you are happy with the length make one or two wraps to secure, trim the curled ends from the stem and wrap with tight, touching wraps forward to about the two thirds mark of the hook shaft. Let the bobbin hang.
2) Select calf tail fibers, trim from the tail and align with a stacker. Tie these in where the bobbin is hanging allowing for the height to be about one and one half the size of the hook gap. When tying the calf in, make sure you keep the back section (the part behind what will be upright) pinched tight and on top of the hook shaft. After three or four tight wraps for positioning, bring the thread forward of the tie in and under the calf. By pulling parallel to the hook shaft and toward the hook bend the calf will stand straight up. Make three or four wraps directly in front of the calf to maintain the upright position. Use your thumbnail to push the calf against the tie in point and it will be easy to divide into two even wings. Hold the wing closest to you with one hand and take the thread over the middle dividing the wings further. The thread will be on the opposite side of the hook at this point. Bring the thread around the wing and back across the middle further defining the divide. Make an “x” for three or four wraps and take the thread in tight wraps back to the hook bend above the barb. Let the bobbin hang.
3) Choose a medium grey dub. Muskrat or Adams in color. Add a small amount to waxed thread and spin on the thread very tightly. Make touching, slightly overlapping wraps forward to within one or two eye lengths of the wing. Most tiers will use too much dubbing. Think of it as doubling the thickness of the thread and you will not have too much. Let the bobbin hang.
4) Select one Brown rooster dry hackle and one Grizzly. They should be close to matching as possible. When selecting it will also help with the tie in if the stems are about the same thickness. They will tie in with the shiny side forward, toward the eye. Strip an eighth of an inch from each and tie in, one on top of the other so that the first wrap is behind the wing and in front of the dub. Advance the thread to the eye and let the bobbin hang.
5) Wrap the hackles forward one at a time. Two or three wraps behind the eye and the same in front. When wrapping the first color leave a small space between wraps to allow for the second color. Do not crowd the eye. Make a wrap close to the back of the wing on the first color and close to the front of the wing with the second color. After the first is advanced toward the eye stop short about two eyelengths and bind in with the thread. Clip the excess hackle as close to the thread as possible. Wrap the second color forward and wiggle it slightly as you wrap to squeeze it in between the first. Tie it off one turn in front of the first color and clip off the excess. Form a small thread head. Whip finish. Add cement. Enjoy a Southern Classic Dry fly.
Fly of the Month 10.12 Thunderhead - Tom Adams, Alen Baker
Thunderhead
It looks like a Wulff pattern but it is an original Southern Appalachian fly pattern developed by Fred Hall who lived in Bryson City, North Carolina. Fred and Allene Hall tied flies as part of making a living and sold them locally to sporting goods stores in the area in the 1950s.
The Thunderhead was created as the ideal dry fly for our freestone, pocket water streams in and around the Smokies. This fly is a great floater pattern. The pattern is tied exactly like any Wulff pattern that utilizes calf hair for upright and divided wings. After researching this fly as much as possible, I was not able to confirm whether this fly pattern actually pre-dates the world renown Wulff series or not. It was certainly utilized in the Smokies as far back as the late-1940s by our well known Tarheel fly fishermen like Mark Cathy and Cap Wiese. Jim Casada said “I wouldn’t be at all surprised if the Thunderhead was in use before the Wulff patterns. Certainly mountain folks were using what they called a Hair-Wing Royal Coachman long before the name Royal Wulff came along.”
Jim Casada believes the name of this fly comes from the notion that the calf hair appears “to resemble a big cloud formation rolling up in an afternoon on a hot summer’s day.” However, I find it most interesting that there is a ThunderheadMountain on the Tennesseeside of the Smokies and I have often wondered if an ole local angler fished a stream coming off Thunderhead Mountainand named the fly for the mountain. Again, according to Jim Casada who knew Fred Hall fairly well says “Fred would probably not have gone that far afield geographically for a name.” Well, it’s just a thought.
Jim Casada includes this fly in his Smoky Mountain Fly Box as “a traditional mountain favorite.” The fly was included in a sold-out poster of Southern Appalachian Fly Patterns by Vic Venters published by the North Carolina Wildlife Resources Commission. Roger Lowe includes the fly in his Fly Pattern Guide to the Smoky Mountains as two patterns, with a gray body and with a chocolate body. The chocolate body is a favorite on Tennesseestreams.
I find this pattern to be relatively easy to tie but it can be purchased in Size 12 or Size 14 at several places along the way to Appletree. I have actually purchased a dark olive body version as well. I have found no research on the dark olive version short of the fact that some of our “ole timers” still tie these flies in three different body colors today – gray, chocolate, black and dark olive! They are appropriately labeled as follows:
Thunderhead (original gray body version)
Chocolate Thunderhead
Black Thunderhead
Dark Olive Thunderhead
I fished the Thunderhead (the original gray body version) last spring at Appletree on a small wild stream in the area and caught and good number of wild rainbow trout including a very nice, hard fighting 14 inch rainbow. Now that is a trout worth bragging about in a wild stream. A Wulff pattern would probably have worked equally well, but the feeling of confidence with a proven local fly pattern is hard to beat. felt the heritage of local fly fishing we should all be proud of as North Carolinians.
While preparing this article, I fished the Thunderhead on a wild stream in the Wilson Creek area in late-August – a time when water temperatures tend to put the trout down due to low oxygen levels. I had a great early morning trek up this wild stream catching and releasing a total of 29 rainbows, many of these bows were small. However I caught and released four that were 8 inches, three that were 10 inches and one that was 12 inches. That’s a fine 3-4 hours experience on a hot summer day.
A special thanks to Jim Casada, Jim Dean and Roger Lowe for sharing their knowledge about the Thunderhead fly pattern. Tom and I plan to research and share more local or traditional Southern Appalachian fly patterns in the future. If you know of a pattern, let us know about it.
Fly of the Month 10.12 Thunderhead
Hook: Dry Fly, Tiemco 100 or equivalent, Size: 10, 12, 14, 16, 18
Thread: Black Uni 8/0 or equivalent
Tail: Blend of brown and grizzly spade hackle
Wing: White Calf tail
Abdomen: Grey dubbing
Hackle: Coachman Brown and Grizzly dry rooster hackle
Directions:
1) Wrap thread starting two eye lengths from the eye to the hook bend above the hook point. Let the bobbin hang. Select a spade hackle ( this is the wide body feather, which on today’s capes is along the outside ) from a Coachman Brown and a Grizzly cape. Holding the tip in one hand, gently stroke back the barbs so they are at right angle to the stem. Use fingertips and select five or six barbs. Hold by their tips and pull away from the stem. This will keep the tips even. Select the other color spade hackle (which is already prepped and at right angles) and overlay the first with tips matching and pull the five or six barbs from the second color. Blend the two colors by rolling between your fingertips. Do your best to keep the tips aligned. Tie in the spade hackle at the hook bend with two or three light wraps and check the length. The tail should be one and one half the length of the shaft. Once you are happy with the length make one or two wraps to secure, trim the curled ends from the stem and wrap with tight, touching wraps forward to about the two thirds mark of the hook shaft. Let the bobbin hang.
2) Select calf tail fibers, trim from the tail and align with a stacker. Tie these in where the bobbin is hanging allowing for the height to be about one and one half the size of the hook gap. When tying the calf in, make sure you keep the back section (the part behind what will be upright) pinched tight and on top of the hook shaft. After three or four tight wraps for positioning, bring the thread forward of the tie in and under the calf. By pulling parallel to the hook shaft and toward the hook bend the calf will stand straight up. Make three or four wraps directly in front of the calf to maintain the upright position. Use your thumbnail to push the calf against the tie in point and it will be easy to divide into two even wings. Hold the wing closest to you with one hand and take the thread over the middle dividing the wings further. The thread will be on the opposite side of the hook at this point. Bring the thread around the wing and back across the middle further defining the divide. Make an “x” for three or four wraps and take the thread in tight wraps back to the hook bend above the barb. Let the bobbin hang.
3) Choose a medium grey dub. Muskrat or Adams in color. Add a small amount to waxed thread and spin on the thread very tightly. Make touching, slightly overlapping wraps forward to within one or two eye lengths of the wing. Most tiers will use too much dubbing. Think of it as doubling the thickness of the thread and you will not have too much. Let the bobbin hang.
4) Select one Brown rooster dry hackle and one Grizzly. They should be close to matching as possible. When selecting it will also help with the tie in if the stems are about the same thickness. They will tie in with the shiny side forward, toward the eye. Strip an eighth of an inch from each and tie in, one on top of the other so that the first wrap is behind the wing and in front of the dub. Advance the thread to the eye and let the bobbin hang.
5) Wrap the hackles forward one at a time. Two or three wraps behind the eye and the same in front. When wrapping the first color leave a small space between wraps to allow for the second color. Do not crowd the eye. Make a wrap close to the back of the wing on the first color and close to the front of the wing with the second color. After the first is advanced toward the eye stop short about two eyelengths and bind in with the thread. Clip the excess hackle as close to the thread as possible. Wrap the second color forward and wiggle it slightly as you wrap to squeeze it in between the first. Tie it off one turn in front of the first color and clip off the excess. Form a small thread head. Whip finish. Add cement. Enjoy a Southern Classic Dry fly.
Fly of the Month 10.12 Thunderhead - Tom Adams, Alen Baker