
Fly of the Month 06.12 Woolly Bugger
If you could only have one fly to fish in all seasons and all conditions, our choice would be the classic and ole reliable…
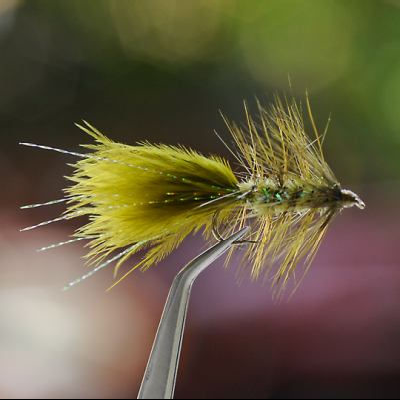
Woolly Bugger
The Woolly Bugger can be fished as either a wet fly or streamer throughout the water column in coldwater, freshwater and saltwater - typically fished in streams, rivers, ponds, lakes, and tidal flats. It is considered an easy fly pattern to tie and typically one of the top patterns in any fly box.
"The Woolly Bugger is so effective; it should be banned from some watersheds. I suspect its effectiveness is due to its resemblance to so many edible creatures in the water--nymphs, leeches, salamanders, or even small sculpins. Its tail undulating behind a fiber, bubble-filled body is just too much for most fish to resist. It just looks like a meal!" Bill Hunter, The Professionals' Favorite Flies.
The Woolly Bugger may be tie in a number of sizes, styles and colors. Sizes used on trout streams range from size 14 down to size 6, in freshwater size 10 down to size 2 are typically used and in saltwater a Woolly Bugger are tied on a stainless steel hook from size 6 down to size 1/0. The styles vary from a simple one color unweighted to a complex multi-color, Conehead with flash and rubber legs added.
Colors generally found on the market include black, brown, olive, white, yellow, pink and purple. It is no surprise that trout may well take a pink or purple Woolly Bugger while refusing other more natural looking nymphs and wet flies. I suspect it’s the bugger look that attracts their attention. I have had the most success with an olive in our freestone streams under normal water conditions and black under high, dingy water conditions.
Here are the many species that Kelly McCoy (a.k.a. Rivergirl) says that she has caught with a good ‘ole hot pink beadhead bugger, ‘kissed’ and released (most of the time)– Freshwater: Brook Trout, Rainbow Trout, Brown Trout, Smallmouth Bass, Rock Bass, Chubs, Warpaint Shiner, Largemouth Bass, Bluegill Sunfish, Redear Sunfish and Warmouth Sunfish; and – Saltwater: Snook,Spotted Sea Trout, Redfish , Lane Snapper, Mutton Snapper, Cubera Snapper, Vermilion Snapper, Gray Snapper, Ladyfish, Pompano,Permit, Crevalle Jack, Black Drum, Sheepshead and Weakfish.
To fish the Woolly Bugger as a streamer, cast across and downstream and allow the fly to tail-out, then strip the fly back upstream. Often then the trout will take the fly on the tail-out or soon after the strip begins. This technique is highly effective working across the riffle area between pools and just beyond the riffles.
Any large, deep pool may be fished with a woolly Bugger by adding some weight and casting across the pool, allowing the fly to sink to near bottom. Strip back across the bottom much like one would retrieve a spinner in the trout’s territory.
To fish the Woolly Bugger as a wet fly, cast across and upstream and allow the fly to dead drift downstream while controlling the slack. Allow the fly to rise up much like an emerger at the end of the drift. This technique is most effect in the deeper runs.
This is a must have fly and the go to fly when all else fails.
Fly of the Month 06.12 Woolly Bugger
Hook: Streamer, 3x to 4x, Tiemco 5263 or equivalent, Size: 4, 6, 8, 10, 12, 14
Thread: 8/0 Uni color to match - olive, black, brown, etc
Weight: Lead wraps, Bead, Cone
Body: Chennille – olive, black, brown, etc
Ribbing: Copper, Gold or Silver wire
Hackle: Saddle feather –olive, black, brown, etc
Tail: Marabou feather – olive, black, brown, etc with flash
Note : This is a must have, at all times and all conditions, fly and the variances for tying are innumerous. Head weight, color combinations are quite
interchangeable with equal success. This is only a starting point for the tiers imagination and creativity.
Directions :
1) Choose the method for weighting or choose no weight at all. For this example we will choose a bead head. Debarb the point of the hook and slide the bead to the head and affix the hook in the vice. Begin thread wraps immediately behind the bead and wrap tight wraps to the hook bend. Let the bobbin hang.
2) Choose a marabou feather. Size the length to be approximately the length of the hook shank. Holding the feather in your left hand by the tip, choose only enough feather of the appropriate length and stroke in the direction of the tip to separate the wanted feather from the waste. Eventually there will be a small section of the stem exposed at the tie in point. Once you are happy that this is the correct length for the tail, strip the marabou feathers away from the stem that will not form the tail, to reduce bulk. If the feathers are too unruly, you can slightly moisten your fingertips and control the shape until tied in. Be careful when moistening to not choose more feathers than needed (they will shrink down remarkably) in that it will add unnecessary bulk to the fly. Tie in above the hook point being careful to keep the marabou ontop of the hook shank. Tie in firmly but not completely and let the bobbin hang. Take the thread in tight turns to the eye tying in the stem on top of the hook shank as you go. Let the bobbin hang. Some marabou feathers will not allow for this technique. Should you not be able to strip the excess effectively, simply bind the excess to the top of the hook shank and wrap tightly with thread one set of touching turns the thorax. Cut away the remainder of marabou and
use open wraps to return the thread to the where the tail was tied in.
3) Select two flash fibers about three inches in length. Match the tips and fold at the midpoint. Tie in the folded midpoint immediately in front of the tail, on top of the hook shank so that two strands are on each side. Trim the lengths to be even and slightly longer than the marabou. Advance the thread to the head and let the bobbin hang.
4) Select about three inches of wire and tie in on top of the hook shank and wrap in tight turns to the tail tie in. Let the bobbin hang.
5) Select a saddle hackle which has barbs of the right length for about four or five turns. The length should be about one and one half the height of the hook gape. Saddle hackle barbs will increase in length as it goes toward the base. That is okay and will make a slight cone shape to the hackle, getting longer as it nears the head. It is also good to have some webby fibers at the head of the fly to form a collar of wavy material. Tie in with several wraps and let the bobbin hang.
6) Select about three inches of chenille and with fingernails or gentle pressure from scissors, strip away the chenille strands revealing a short section of core thread. About one eighth inch or so. Tie in at the tail on top of the hook shank and advance the thread in tight turns to the eye. Let the bobbin hang. Advance the chenille to the head of the hook at the bead. Tie in and let the bobbin hang.
7) Advance the saddle hackle with the shiny side forward in wraps between the chenille wraps (it is not necessary to fill every wrap) to just behind the bead head. At this point the hackle should be getting “webby”. Make several firm wraps of thread to secure the hackle and let the bobbin hang. Do not trim the hackle yet.
8) Advance the wire in the opposite direction as the hackle (wrap toward you not away from you) and with a wiggling motion avoid trapping too many fibers. This will hold and protect the hackle. At the bead head make two turns of wire, bind with two or three thread wraps and break off excess wire.
9) Finish the hackle wrap, forming a collar by making two or three turns of the webby hackle.
10) Whip finish, trim the thread and you are finished.
There are a large number of variations for this fly pattern including Black Woolly Bugger, Brown Woolly Bugger, Olive Woolly Bugger, White Woolly Bugger and Hot Pink Woolly Bugger.
- Tom Adams, Alen Baker
If you could only have one fly to fish in all seasons and all conditions, our choice would be the classic and ole reliable…
Woolly Bugger
The Woolly Bugger can be fished as either a wet fly or streamer throughout the water column in coldwater, freshwater and saltwater - typically fished in streams, rivers, ponds, lakes, and tidal flats. It is considered an easy fly pattern to tie and typically one of the top patterns in any fly box.
"The Woolly Bugger is so effective; it should be banned from some watersheds. I suspect its effectiveness is due to its resemblance to so many edible creatures in the water--nymphs, leeches, salamanders, or even small sculpins. Its tail undulating behind a fiber, bubble-filled body is just too much for most fish to resist. It just looks like a meal!" Bill Hunter, The Professionals' Favorite Flies.
The Woolly Bugger may be tie in a number of sizes, styles and colors. Sizes used on trout streams range from size 14 down to size 6, in freshwater size 10 down to size 2 are typically used and in saltwater a Woolly Bugger are tied on a stainless steel hook from size 6 down to size 1/0. The styles vary from a simple one color unweighted to a complex multi-color, Conehead with flash and rubber legs added.
Colors generally found on the market include black, brown, olive, white, yellow, pink and purple. It is no surprise that trout may well take a pink or purple Woolly Bugger while refusing other more natural looking nymphs and wet flies. I suspect it’s the bugger look that attracts their attention. I have had the most success with an olive in our freestone streams under normal water conditions and black under high, dingy water conditions.
Here are the many species that Kelly McCoy (a.k.a. Rivergirl) says that she has caught with a good ‘ole hot pink beadhead bugger, ‘kissed’ and released (most of the time)– Freshwater: Brook Trout, Rainbow Trout, Brown Trout, Smallmouth Bass, Rock Bass, Chubs, Warpaint Shiner, Largemouth Bass, Bluegill Sunfish, Redear Sunfish and Warmouth Sunfish; and – Saltwater: Snook,Spotted Sea Trout, Redfish , Lane Snapper, Mutton Snapper, Cubera Snapper, Vermilion Snapper, Gray Snapper, Ladyfish, Pompano,Permit, Crevalle Jack, Black Drum, Sheepshead and Weakfish.
To fish the Woolly Bugger as a streamer, cast across and downstream and allow the fly to tail-out, then strip the fly back upstream. Often then the trout will take the fly on the tail-out or soon after the strip begins. This technique is highly effective working across the riffle area between pools and just beyond the riffles.
Any large, deep pool may be fished with a woolly Bugger by adding some weight and casting across the pool, allowing the fly to sink to near bottom. Strip back across the bottom much like one would retrieve a spinner in the trout’s territory.
To fish the Woolly Bugger as a wet fly, cast across and upstream and allow the fly to dead drift downstream while controlling the slack. Allow the fly to rise up much like an emerger at the end of the drift. This technique is most effect in the deeper runs.
This is a must have fly and the go to fly when all else fails.
Fly of the Month 06.12 Woolly Bugger
Hook: Streamer, 3x to 4x, Tiemco 5263 or equivalent, Size: 4, 6, 8, 10, 12, 14
Thread: 8/0 Uni color to match - olive, black, brown, etc
Weight: Lead wraps, Bead, Cone
Body: Chennille – olive, black, brown, etc
Ribbing: Copper, Gold or Silver wire
Hackle: Saddle feather –olive, black, brown, etc
Tail: Marabou feather – olive, black, brown, etc with flash
Note : This is a must have, at all times and all conditions, fly and the variances for tying are innumerous. Head weight, color combinations are quite
interchangeable with equal success. This is only a starting point for the tiers imagination and creativity.
Directions :
1) Choose the method for weighting or choose no weight at all. For this example we will choose a bead head. Debarb the point of the hook and slide the bead to the head and affix the hook in the vice. Begin thread wraps immediately behind the bead and wrap tight wraps to the hook bend. Let the bobbin hang.
2) Choose a marabou feather. Size the length to be approximately the length of the hook shank. Holding the feather in your left hand by the tip, choose only enough feather of the appropriate length and stroke in the direction of the tip to separate the wanted feather from the waste. Eventually there will be a small section of the stem exposed at the tie in point. Once you are happy that this is the correct length for the tail, strip the marabou feathers away from the stem that will not form the tail, to reduce bulk. If the feathers are too unruly, you can slightly moisten your fingertips and control the shape until tied in. Be careful when moistening to not choose more feathers than needed (they will shrink down remarkably) in that it will add unnecessary bulk to the fly. Tie in above the hook point being careful to keep the marabou ontop of the hook shank. Tie in firmly but not completely and let the bobbin hang. Take the thread in tight turns to the eye tying in the stem on top of the hook shank as you go. Let the bobbin hang. Some marabou feathers will not allow for this technique. Should you not be able to strip the excess effectively, simply bind the excess to the top of the hook shank and wrap tightly with thread one set of touching turns the thorax. Cut away the remainder of marabou and
use open wraps to return the thread to the where the tail was tied in.
3) Select two flash fibers about three inches in length. Match the tips and fold at the midpoint. Tie in the folded midpoint immediately in front of the tail, on top of the hook shank so that two strands are on each side. Trim the lengths to be even and slightly longer than the marabou. Advance the thread to the head and let the bobbin hang.
4) Select about three inches of wire and tie in on top of the hook shank and wrap in tight turns to the tail tie in. Let the bobbin hang.
5) Select a saddle hackle which has barbs of the right length for about four or five turns. The length should be about one and one half the height of the hook gape. Saddle hackle barbs will increase in length as it goes toward the base. That is okay and will make a slight cone shape to the hackle, getting longer as it nears the head. It is also good to have some webby fibers at the head of the fly to form a collar of wavy material. Tie in with several wraps and let the bobbin hang.
6) Select about three inches of chenille and with fingernails or gentle pressure from scissors, strip away the chenille strands revealing a short section of core thread. About one eighth inch or so. Tie in at the tail on top of the hook shank and advance the thread in tight turns to the eye. Let the bobbin hang. Advance the chenille to the head of the hook at the bead. Tie in and let the bobbin hang.
7) Advance the saddle hackle with the shiny side forward in wraps between the chenille wraps (it is not necessary to fill every wrap) to just behind the bead head. At this point the hackle should be getting “webby”. Make several firm wraps of thread to secure the hackle and let the bobbin hang. Do not trim the hackle yet.
8) Advance the wire in the opposite direction as the hackle (wrap toward you not away from you) and with a wiggling motion avoid trapping too many fibers. This will hold and protect the hackle. At the bead head make two turns of wire, bind with two or three thread wraps and break off excess wire.
9) Finish the hackle wrap, forming a collar by making two or three turns of the webby hackle.
10) Whip finish, trim the thread and you are finished.
There are a large number of variations for this fly pattern including Black Woolly Bugger, Brown Woolly Bugger, Olive Woolly Bugger, White Woolly Bugger and Hot Pink Woolly Bugger.
- Tom Adams, Alen Baker