Fly of the Month 08.11 Yellow Humpy
This “fly of the month” represents the latest in the Tim Wilhelm/Tom Adams series. How would you like to carry in your fly box and fly that represents a caddis, green drake, stonefly, "hoppers," beetles, and, in small sizes, blue-winged olives or even midges? If you are carrying a Humpy you are and by varying the colors you have all sort of magic in your fly box although the most common color
is yellow. Besides representing several different insects it also goes by several names including Goofus Bug and Horner Deer Hair Fly.
In his article "Goofus Bug Evolution," for American Angler (Spring, 1990) Pat Barnes credits this pattern to Keith Kenyon. Kenyon, a Montana guide and tier, secretly created it in 1944 for the Firehole River, says Pat. The pattern's effectiveness leaked out and requests for that "goofy deer hair fly" bombarded Pat and Sig in their West Yellowstone shop after it opened in 1946.
Thus the name "Goofus Bug" was adopted and its popularity in Montana rocketed. When Dan Bailey began offering the Goofus Bug in the early 1950s it was labeled "The Poor Man's Wulff." Bailey gets credit for starting the Blond Goofus Bug, tied from white or bleached deer body hair. This also made its appearance in his mail order catalogue in the early 1950s. The name Humpy seems to originate in Wyoming where Jack Dennis, besides creating the Royal Humpy variation, began commercially tying the Humpy with Elk hair. Whatever your name of choice, it is a good producer, floats well and is well suited for using with a dropper.
Fly of the Month 08.11 Yellow Humpy
Hook: Dry Fly, standard length, Tiemco 100 or equivalent, Size: 10, 12, 14, 16
Thread: 8/0 Uni or equivalent
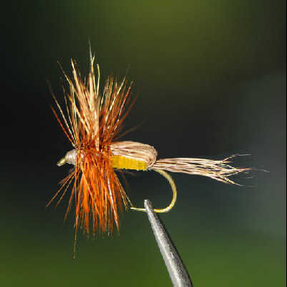
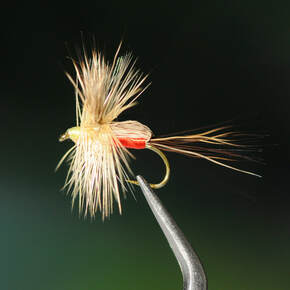
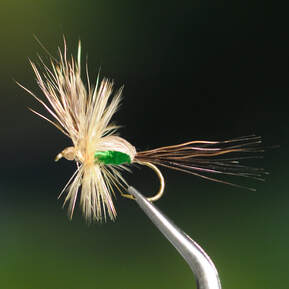
Abdomen: Floss, Stretch Floss, Thread, Dubbing- Yellow, Red, Green, Tan. Orange
Wingcase: Deer Body hair, Elk Body hair – natural or bleached
Wing: Elk body hair, natural , deer body hair, kip or calf tail
Tail: Moose body hair, deer hair, elk hair
Hackle: Rooster badger and brown
Note: There are as many variations on the tying details for the body and wings as any fly I know. This is one of the several methods of tying and is one of the easier methods. The photos illustrate some of the optional methods.
Directions :
1) Wrap body with tight, touching wraps beginning about three eyelengths from the eye and stopping at the bend above the barb. Let the bobbin hang.
2) Select several moose hair, clean and stack. You may want to trim some, just for handling purposes. Set aligned hair on top of the hook and gently secure with several light wraps and verify the length. Once satisfied with the length, which should be about the length of the hook shaft, tie down softly for the first several wraps from the back and increase pressure as you advance toward the eye. This will avoid the hair standing or splaying. Trim the excess and bring the bobbin back to the bend. Let the bobbin hang.
3) Select a medium size clump of deer/elk hair and clean the underfur thoroughly. Stack and remove with your left hand (for right handed tyers). The length should be about one and one half the length of the shaft. Tie in softly, keeping the hair pinched firmly with your left hand, with the tips facing away from the eye at the point directly above the hook barb. Make certain the hair stays on top of the shaft as you tie in by advancing forward, adding a little more pressure along the way. Stop about one third back from the eye. Do not crowd the eye, there is a lot more to go. Wrap the thread back to the tie in tight, touching wraps and let the bobbin hang.
4) The underbody can be various materials. Floss, Stretch Floss, Tying thread, or even dubbing. Tie the floss in as far back as possible, trim the
excess and advance the thread to about one third back of the eye. Wrap the floss forward to the thread and tie off. Let the bobbin hang.
5. Using your left hand, pinch the deer hair and pull over the hook shank and tie in where you left the bobbin. Make sure by pinching the deer hair stays on top and aligned as possible. Secure with thread wraps. Using thread, raise the deer hair to upright by advancing the thread to immediately in front and pulling the thread toward the hook bend.
6. Split the deer hair in to two wings with x-wraps.
7. Tie in rooster hackle and wrap three turns behind the wings and four in front and form a head. Whip finish and dress the head.
Other fly patterns in this series include: Black Humpy, Green Humpy, Orange Humpy and Red Humpy
- Tom Adams, Tim Wilhelm


