
Fly Tying Basics

There is nothing like landing a beautiful trout using your own creations that replicate nature. That enjoyment alone can add years to anyone’s life. At some point in the fly fisher’s life, the question will arise, “Should I buy or tie my own flies? A fly fisher comes into fly tying with his or her own explanation as to why they have made the choice they have. Most enjoy the sensation of luring a trout to an artificial fly brought to life from materials such as thread and feathers. Some to learn more about the life cycles (entomology) of the flies themselves. Others to save money from flies tangled in trees and shrubs from a way-ward cast.
There are many websites, books and videos available that are awesome resources. Also, members of our chapter has a hands-on fly tying class that you can attend. Fly tying classes can be offered by local fly shops as well. Be sure to navigate further into the fly tying area to get some more tips and techniques and as always, just enjoy yourself!
There are many websites, books and videos available that are awesome resources. Also, members of our chapter has a hands-on fly tying class that you can attend. Fly tying classes can be offered by local fly shops as well. Be sure to navigate further into the fly tying area to get some more tips and techniques and as always, just enjoy yourself!
|
Beginner Instructions for Fly Tying
An example fly pattern recipe for a basic Wet Fly: Hook: Mustad 3906B wet/nymph, size 12 Thread: 6/0 waxed fly tying thread, black Tail: red saddle hackle Body: peacock herl Hackle: brown or tan hen hackle The 3 steps to the Basic Wet Fly are: (a) attaching the tail (b) creating the body (c) attaching the hackle Getting Started 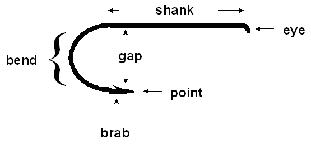
The Basic Elements of a Fishing Hook
Some hooks may be mounted with the barb covered which will prevent snagging the thread on the point.
|
These instructions go into specific detail to show you the aspects of each individual step. However, there are only 3 principal steps in tying a wet fly (for example), everything else is fine detail and often additional steps; so do not let the length of these instructions put off your tying efforts. This set of instructions is written to provide you with a guide to help you remember all the steps that demonstrate how to tie a fly pattern. You can conclude the general steps required to building a fly by reading the fly pattern recipe. Fly Tying classes are a good start to learning the tricks and techniques of fly tying. The best way to become proficient is to practice at home and tie the same fly several times. You will know that you have nailed down the skills when you can tie one fly after another and have them come out similar.
The sequence below are in tying order. First review tying tools to get a basic understanding of the tools of tying. After you are familier with the tools, move on to the next area; Parts of a hook; and so on, and you will have a finished fly in no time
Parts of the Hook The size of the fly is determined by the width of the gap. The larger the number, the smaller the fly. For example, dry flies are commonly tied from size #8 (fairly large) down to tiny #22 flies (midges, tricos, etc.). The length of the shank may change from one hook style to another. For example, dry flies are commonly tied on hooks with a “normal” shank length. Streamers are often tied on 3XL (3 extra long) hooks. Using a Vise
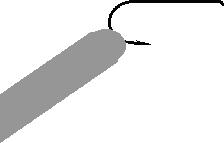
If you are right-handed, set up the vise so the opening faces your right. If you prefer to fish with a barbless hook, crush the point now – BEFORE you mount it in the vise. Place the hook firmly in the vise. The vise should hold firmly enough that the hook will “ring” if you pluck it with your finger, but not so hard that it dents the metal. Make sure you leave enough room to work on all sides of the hook. Be sure that you do not obstruct the shank of the hook. Applying the Thread
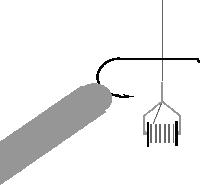
Attaching the thread – Step 1 Hold the end of the thread in your left hand. Let the bobbin hang down BEHIND the shank of the hook. Attaching the thread – Step 2
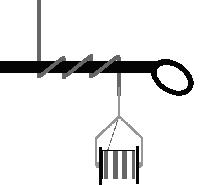
Begin winding the thread by pulling the bobbin toward you while coming UNDER the hook, then wrap over the hook away from yourself over the TOP of the hook. Take about 4 to 5 windings toward the eye of the hook. These should be space uniformly, each wrap going directly in front of the previous wrap. The tension on the bobbin should be set so that the thread can pull out easily, but the bobbin should stay in place under its own tension if you let it hang loose. Attaching the thread – Step 3
ind the thread back towards the bend, wrapping directly over the earlier wraps, until you reach the middle of the hook shank. Attaching the thread – Step 4
CAREFULLY clip off the part of the thread that you have been holding in your left hand (the “tag end”). HINT: Pay particular attention to the location of the thread from the bobbin whenever you cut thread or material. Always try to pull the item to be cut on top of the hook so it will be on the opposite side of the hook from the thread that you want to keep using. Wrap to the bend Continue wrapping the thread towards the bend of the hook. Stop wrapping when the thread falls somewhere between the point and the barb. |
Starting the Material with a Pinch Loop
With the thread secure, take any piece of material such as wire, floss, yarn or hackle fibers and pinch both the material and the hook shank with the fingertips from the top side of the hook shank and from behind the hook bend. As the thread from the bobbin is raised above the hook shank, pinch the thread also, and then bring a soft loop down behind the hook shank and within the pinching fingers, pinching the loop. Hold the pinch as you pull down on the thread with the bobbin from the down side of the hook shank. The loop will close tightly on the material securing the material on top of the hook shank. Repeat the pinch loops one or two more times, then follow with one or two wraps. The material should not have moved from the top position and be tied tightly in place as long as there is tension on the thread from the bobbin. For practice before tying your first fly or if you are out of practice, unwrap the thread and repeat starting the material with a pinch loop again and again until you have some confidence in this task.
Some fly tyers do not use the pinch loop method. They place the material on the hook with a slight angle and carefully make a first loop. The angle of the material to the hook shank traps the material as it slides into place allowing the first soft loop to be tightened from the down side. This controlled-slide method works fine for tying in many materials but requires some practice for materials such as hair and other materials that are slippery or clumped together and tied down.
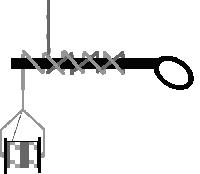
Tying a Half-Hitch Manually
With the thread secured, release about six extra inches from the bobbin. While keeping the thread tight between the hook and the bobbin, use two fingers to hook the thread and twist such that a simple loop forms around the two fingers. If you are right-handed, with the palm of the hand pointing toward the fly the fingers go down on the thread and the twist is clockwise. If you are left-handed, with the palm of the hand point toward the fly the fingers go down on the thread and the twist is counterclockwise.
Keeping the thread tight between the hook, the fingers and the bobbin, work the thread crossing point of the loop to the front of the hook shank and the loop over the fly such that the back of the loop is against the back side of the hook shank. With the two fingers keeping the loop tight and tight to the hook, let go of the bobbin and use the other hand and one finger to press the back of the loop firmly to the back of the hook. With the one finger applying pressure, remove the two finger of the other hand from the loop. Use this free hand to grab the bobbin, pull in some of the thread, tighten the line and pull the loop down securely into a half-hitch around the fly. For practice before tying your first fly or if you are out of practice, repeat tying half-hitches in this manner over and over again until you have a rhythm and confidence that you can tie a half-hitch step by step.
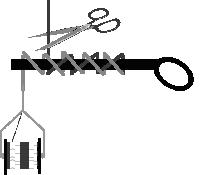
Using a Half-Hitch Tool
As an alternative method or if you have not achieved a degree of confidence in manually tying a half-hitch, use the half-hitch tool and practice more. With the thread tight between the hook and the bobbin, the half-hitch tool is used to twist the line into a loop by coming down on the thread and using the end of the half-hitch tool to catch the line, turning the line into a loop around the end of the tool. Work the end of the tool to the eye of the hook. Put the eye of the hook into the hole in the end of the tool by repositioning the tool. The very end of the tool should be exactly where you want to place the half-hitch. Pull on the thread steadily as you remove the half-hitch tool such that the half-hitch is tied in place. For practice before tying your first fly or if you are out of practice, repeat tying half-hitches in this manner over and over again until you have a confidence that you can tie a half-hitch using the half-hitch tool.
Both methods of tying a half-hitch must be mastered. The half-hitch tool can only reach down the hook shank and over materials to a certain point. Beyond that point, if a half-hitch is needed, the manual method allows for fairly large loops to be moved over materials and allows the half-hitch to be placed exactly where needed in every case.
Some fly tyers use a single finger in the same manner as the half-hitch tool by forming a small loop on the very tip of the finger. Then place the finger tip on the hook eye and pull on the bobbin thread to allow the loop to slide off the finger and close on the hook shank. Smaller fingers work best for this alternative manual technique.
Using a Matarelli Style Whip Finisher
With the thread secure to the hook shank, practice whip finishing on the bare hook. With about six inches of thread taut between the hook and the bobbin, grasp your Matarelli Style Whip Finisher; hold the stem to prevent the tool from rotating. With the hook end down, hook the thread with the hook part of the whip finisher. Bring the tool down on the thread such that the curved-end part of the whip finisher and the hook part grab the thread. In a similar manner as tying a half-hitch, the tool is positioned to twist or rotate and grab the thread to form a loop. Hold the thread from the bobbin up to keep the thread in the indention or curved end. The thread should wrap around the whip finisher such that it looks like an upside-down “figure 4”. Do not apply too much pressure to the thread, only enough to keep it slightly tight. The bobbin and thread are taut and parallel to the hook shank with the bobbin to the tail of the hook and the whip finisher tool to the head. The thread is taut to the hook and square to the shank. At this point, the whip finisher may be rotated around the hook to make a tight loop. Again, do not apply too much pressure to the thread, just
enough to remove any slack in the thread.
Continue to wrap the thread with the whip finisher, allowing thread to be pulled into the knot as needed. If you have too much pressure on the bobbin, the thread will bind up and will not feed into the knot as needed. After you have made four to seven wraps, lift the whip finisher and reposition it such that the indention or curved end part of the whip finisher is first removed. The thread will slide off the bump of the indention or curved-end part of the whip finisher while keeping slight tension on the thread. Pull the bobbin away from the hook and pull the whip finisher to the hook. Once the whip finisher is pulled to the hook, the hook part of the whip finisher is removed as the thread is fully tightened and the whipping completed.
Practice the whip finish dozens of times to burn this technique into memory well. Use a bare hook and practice. When you have built up a lump of thread, strip the hook with a razor blade and start over. For practice before tying your first fly or if you are out of practice, repeat whip finishing in this manner over and over again until you have a confidence that you can whip finish using the whip finisher tool.
With the practice completed, use a razor blade to cut the many whip finishes from the hook or simply discard the practice hook and get another hook for tying your first fly.
Hackling a Fly
Most dry fly patterns use one or more hackle feather for hackling a fly. A stiff dry hackle feather of the right size from a quality rooster neck is typically used to imitate or suggest legs. Tied as a radial collar around the forward body of the fly, the many stiff hackle fibers set onto the surface film of the water, supporting and keeping the fly afloat. If two hackle feathers are used in a fly pattern they may be tied in together, then wrapped through the same space on the hook shank, one over the other. In some patterns, such as a Bivisible dry fly, two or even more hackle feathers are wrapped back to back. Some two hackle fly patterns will have a separate aft-hackle and fore-hackle which are separated by some amount of body material. From the underside, the view that the fish sees, the hackle imitates the insect’s legs riding on the surface.
With the thread secure, take any piece of material such as wire, floss, yarn or hackle fibers and pinch both the material and the hook shank with the fingertips from the top side of the hook shank and from behind the hook bend. As the thread from the bobbin is raised above the hook shank, pinch the thread also, and then bring a soft loop down behind the hook shank and within the pinching fingers, pinching the loop. Hold the pinch as you pull down on the thread with the bobbin from the down side of the hook shank. The loop will close tightly on the material securing the material on top of the hook shank. Repeat the pinch loops one or two more times, then follow with one or two wraps. The material should not have moved from the top position and be tied tightly in place as long as there is tension on the thread from the bobbin. For practice before tying your first fly or if you are out of practice, unwrap the thread and repeat starting the material with a pinch loop again and again until you have some confidence in this task.
Some fly tyers do not use the pinch loop method. They place the material on the hook with a slight angle and carefully make a first loop. The angle of the material to the hook shank traps the material as it slides into place allowing the first soft loop to be tightened from the down side. This controlled-slide method works fine for tying in many materials but requires some practice for materials such as hair and other materials that are slippery or clumped together and tied down.
Tying a Half-Hitch Manually
With the thread secured, release about six extra inches from the bobbin. While keeping the thread tight between the hook and the bobbin, use two fingers to hook the thread and twist such that a simple loop forms around the two fingers. If you are right-handed, with the palm of the hand pointing toward the fly the fingers go down on the thread and the twist is clockwise. If you are left-handed, with the palm of the hand point toward the fly the fingers go down on the thread and the twist is counterclockwise.
Keeping the thread tight between the hook, the fingers and the bobbin, work the thread crossing point of the loop to the front of the hook shank and the loop over the fly such that the back of the loop is against the back side of the hook shank. With the two fingers keeping the loop tight and tight to the hook, let go of the bobbin and use the other hand and one finger to press the back of the loop firmly to the back of the hook. With the one finger applying pressure, remove the two finger of the other hand from the loop. Use this free hand to grab the bobbin, pull in some of the thread, tighten the line and pull the loop down securely into a half-hitch around the fly. For practice before tying your first fly or if you are out of practice, repeat tying half-hitches in this manner over and over again until you have a rhythm and confidence that you can tie a half-hitch step by step.
Using a Half-Hitch Tool
As an alternative method or if you have not achieved a degree of confidence in manually tying a half-hitch, use the half-hitch tool and practice more. With the thread tight between the hook and the bobbin, the half-hitch tool is used to twist the line into a loop by coming down on the thread and using the end of the half-hitch tool to catch the line, turning the line into a loop around the end of the tool. Work the end of the tool to the eye of the hook. Put the eye of the hook into the hole in the end of the tool by repositioning the tool. The very end of the tool should be exactly where you want to place the half-hitch. Pull on the thread steadily as you remove the half-hitch tool such that the half-hitch is tied in place. For practice before tying your first fly or if you are out of practice, repeat tying half-hitches in this manner over and over again until you have a confidence that you can tie a half-hitch using the half-hitch tool.
Both methods of tying a half-hitch must be mastered. The half-hitch tool can only reach down the hook shank and over materials to a certain point. Beyond that point, if a half-hitch is needed, the manual method allows for fairly large loops to be moved over materials and allows the half-hitch to be placed exactly where needed in every case.
Some fly tyers use a single finger in the same manner as the half-hitch tool by forming a small loop on the very tip of the finger. Then place the finger tip on the hook eye and pull on the bobbin thread to allow the loop to slide off the finger and close on the hook shank. Smaller fingers work best for this alternative manual technique.
Using a Matarelli Style Whip Finisher
With the thread secure to the hook shank, practice whip finishing on the bare hook. With about six inches of thread taut between the hook and the bobbin, grasp your Matarelli Style Whip Finisher; hold the stem to prevent the tool from rotating. With the hook end down, hook the thread with the hook part of the whip finisher. Bring the tool down on the thread such that the curved-end part of the whip finisher and the hook part grab the thread. In a similar manner as tying a half-hitch, the tool is positioned to twist or rotate and grab the thread to form a loop. Hold the thread from the bobbin up to keep the thread in the indention or curved end. The thread should wrap around the whip finisher such that it looks like an upside-down “figure 4”. Do not apply too much pressure to the thread, only enough to keep it slightly tight. The bobbin and thread are taut and parallel to the hook shank with the bobbin to the tail of the hook and the whip finisher tool to the head. The thread is taut to the hook and square to the shank. At this point, the whip finisher may be rotated around the hook to make a tight loop. Again, do not apply too much pressure to the thread, just
enough to remove any slack in the thread.
Continue to wrap the thread with the whip finisher, allowing thread to be pulled into the knot as needed. If you have too much pressure on the bobbin, the thread will bind up and will not feed into the knot as needed. After you have made four to seven wraps, lift the whip finisher and reposition it such that the indention or curved end part of the whip finisher is first removed. The thread will slide off the bump of the indention or curved-end part of the whip finisher while keeping slight tension on the thread. Pull the bobbin away from the hook and pull the whip finisher to the hook. Once the whip finisher is pulled to the hook, the hook part of the whip finisher is removed as the thread is fully tightened and the whipping completed.
Practice the whip finish dozens of times to burn this technique into memory well. Use a bare hook and practice. When you have built up a lump of thread, strip the hook with a razor blade and start over. For practice before tying your first fly or if you are out of practice, repeat whip finishing in this manner over and over again until you have a confidence that you can whip finish using the whip finisher tool.
With the practice completed, use a razor blade to cut the many whip finishes from the hook or simply discard the practice hook and get another hook for tying your first fly.
Hackling a Fly
Most dry fly patterns use one or more hackle feather for hackling a fly. A stiff dry hackle feather of the right size from a quality rooster neck is typically used to imitate or suggest legs. Tied as a radial collar around the forward body of the fly, the many stiff hackle fibers set onto the surface film of the water, supporting and keeping the fly afloat. If two hackle feathers are used in a fly pattern they may be tied in together, then wrapped through the same space on the hook shank, one over the other. In some patterns, such as a Bivisible dry fly, two or even more hackle feathers are wrapped back to back. Some two hackle fly patterns will have a separate aft-hackle and fore-hackle which are separated by some amount of body material. From the underside, the view that the fish sees, the hackle imitates the insect’s legs riding on the surface.
Note: These instructions were developed as part of a fly tying course that the author taught at the Rochester Museum and Science Center for several years. He has graciously offered to have them published on the web site of the Seth Green Chapter of Trout Unlimited (who extended these privileges to Rocky River Trout Unlimited) as means of demonstrating how easy it is to get started tying your own flies. Out of respect for the owner’s copyright, it is requested that copies of the following materials be made solely for personal use. Copyright © Alan Uthman1997-2007.
_______________________________________________________________________________________________________________________________________
Rocky River Chapter of Trout Unlimited - 2014